Handi TEC9 integrated hop-up flash hider silencer (with non-destructive 11.1v modification plan)


Print Profile(5)


Description
HANDEE TEC9 Integrated Hop-Up Flash Hider (If you think it's good, please give it a boost. Your support is my motivation for development. Thank you all!)
The model is divided into four parts:(See below for a detailed tutorial)
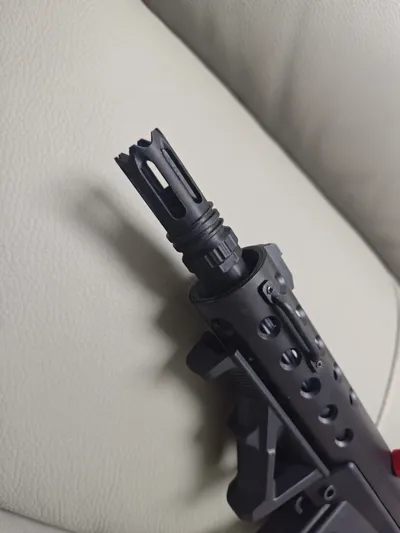
1、Hop-up Flash Hider (14mm Counter-Clockwise Thread Interface) The friction plate requires an M3*3 grub screw
2、Flash Hider Silencer Outer Barrel (Can be directly screwed onto the flash hider as a decorative silencer with no actual function)
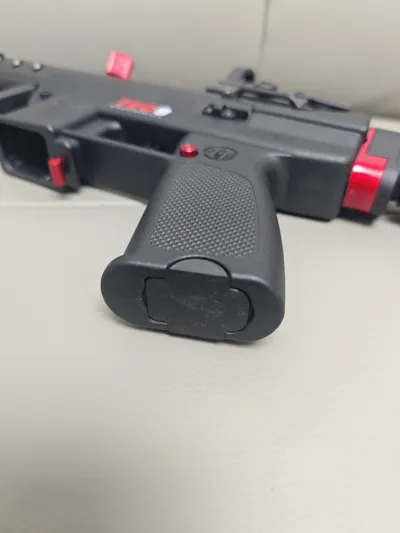
3、Battery Bottom Cover (Non-destructive modification for 11.1v, requires an adapter cable)
4、Counter-Clockwise Thread Front Cap (Requires replacing with an extended inner barrel and sanding)
5、Inner Barrel Stabilizer Ring (The original factory has this accessory; if lost, you can print it)
Introduction to Non-Destructive 11.1v Modification Plan:

You need to purchase the adapter cable shown in the figure, and remove or cut the two black wires in the middle (if cutting, ensure proper insulation); Then use a tool to insert one end of the cable into the socket inside the grip.


Effect after modification; you can now directly plug in an 11.1v battery. You can print the battery bottom cover to enhance aesthetics and prevent the battery from falling out.
The battery was tested referencing the Boashi Shorter One; other models should be tested by yourself.

Replacing the Counter-Clockwise Thread Front Cap:
Purchase a 3-way inner barrel yourself (It is recommended to buy a 16cm inner barrel; 15cm can also be used). After replacement, remove the original factory top cover and pull off the original inner barrel's front stabilizing ring (as shown in the red circle in the figure below).

There is a protrusion inside that will prevent the inner barrel from passing through. Please use a small knife or file to sand it down until the inner barrel passes through snugly (Try not to over-sand, as this may lead to an unstable inner barrel)
After completion, insert the stabilizing ring into the same position on the counter-clockwise thread front cap and install it onto the front end of the launcher, ensuring the opening aligns with the protrusion.
Q&A:
1、The flash hider's threaded design, when screwed all the way down with the counter-clockwise thread front cap, should position the hop-up facing directly upwards. If it's off-center, you can slightly twist it to adjust.
2、Do not extend the matching silencer outer barrel yourself, as it might rub against the fired projectiles, causing misfires.
3、After modifying to 11.1v, note that you cannot use the original factory battery. If using the original factory battery, you must unplug the adapter cable first.
4、The entire modification set, excluding the battery, costs within 10 (the sky's the limit QAQ)
Modifications carry risks; please ensure you are familiar with the process before proceeding. If you have any questions, feel free to leave a comment or send a private message. This design is for entertainment purposes; please do not use it directly for commercial purposes without permission.
If you think it's good, please give it a boost. Your support is my motivation for development. Thank you all!
License
You shall not share, sub-license, sell, rent, host, transfer, or distribute in any way the digital or 3D printed versions of this object, nor any other derivative work of this object in its digital or physical format (including - but not limited to - remixes of this object, and hosting on other digital platforms). The objects may not be used without permission in any way whatsoever in which you charge money, or collect fees.
Comment & Rating (3)