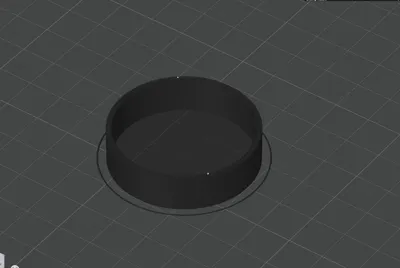
Breville/Sage Steam Lever Anti-Jiggle Spacer


Print Profile(1)

Description
Description:
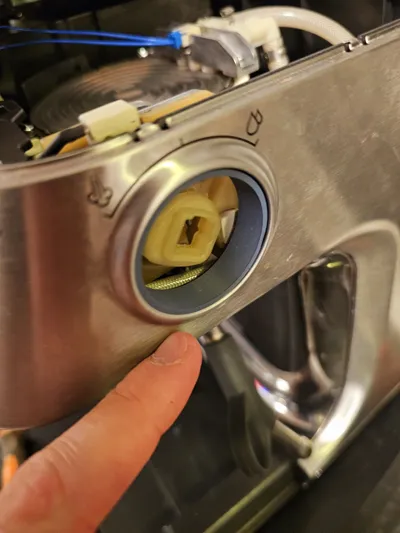
If you have upgraded your Breville or Sage espresso machine (Barista Express, Pro, Touch, etc.) with an aftermarket metal steam lever, you've likely noticed it feels wobbly or "jiggly" compared to the original plastic knob. This is a common issue because the metal levers are heavier and often leave a small gap between the handle and the machine body.
I designed this precision-measured spacer ring to bridge that gap. Once installed, it provides the necessary tension to make the lever feel solid, premium, and wobble-free.
Key Features:
- Precision Fit: Designed specifically based on precision measurements of the gap between the lever and the machine chassis.
- Easy Installation: Simply slide the ring onto the steam shaft before snapping your upgrade lever into place.
- Non-Permanent: No adhesive or tape required; it stays in place via friction and the lever's own mounting pressure.
Print Settings & Recommendations:
- Material: TPU is highly recommended for its flexibility and "squish," which provides the best tension. If using PLA or PETG, ensure your Z-offset is perfect, as these materials won't compress.
- Wall Loops: 2-3 for a good balance of strength and flexibility.
- Infill: 100% (It’s a small part, solid is best for durability).
- Layer Height: 0.12mm or 0.16mm for maximum precision on the thickness.
Compatible Machines:
- Breville / Sage Barista Express (BES870)
- Breville / Sage Barista Pro (BES878)
- Breville / Sage Barista Touch (BES880)
- And other models using the standard D-shaft steam valve.
Assembly Tip:
Before installing, ensure the two internal screws on your lever upgrade are fully tightened. Slide this 3D-printed ring onto the shaft first, then align the lever's internal plastic retaining clip (pointing upwards) and press firmly until you hear the "click".
License
You may create derivative works based on this object, provided that all such derivative works are published exclusively on the MakerWorld platform and include proper attribution to the original creator. You may not share, upload, host, distribute, or publish this object—or any derivative work of this object—on any other digital platform, marketplace, or distribution channel. Commercial use of this object and any derivative works is strictly prohibited. This includes, but is not limited to, selling, renting, sublicensing, or using the object in any context in which you receive monetary compensation or other financial benefits.
Comment & Rating (0)