


Print Profile(6)
![[1/2'' Hose Compatible] 0.16mm layer, 4 walls, 15% infill](https://makerworld.bblmw.com/makerworld/model/US5fe1f995427088/563534227/instance/2026-01-01_2d8be0d62c5f7.png?x-oss-process=image%2Fresize%2Cw_100%2Fformat%2Cwebp)
![[3/4'' Hose Compatible] 0.16mm layer, 4 walls, 15% infill](https://makerworld.bblmw.com/makerworld/model/US5fe1f995427088/563534262/instance/2026-01-07_d38e37ed7c3968.png?x-oss-process=image%2Fresize%2Cw_100%2Fformat%2Cwebp)
![[GHT Thread] 0.16mm layer, 4 walls, 15% infill](https://makerworld.bblmw.com/makerworld/model/US5fe1f995427088/563555488/instance/2026-01-14_13f617f064e12.png?x-oss-process=image%2Fresize%2Cw_100%2Fformat%2Cwebp)
![[BSP Thread] 0.16mm layer, 4 walls, 15% infill](https://makerworld.bblmw.com/makerworld/model/US5fe1f995427088/563555595/instance/2026-01-14_424ab9fbe357b.png?x-oss-process=image%2Fresize%2Cw_100%2Fformat%2Cwebp)
Description
Boost Me (for free)
If this connector saved you a trip to the hardware store or a few dollars, please consider dropping a Boost. It keeps the filament flowing and the designs coming. Happy printing and happy gardening!
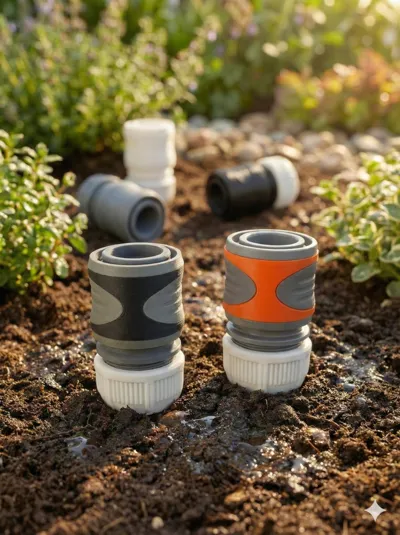
Gardena Compatible Fully Printable Female Quick Connect for 1/2" and 3/4" Hose
#Update (14/01/2026):
- Threaded Hose Support: Added print profiles for direct connection to threaded hose ends (covering both GHT and BSP standards). Please note that these are currently untested as I do not have threaded hose ends on hand—please let me know if you run into any fitment or other issues.
- New "Tight-Tolerance" Core: I’ve added a separate core model with tighter tolerances to minimize leaks. In my testing (PETG-CF @ 0.16mm), this version performed much better, resulting in only slight dripping on a small portion of the male connectors I tested. Note: This version will require more force to connect/disconnect.
- A Note on Sealing: Achieving absolutely zero water leakage is difficult due to the inherent texture of FDM layer lines against the O-rings, filament shrinkage, and slight sizing variations between different male connector brands. If you still experience significant leaks, I recommend using a filament with low shrinkage, lowering your layer height, or fine-tuning your X-Y contour compensation.
#Update (07/01/2026):
- Added a new print profile for the ¾" Hose Quick Connector. I don’t have a ¾" hose to test it with yet, so it hasn’t been validated—please comment if you run into any fitment issues or leaks.
- Updated the quick connector core to reduce overhang areas that were likely to fail during printing.
Why pay $10 a piece when you can print 30 from a single spool?
After failing to find any fully 3D printable female garden hose connectors on MakerWorld, I decided to build this. It is a robust, 3d-print-optimised quick connector designed to work perfectly with your existing 1/2" gardening setup.

Features
This connector is designed to work exactly like a standard store-bought quick connect:
- Automatic Lock: Simply push the connector onto any standard male quick connect adapter until it clicks into place.
- Quick Release: Hold the outer grip and pull back to unlock and detach from the male connector.
- I have included an optional multi-color shell model for those who want a better look.
Print Settings
- Optimized Profile: For best results, use the provided print profile settings and do not enable slicer supports.
- Integrated Spring Support: The model features built-in supports for the internal spring; simply snap them off—or use a craft knife for a cleaner finish depending on your filament—to prepare for assembly.
- Material: PETG, ASA, or ABS is recommended for outdoor durability and UV resistance. (PLA may deform under summer heat or constant pressure).
- Walls: 4+ walls are recommended to ensure the part is watertight.
Compatibility
- Hose Size: Fits standard 1/2" (13mm) Garden Hoses.
- System: Compatible with Gardena and generic "Click System" watering accessories.
Assembly Guide
- Core & Shell: Insert the core into the shell. Ensure the fins on the core align perfectly with the internal gaps/spacings of the shell.


- Spring Installation: Slide the spring (with supports removed) into the shell until it is fully seated.

- Partial Joiner Fit: Screw the hose joiner onto the core. Only screw it in just enough so the joiner does not fall off. Do not screw it in further yet.

- Locking Pins: Pull the shell toward the hose joiner to create room, then push all three pins into the gap (as illustrated in the images) until they seat fully.


- Final Lockdown: Screw the hose joiner in fully. Finally, thread the hose lock nut on, but do not fully tighten without a hose inserted to avoid breaking the locking teeth.

License
You shall not share, sub-license, sell, rent, host, transfer, or distribute in any way the digital or 3D printed versions of this object, nor any other derivative work of this object in its digital or physical format (including - but not limited to - remixes of this object, and hosting on other digital platforms). The objects may not be used without permission in any way whatsoever in which you charge money, or collect fees.
Comment & Rating (276)