Smart Servo Blast Gate 100mm - LED Status - ESP+HA


Print Profile(1)

Description
Description (English)
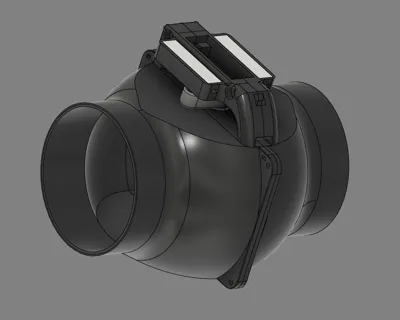
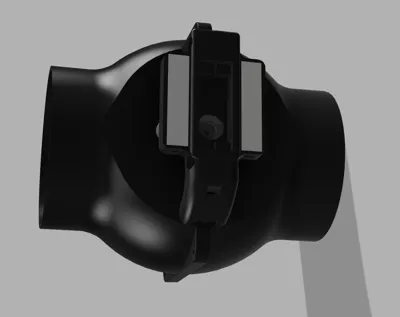
This fully automated 100mm blast gate is a high-performance solution for workshop dust collection. It merges the reliable **Truncated Ball Valve** mechanics with a rugged **direct servo mount** and smart features.
Technical Highlights & Enhancements:
- Perfect Fit: The geometry is specifically designed to fit **standard 100mm HT/Sewer pipe couplers** (Muffen) seamlessly.
- Hardware Upgrade: Replaced standard holes with integrated **M3 lock-nut sockets** on the right side for a vibration-resistant, durable assembly.
- High-Torque Actuation: Custom lever arm designed for the **Miuzei Servo Motor 15KG**, providing enough power even under high suction.
- Visual Feedback: Features two onboard LEDs to indicate the "Open" and "Closed" status at a glance.
- Smart Home Ready: Optimized for **ESPHome and Home Assistant** integration.
- Power Specs: The system uses a **7V supply** for the servo to maximize torque, requiring a step-down for the **5V LED** indicators and for the **Wemos D1 Mini** which ist used for ESPHome.
Description (English)
This fully automated 100mm blast gate is a high-end solution for workshop dust collection systems. It combines the proven principle of the **Truncated Ball Valve** with a stable **direct servo mount** and modern smart home technology.
Technical Highlights & Improvements:
- Optimized Geometry: The housing has been adapted to fit perfectly into **standard 100mm HT pipe couplers**.
- Improved Mechanics: Instead of simple bores, precise **sockets for M3 lock-nuts** have been integrated on the right side. This prevents loosening due to vibrations.
- Powerful Actuation: The lever arm is precisely tailored for the **Miuzei Servo Motor 15KG**.
- Status LEDs: Two integrated LEDs visually indicate the current state (Open/Closed) – ideal for a quick check in the workshop.
- Smart Home Integration: Developed for control via **ESPHome/Home Assistant**.
- Electronics Note: The servo is operated at **7V** for maximum power. A small voltage converter is required for the **5V LEDs**.
--------------------------------------------------------------------------------------------------------------------------------------------------
Guide: Flashing ESPHome to Wemos D1 Mini (English)
1. Prerequisites
- Hardware: Wemos D1 Mini, a Micro-USB data cable.
- Software: A running Home Assistant instance with the ESPHome add-on installed.
- LED: WS2812b 144LEDs/m → https://www.amazon.de/dp/B0F4JYCV91?ref_=ppx_hzsearch_conn_dt_b_fed_asin_title_4
- Servo: Miuzei Servo Motor 15KG → https://www.amazon.de/dp/B0BTYRBBFY?ref_=ppx_hzsearch_conn_dt_b_fed_asin_title_1
2. Create New Device in ESPHome Dashboard
- Open your Home Assistant dashboard and navigate to ESPHome.
- Click "+ New Device" and then "Continue".
- Give your device a name (e.g., my-project).
- Select ESP8266 as the platform (or Wemos D1 Mini if listed).
- ESPHome will generate a configuration. Click "Edit" to paste your specific settings (sensors, pins, etc.).
3. First-Time Installation (Via USB)
- Connect the Wemos D1 Mini to your computer via USB (not to the Home Assistant server!).
- In the ESPHome dashboard, click the three dots on your device card and select "Install".
- Choose "Plug into this computer".
- A browser pop-up will appear. Select your Wemos COM port and click "Connect".
- The browser will compile the firmware and flash it to the Wemos. This may take a few minutes.
4. Integration into Home Assistant
Once finished and connected to your Wi-Fi, Home Assistant will automatically discover the device. Go to Settings > Devices & Services to add it to your dashboard. After that, you can click on “Edit” on the discovered device in ESPHome Device Builder and adapt the following code:
Configuration:
esphome:
name: blast-gate-1
friendly_name: Blast Gates
esp8266:
board: d1_mini # <--- Important to be able to use pin descriptions like D5
logger:
api:
encryption:
key: "KEY"
ota:
- platform: esphome
password: "PASSWORD"
wifi:
ssid: !secret wifi_ssid
password: !secret wifi_password
min_auth_mode: WPA2
ap:
ssid: "YOUR SSID"
password: “YOUR PASSWORD”
# --- Hardware Definition ---
output:
# Output Servo 1 (1st gate) on Pin D5
- platform: esp8266_pwm
id: output1
pin: D5
frequency: 50 Hz
# Output Servo 2 (2nd gate) on Pin D2
- platform: esp8266_pwm
id: output2
pin: D6
frequency: 50 Hz
light:
# LED 1: 1st gate LED (on Pin D4) -
- platform: neopixelbus
type: GRB
variant: WS2812
pin: D4
method: BIT_BANG
num_leds: 9
name: "1st gate statusLED"
id: 1st_gate_led
on_turn_on:
- light.addressable_set:
id: 1st_gate_led
range_from: 0
range_to: 1
red: 0%
green: 0%
blue: 0%
# LED 2: 2nd gate LED (on Pin D6)
- platform: neopixelbus
type: GRB
variant: WS2812
pin: D3
method: BIT_BANG
num_leds: 9
name: "2nd gate statusLED"
id: 2nd_gate_led
on_turn_on:
- light.addressable_set:
id: 2nd_gate_led
range_from: 0
range_to: 1
red: 0%
green: 0%
blue: 0%
# set up servosservo:
- id: servo1
output: output1
- id: servo2
output: output2
# Sliders to control servo position
number:
- platform: template
id: servoSlider1
name: 1st Gate
icon: mdi:valve
optimistic: true
min_value: -100
max_value: 100
initial_value: -67
step: 5
on_value:
then:
- lambda: !lambda ‘id(servo1).write(x / 100.0);’
- platform: template
id: servoSlider2
name: 2nd Gate
icon: mdi:valve
optimistic: true
min_value: -100
max_value: 100
initial_value: 35
step: 5
on_value:
then:
- lambda: !lambda 'id(servo2).write(x / 100.0);'
# --- Button Definitions ---
button:
- platform: template
name: open 1st gate
icon: mdi:valve-open
on_press:
then:
- number.set:
id: servoSlider1
value: -67
# Value depending on your servo position
- platform: template
name: close 1st gate
icon: mdi:valve-closed
on_press:
then:
- number.set:
id: servoSlider1
value: 48
# Value depending on your servo position
- platform: template
name: open 2nd gate
icon: mdi:valve-open
on_press:
then:
- number.set:
id: servoSlider2
value: 57
# Value depending on your servo position
- platform: template
name: close 2nd gate
icon: mdi:valve-closed
on_press:
then:
- number.set:
id: servoSlider2
value: -60
# Value depending on your servo position
# --- Logic & ---
binary_sensor:
# Logic for first gate
- platform: template
name: 1st gate status
id: blast_gate_status
device_class: garage_door
lambda: !lambda |-
if (id(servoSlider1).state <= -66.0) return true;
if (id(servoSlider1).state >= 44.0) return false;
return id(blast_gate_status).state;
on_press:
- light.turn_on:
id: 1st_gate_led
brightness: 100%
red: 0%
green: 100%
blue: 0%
on_release:
- light.turn_on:
id: 1st_gate_led
brightness: 100%
red: 100%
green: 0%
blue: 0%
# Logic for second gate
- platform: template
name: 2nd Blast Gate
id: blast_gate_status2
device_class: garage_door
lambda: !lambda |-
if (id(servoSlider2).state >= 56) return true;
if (id(servoSlider2).state <= -59 ) return false;
return id(blast_gate_status2).state;
on_press:
- light.turn_on:
id: 2nd_gate_led
brightness: 100%
red: 0%
green: 100%
blue: 0%
on_release:
- light.turn_on:
id: 2nd_gate_led
brightness: 100%
red: 100%
green: 0%
blue: 0%
captive_portal:
######## NOTICE! ########
# Your values must be set to your correct servo position. Test those via the sliders in Home Assistant before final assembly to prevent damaging the parts!
Boost Me (for free)
I would really appreciate if you want to spend your boosts!
This remix is based on

Comment & Rating (11)