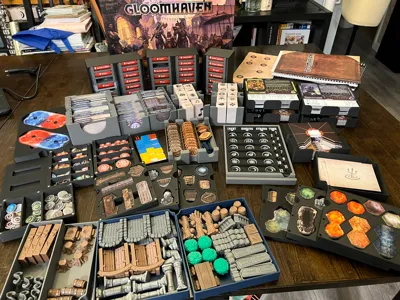
Gloomhaven 2nd Edition Insert


Print Profile(2)


Description
This insert had a few primary goals in mind to expedite setup:
- Quick and easy access to monster standees
- All-inclusive player boxes
- Easily viewable overlay trays
3D printed Inserts for Gloomhaven are difficult. If you’re able to print this insert, chances are you’ve also printed quite a few other upgrades as well. As a result, most everyone’s copy will look a bit different. This insert is custom tailored for our add-ons listed below. These are by no means necessary to have and the insert will still function appropriately without them.
- Mrgigg's Remixed Element Tracker
- Monster Health Tracker Hex Bases (See section on bases below on alternatives)
- Assorted 3D printed terrain from Robagon3D
Warning: This design prioritizes thick walls and high rigidity-- and takes A LOT of filament.
Lid Lift
This has zero lid lift and packs snugly into the box.
Map Tiles
Map tiles are stored separately (ideally in an accordion folder or the Gloomhaven Map Archive).
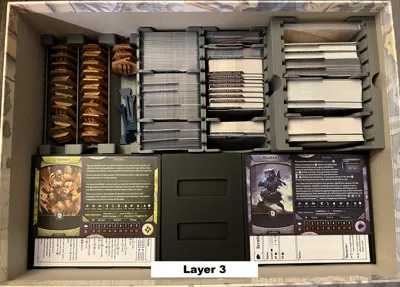
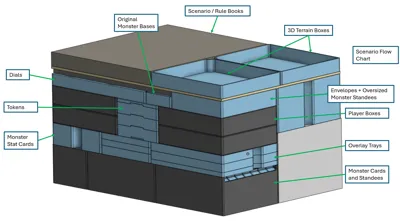
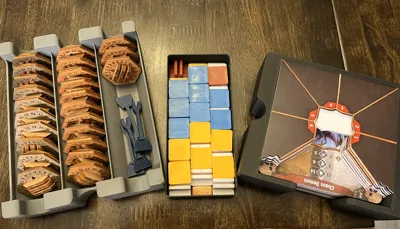
Monster Cards and Standees


We primarily use the X-Haven App, so wanted easy access to monster standees but didn’t care as much about the monster stat cards / envelopes. The monster ability cards and standees are stored in drawers. It is important that you print either the SLEEVED or UNSLEEVED sets. A snug fit is important. If loose, the standees may tilt out of the drawers causing interferences when trying to put drawers back in.
- 24x (Sleeved + 6x) OR (Unsleeved + 6x)
- To achieve snug fit on monsters with 10x standees, do two columns of 4x and use 2x standees horizontal going across both columns to have “6x” effective thickness.
- 7x (Sleeved + 4x) OR (Unsleeved + 4x)
- Cave Bear, Chaos Demon, Crystal Rot, Harrower Infester, Savvas Icestorm, Savvas Lavaflow, Stone Golem
- 4x (6x only)
- Archer, Boss, Guard, Imp
- These all require an extra drawer due to the high quantity of standees
- The 2x oversized boss standees are placed in the “Envelope and Oversized” tray
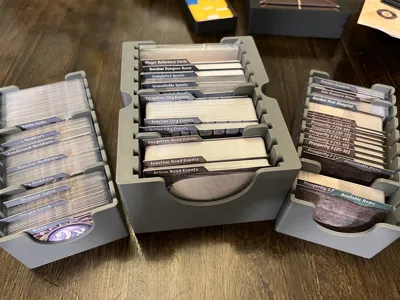
Cards and Sleeves
This allows for all cards to be sleeved except Road / City Events and unpurchased items. It was tested with Gamegenic 90 micron sleeves. It does theoretically have enough room for a fully sleeved collection, but you will not be able to access cards as easily.
I include a PDF of dividers that I printed on card stock and use with the card trays.
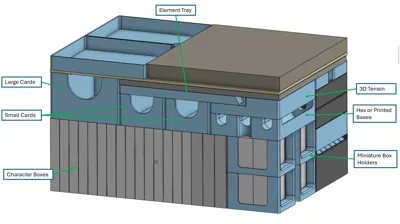
Bases


Update (1/10/25): I have switched to Rotating click bases from @SgtCaffran (Original Printables Link Here). I updated the tolerances to fit Gloomhaven 2E standees, which are a bit thicker. This holder fits each base in a dedicated pocket, allowing easier removal and replacement of bases. It is optimized for the version with extra holders for status conditions linked below.
The original design shown in the images accommodates up to 30 hex bases (39mm point to point, 12mm tall). While I use Smonex wood bases, most 3D printed bases should fall within these bounds. If your bases do not, I include an optional Base Tray (Blank) that removes the chamfers used for stabilizing hexes.
I've evaluted the following popular 3D Print Base models and they will all fit within the hex tray:
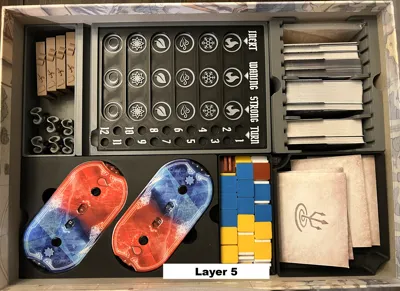
Element Tray

The Element Tray is designed to work as a tray and stand for Mrgigg's Remixed Element Tracker. Note that the similar (original) model by Mojo will not work with this, as it is much thicker. It does accommodate the wooden Element Infusion Markers from 1st Edition as well as the cardboard markers from 2nd Edition.
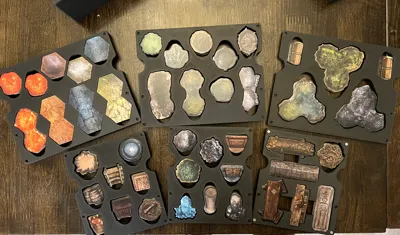
Overlays
The overlay trays include thumb slots. They can be used to pry up, push down (to lever up a piece) or push out from the back. When trying to pull out a full stack of anything more than 4 pieces, it’s usually easiest to push from the back. There are holes for 4mm x 2mm round magnets (Amazon). These are optional and allow you pull out and replace an entire stack of overlays quicker than going tray by tray.
Since the cut outs are cut to exact shape, the overlays only fit in one direction. If you're the type of person to throw tiles in a bag/tray, this insert likely isn't for you.
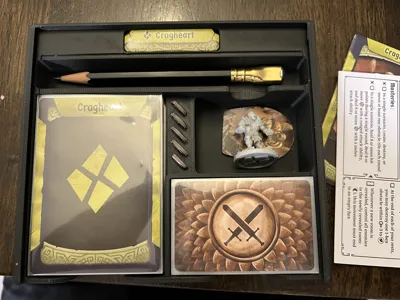
Player Boxes
The player boxes house all components needed, including all standees, miniatures, pads, cards, and even room for a pen. The area for the miniature / standee is a bit awkward to accommodate larger sets like those found with the “Two Minis” class. Dividers are included to separate cards in hand “Sideboard” and “Level Up”. Mini cards are divided by “Items” and “Level Up”. The initiative token can be pushed in on one side to pivot out easily.
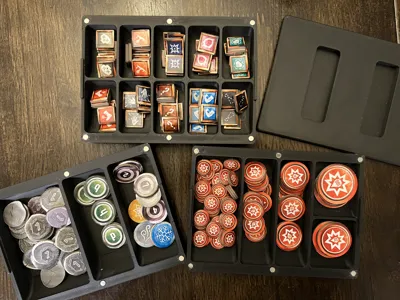
Tokens

I strongly suggest using the 4mm x 2mm magnets (Amazon) with the token trays, as pulling these out one by one is a bit more of a hassle. It also makes the token trays spill proof while in the box.
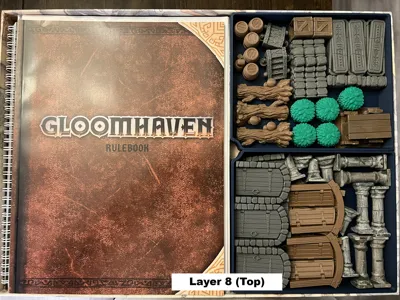
3D Terrain

This insert has 3 separate trays for assorted 3d Printed terrain. You may need to scale some larger terrain pieces to fit as necessary.
- 2x trays with max height 22mm
- 1x stepped tray with max height 30mm and 16mm
The images show mostly Robagon3D terrain. Any special scaling is noted below.
- 3x Log
- 2x Barrel
- 2x Stairs
- 3x Sarcophagus
- 5x Bush
- 6x Stone Door
- 4x Wood Door
- 6x Fog
- 4x Wall Sections
- ruined_stone.wall.wall.inch.3x.low -- Scaled to 63mm wide (uniform) then 12mm thick (single direction)
- 4x Bookcases
- 2x Altars
- 4x Stumps
Also shown are some misc. items re-used from our Gloomhaven 1st edition days that are not 3D prints:
- 6x full columns, 5x partial colummns
- 2x crates
- 3x tables
- 6x chests
Hopefully the trays are flexible enough to work for your group’s specific needs.
Printing
You will need to print the following:
- 1x Monster Cabinet (1cl)
- 2x Monster Cabinet (2cl)
- Monster Drawer SLEEVED or UNSLEEVED set (see above)
- 1x each Overlays (Short A, Short B, Short C)
- 1x each Overlays (Long A, Long B, Long C)
- 1x each Token Trays (Damage, Money-Markers, Conditions, Lid)
- 4x Player Box
- 1x Envelope and Oversized
- 1x Original Bases
- 1x Monster Cards
- 1x Dial Tray
- 2x Miniature Box Holders
- 1x Card Tray (Large)
- 2x Card Tray (Small)
- Optional: Card Tray Dividers (Large and Small)
- 1x Base Tray (options are given for Hex or Blank)
- 1x each 3D Box (Stepped, A, B)
- 1x Element Board Holder
Filaments used:
- Bambu PLA Matte – Charcoal
- Sunlu PLA Meta - Gray
- Bambu PLA Matte – Dark Blue
Documentation (1)
License
You may create derivative works based on this object, provided that all such derivative works are published exclusively on the MakerWorld platform and include proper attribution to the original creator. You may not share, upload, host, distribute, or publish this object—or any derivative work of this object—on any other digital platform, marketplace, or distribution channel. Commercial use of this object and any derivative works is strictly prohibited. This includes, but is not limited to, selling, renting, sublicensing, or using the object in any context in which you receive monetary compensation or other financial benefits.
Comment & Rating (87)