The Versatile Advent Calendar (7–31 Day Range)


Print Profile(3)


Description
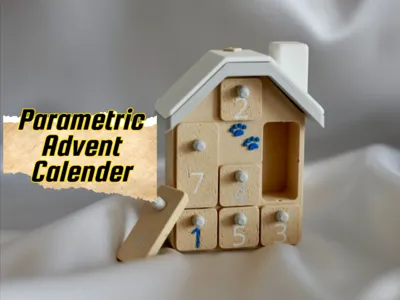
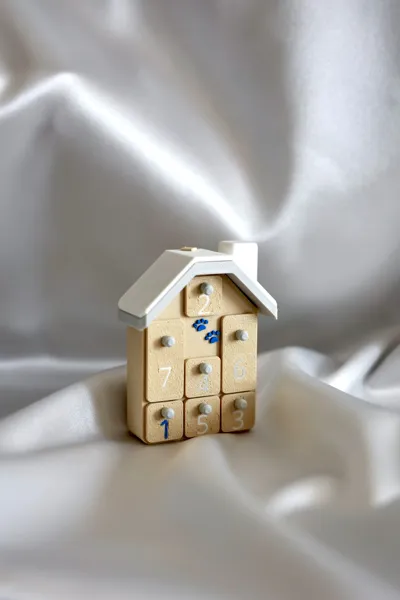
🏠 Advent Calendar
A parametric model that automatically generates an advent calendar with a house silhouette! Simply specify the number of days, and it will automatically calculate the optimal house size and room layout, creating a 3D printable model.
✨ Features
- 🎄 Automatic Layout: Just specify the number of days, and the optimal house size and room arrangement are calculated automatically
- 🎁 Highly Customizable: Fine-tune room sizes, wall thicknesses, roof shapes, and more
- 🎨 Emoji Support: Place emojis in empty spaces using Noto Emoji
- 🔢 Numbered Doors: Automatically generates numbered doors for each room
- 🎯 Flexible Output: Generate house body, roof, doors, screws, and more individually
Boost Me (for free)
If you love the these designs please consider a BOOST 🚀 It helps me keep creating more designs 🙏
📖 How to Use
This model is designed as a parametric model. By adjusting parameters, you can create advent calendars of various sizes and shapes.
Basic Usage
- Set the Number of Days: Specify number_of_days from 7 to 31 in the "Advent Calendar Settings"
- Adjust Sizes: Modify the dimensions of each room (cell_width, cell_depth, cell_height) in the "Box Dimensions" section
- Generate: The model automatically regenerates when you adjust parameters
Object Generation Control
In "Object Generation Settings", you can select which objects to generate:
- House Body: Main advent calendar body
- Lower Roof: Y-axis inner side roof
- Upper Roof: Y-axis outer side roof (with chimney)
- Doors: Doors for small rooms and tall rooms
- Door Knob: Objects with screws and screw heads
You can generate only the parts you need and print them in stages.
📋 Parameter List
📦 Advent Calendar Settings
| Parameter | Description | Default | Range |
|---|---|---|---|
| number_of_days | Number of days for the advent calendar | 15 | 7-31 |
| min_empty_spaces | Minimum number of empty spaces for emoji placement | 5 | 0-5 |
| min_tall_rooms | Minimum number of tall rooms (rooms with 2+ cells) to generate | 0 | 0-31 |
📏 Box Dimensions
| Parameter | Description | Default | Unit |
|---|---|---|---|
| cell_width | Inner width of each room | 40 | mm |
| cell_depth | Inner depth of each room | 30 | mm |
| cell_height | Inner height of each room | 40 | mm |
🧱 Wall & Corner Configuration
| Parameter | Description | Default | Unit |
|---|---|---|---|
| divider_thickness | Thickness of walls between cells | 2 | mm |
| outer_wall_thickness | Thickness of outer walls | 3 | mm |
| inner_corner_radius | Roundness of room corners | 2 | mm |
🏠 Automatic House Silhouette Settings
| Parameter | Description | Default | Options |
|---|---|---|---|
| desired_house_width_cells | Desired number of horizontal cells (0 for auto) | 5 | 0, 3, 5, 7, 9, 11 |
| fill_unused_cells_mode | How to handle unused cells | "Fill with tall rooms" | "Fill with tall rooms", "Keep empty gaps" |
🔤 Text Printing Settings
| Parameter | Description | Default | Range/Options |
|---|---|---|---|
| gap_text_string | Text to place in empty spaces | "🐾🐈🎄🐶🧒⛄🎄🐈🎁..." | Any string |
| gap_text_height | Height of text | 1.2 | mm |
| gap_text_extra_height | Amount text protrudes | 1 | 0-5 mm |
| gap_text_font_face | Font to use | "Noto Emoji" | Various fonts |
| gap_text_size_scale | Font size scale factor | 0.6 | - |
| gap_text_color | Color of text | "green" | red, white, black, yellow, green, blue, cyan, magenta, gray |
| gap_text_enabled | Enable/disable text printing | true | true/false |
🎨 About Noto Emoji
This model uses the Noto Emoji font to display emojis beautifully! Noto Emoji is a comprehensive emoji font developed by Google, capable of displaying various emojis beautifully.
✨ Emoji customization is possible!
You can check the list of available emojis at Noto Emoji Glyphs. Combine Christmas-related emojis (🎄, 🎁, ⛄, etc.) and animal emojis (🐾, 🐈, 🐶, etc.) to create your original advent calendar!
Simply enter emojis in the gap_text_string parameter, and they will automatically be placed in empty spaces. Emojis are automatically optimized to avoid adjacent placement, ensuring a beautiful finish. You can change the emoji color using the gap_text_color parameter.
🏠 Roof Settings
| Parameter | Description | Default | Range |
|---|---|---|---|
| roof_thickness_1 | Thickness of roof on Y-axis inner side | 8 | 5-20 mm |
| roof_thickness_2 | Thickness of roof on Y-axis outer side | 2 | 2-20 mm |
| roof_enlargement | Enlargement added to each dimension | 10 | 0-50 mm |
| chimney_enabled | Whether to generate chimney | true | true/false |
🔢 Door Generation & Numbering Settings
| Parameter | Description | Default | Options |
|---|---|---|---|
| door_text_font_face | Font for door numbers | "Noto Sans" | Various fonts |
| door_text_height | Height of numbers | 0.8 | mm |
| door_text_size_scale | Font size scale | 0.5 | - |
| door_text_color_even | Color for even numbers | "red" | red, white, black, yellow, green, blue, cyan, magenta, gray |
| door_text_color_odd | Color for odd numbers | "blue" | red, white, black, yellow, green, blue, cyan, magenta, gray |
| door_text_color_prime | Color for prime numbers | "green" | red, white, black, yellow, green, blue, cyan, magenta, gray |
| door_number_order | Number from small rooms or tall rooms first | "Small rooms first" | "Small rooms first", "Tall rooms first" |
| door_number_start | Starting number for sequence | 1 | 1-100 |
| door_shrink | Door shrink amount (amount to shrink toward center overall) | 0.6 | 0-2 mm |
💡 Number Customization: You can specify the starting number for printing using the door_number_start parameter, allowing for various creative ideas such as printing actual dates or numbers with special meanings. For example, set the starting number to 1 for an advent calendar starting on December 1st, or set it to count down from 24 for a Christmas countdown, allowing flexible customization according to your needs.
💡 Number Order: The door_number_order parameter allows you to change the number order, making it easy to adjust and bring tall rooms to the end. By setting it to "Tall rooms first", you can number tall room doors first, making layout adjustments simple.
💡 Tall Room Count: By setting the min_tall_rooms parameter, you can ensure that at least the specified number of tall rooms are automatically generated. Tall rooms are created by merging adjacent 1x1 rooms, so the layout is automatically adjusted. If you specify a value greater than the number of days, the number of days will be used as the upper limit.
⚠️ Detailed Effects and Adjustment Methods for door_shrink
🎯 Effects and Changes Brought by door_shrink
The door_shrink parameter is an important parameter that adjusts the size of doors. This value affects the following elements:
- Overall Door Size: The door width and depth are reduced by the door_shrink value
- actual_plate_width = plate_width - door_shrink
- actual_plate_depth = plate_depth - door_shrink
- Rim Size: Since the rim is placed inside the door, a larger door_shrink makes the outer rim size smaller
- The rim width (ring_thickness = 1mm) is fixed, but the outer rim size changes according to door_shrink
- Fit in Room:
- Larger door_shrink → Door and rim become smaller → Looser fit in room
- Smaller door_shrink → Door and rim become larger → Tighter fit in room
🔧 How to Handle Tight Doors
When doors are difficult to fit into rooms or don't fit:
- Increase the door_shrink value (Recommended)
- Gradually increase from the default value (0.6mm) to 0.8mm, 1.0mm, etc.
- Can be set up to a maximum of 2.0mm
- Example: door_shrink = 0.8; or door_shrink = 1.0;
- Consider 3D Printing Shrinkage
- 3D printing materials can shrink during printing
- Materials like PLA or ABS may shrink by about 0.2-0.5mm
- Therefore, it may be good to set door_shrink about 0.2-0.4mm larger
- Check Room Size
- If cell_width or cell_depth is too small, doors may not fit
- Consider slightly increasing room size (e.g., 40mm → 42mm)
🔧 How to Handle Loose Doors
When doors fit loosely in rooms and rattle:
- Decrease the door_shrink value (Recommended)
- Gradually decrease from the default value (0.6mm) to 0.4mm, 0.2mm, etc.
- Can be set down to a minimum of 0.0mm (though 0.2mm is safer considering 3D printing shrinkage)
- Example: door_shrink = 0.4; or door_shrink = 0.2;
- Also Check Rim Size
- Decreasing door_shrink makes the rim larger, resulting in a tighter fit
- The rim width (1mm) is fixed, but the larger outer size strengthens the fit in the room
- Check Print Accuracy
- If your 3D printer has high accuracy, doors may fit well even with a smaller door_shrink
- Conversely, if accuracy is low, it's safer to leave some margin (increase door_shrink)
📊 Recommended Setting Value Guidelines
| Situation | Recommended door_shrink Value | Notes |
|---|---|---|
| Standard Use | 0.6mm (Default) | Suitable for most cases |
| Too Tight | 0.8mm ~ 1.2mm | Gradually increase to adjust |
| Too Loose | 0.2mm ~ 0.4mm | Gradually decrease to adjust |
| High Accuracy Printer | 0.4mm ~ 0.6mm | Can be set smaller if accuracy is high |
| Low Accuracy Printer | 0.8mm ~ 1.0mm | Recommended to set larger if accuracy is low |
⚠️ Important Notes
- Setting door_shrink to 0.0mm means the door and room sizes theoretically match, but due to 3D printing shrinkage and errors, it may not fit
- Conversely, setting door_shrink to 2.0mm (maximum) makes the door too small, potentially causing rattling in the room
- The optimal value varies depending on your 3D printer and material, so we recommend adjusting through test prints
⚠️ Impact of Filament Type
- The optimal clearance for doors and door knobs varies depending on the type and material of filament you use
- Different materials such as PLA, ABS, PETG, and TPU have different shrinkage rates
- For example, ABS has a higher shrinkage rate than PLA, so even with the same door_shrink or screw_slack values, the actual sizes may differ
- If you change filaments, we recommend readjusting the clearance parameters (door_shrink, screw_slack)
⚠️ Importance of Trial Printing
- For parts with critical clearances like door knobs and doors, it is very important to print only one piece at a time for testing until you find the optimal parameter values, rather than printing everything at once
- If you print all doors and door knobs at once, and the parameters are not appropriate, you will waste a lot of material and time
- First, print only one door and one door knob, and test how they fit into the room
- After checking the fit, adjust door_shrink or screw_slack as needed, and repeat the process of printing one piece and testing
- Once you find the optimal values, print all parts with those parameters
🔩 Screw Settings
| Parameter | Description | Default | Options |
|---|---|---|---|
| screw_size | Screw size to use | "M5" | M3, M4, M5, M6, M7, M8 |
| screw_slack | Diameter change amount | 0.2 | 0-0.5 mm |
💡 Printing Small Sizes: When creating a small advent calendar, it is recommended to make the screw thread clearance tight. Setting the screw slack to around 0.1mm ensures that screws are securely fixed even in small parts.
⚠️ Detailed Effects and Adjustment Methods for screw_slack
🎯 Effects and Changes Brought by screw_slack
The screw_slack parameter is an important parameter that controls the clearance (play) between screw holes and screw bodies. This value affects the following elements:
- Screw Hole Size: The screw hole diameter increases according to the screw_slack value
- Set as $slop = screw_slack / 4 in BOSL2's $slop global variable
- According to BOSL2 specifications, $slop = 0.05 changes the diameter by approximately 0.2mm
- That is, when screw_slack = 0.2, the screw hole diameter is approximately 0.2mm larger
- Screw Body Size: The screw body diameter decreases according to screw_slack, similar to the screw hole
- When screw_slack = 0.2, the screw body diameter is approximately 0.2mm smaller
- Fit:
- Larger screw_slack → Larger screw hole, smaller screw body → Screw fits loosely
- Smaller screw_slack → Smaller screw hole, larger screw body → Screw fits tightly
- Impact on 3D Printing:
- In 3D printing, materials may shrink or printer accuracy may cause deviations from theoretical values
- Therefore, appropriate screw_slack settings are important
🔧 How to Handle Tight Door Knobs (Screws)
When screws don't fit into screw holes or are difficult to turn:
- Increase the screw_slack value (Recommended)
- Gradually increase from the default value (0.2mm) to 0.3mm, 0.4mm, etc.
- Can be set up to a maximum of 0.5mm
- Example: screw_slack = 0.3; or screw_slack = 0.4;
- Consider 3D Printing Shrinkage
- 3D printing materials can shrink during printing
- Materials like PLA or ABS tend to make screw holes smaller
- Therefore, it may be good to set screw_slack about 0.1-0.2mm larger
- Check Screw Size
- Verify the screw size using the screw_size parameter
- Confirm that it matches the actual screw size you plan to use
- If the screw size is too large, consider reducing screw_size
- Check Print Accuracy
- If your 3D printer has low accuracy, screw holes may be printed smaller
- In that case, you need to set screw_slack larger
🔧 How to Handle Loose Door Knobs (Screws)
When screws fit loosely in screw holes and rattle:
- Decrease the screw_slack value (Recommended)
- Gradually decrease from the default value (0.2mm) to 0.1mm, 0.0mm, etc.
- Can be set down to a minimum of 0.0mm (though 0.1mm is safer considering 3D printing shrinkage)
- Example: screw_slack = 0.1; or screw_slack = 0.0;
- For High Accuracy Printers
- If your 3D printer has high accuracy, screws may fit well even with a smaller screw_slack
- In that case, setting it to around 0.1mm will ensure secure fastening
- Printing Small Sizes
- When creating a small advent calendar, setting screw_slack to around 0.1mm ensures that screws are securely fixed even in small parts
- Check Screw Size
- If the actual screw size is smaller than the set screw_size, it may become loose
- In that case, adjust screw_size to match the actual screw size
- If Parameter Adjustment Doesn't Solve the Problem
- If screws are still loose even with screw_slack set to 0.0mm, or if parameter adjustment alone doesn't solve the problem
- Consider using adhesive
- Using a small amount of adhesive (such as instant adhesive or epoxy) between the screw and screw hole can ensure secure fastening
- If using adhesive, make sure the screw fits correctly before applying it
📊 Recommended Setting Value Guidelines
| Situation | Recommended screw_slack Value | Notes |
|---|---|---|
| Standard Use | 0.2mm (Default) | Suitable for most cases |
| Too Tight | 0.3mm ~ 0.5mm | Gradually increase to adjust |
| Too Loose | 0.0mm ~ 0.1mm | Gradually decrease to adjust |
| High Accuracy Printer | 0.1mm ~ 0.2mm | Can be set smaller if accuracy is high |
| Low Accuracy Printer | 0.3mm ~ 0.4mm | Recommended to set larger if accuracy is low |
| Small Size | 0.1mm | Ensures secure fastening even in small parts |
| Large Size | 0.2mm ~ 0.3mm | Leave some margin for large parts |
⚠️ Important Notes
- Setting screw_slack to 0.0mm means the screw hole and screw body sizes theoretically match, but due to 3D printing shrinkage and errors, screws may not fit
- Conversely, setting screw_slack to 0.5mm (maximum) makes the screw hole too large, potentially causing screws to rattle
- The optimal value varies depending on your 3D printer, material, and screw size, so we recommend adjusting through test prints
- screw_slack is a parameter that directly specifies the diameter change amount (passed to BOSL2 as $slop = screw_slack / 4)
⚠️ Impact of Filament Type
- The optimal clearance for doors and door knobs varies depending on the type and material of filament you use
- Different materials such as PLA, ABS, PETG, and TPU have different shrinkage rates
- For example, ABS has a higher shrinkage rate than PLA, so even with the same door_shrink or screw_slack values, the actual sizes may differ
- If you change filaments, we recommend readjusting the clearance parameters (door_shrink, screw_slack)
⚠️ Importance of Trial Printing
- For parts with critical clearances like door knobs and doors, it is very important to print only one piece at a time for testing until you find the optimal parameter values, rather than printing everything at once
- If you print all doors and door knobs at once, and the parameters are not appropriate, you will waste a lot of material and time
- First, print only one door and one door knob, and test how they fit into the room
- After checking the fit, adjust door_shrink or screw_slack as needed, and repeat the process of printing one piece and testing
- Once you find the optimal values, print all parts with those parameters
🎯 Object Generation Settings
| Parameter | Description | Default |
|---|---|---|
| generate_house | Main advent calendar body | true |
| generate_roof_lower | Y-axis inner side roof | true |
| generate_roof_upper | Y-axis outer side roof | true |
| generate_doors | Doors for small and tall rooms | true |
| generate_door_knob | Objects with screws and screw heads | true |
💡 Printing Tip: You can specify objects to generate individually, making printing easier. For example, you can generate and print only the house body first, then generate and print only the roof next. This staged printing approach allows you to print each part with optimal settings, and if something fails, you only need to reprint that specific part, making it more efficient.
🎨 Color Settings
| Parameter | Description | Default | Options |
|---|---|---|---|
| house_body_color | Color of the house body | "NavajoWhite" | red, green, blue, yellow, cyan, magenta, black, white, gray, Brown, NavajoWhite, Gold, Silver |
| lower_roof_color | Color of the lower roof (inner) | "Brown" | red, green, blue, yellow, cyan, magenta, black, white, gray, Brown, NavajoWhite, Gold, Silver |
| upper_roof_color | Color of the upper roof (outer) | "white" | red, green, blue, yellow, cyan, magenta, black, white, gray, Brown, NavajoWhite, Gold, Silver |
| door_color_even | Color of doors with even numbers | "gray" | red, green, blue, yellow, cyan, magenta, black, white, gray, Brown, NavajoWhite, Gold, Silver |
| door_color_odd | Color of doors with odd numbers | "blue" | red, green, blue, yellow, cyan, magenta, black, white, gray, Brown, NavajoWhite, Gold, Silver |
| door_color_prime | Color of doors with prime numbers | "Gold" | red, green, blue, yellow, cyan, magenta, black, white, gray, Brown, NavajoWhite, Gold, Silver |
| knob_color | Color of screw head knobs | "Silver" | red, green, blue, yellow, cyan, magenta, black, white, gray, Brown, NavajoWhite, Gold, Silver |
💡 Multi-Color Printing Tip: You can specify various colors, so you can make good use of AMS (Automatic Material System) for multi-color printing, or keep colors simple for quick printing. You can create a vibrant finish with multi-color printing or print quickly with simple single or two-color printing. Choose flexibly according to your needs and preferences.
💡 Winter Atmosphere: For winter seasons and events, setting the upper roof to white creates a snow-covered atmosphere. Perfect for Christmas and winter events!
🎯 Use Cases
Christmas Gifts
- Perfect for a 24-day advent calendar, opening one gift each day from December 1st to 24th
- Ideal for storing small toys or candies for children
Event Calendar
- Countdown calendar for weddings
- Birthday countdown
- Anniversary countdown
Educational Tool
- Number learning (color-coding even, odd, and prime numbers with door numbers)
- Learning date concepts
- Countdown practice
Decoration
- Place next to the Christmas tree
- Use as living room interior decoration
- Handmade gift idea
💡 Key Highlights
- Fully Automatic Layout: Just specify the number of days, and the optimal house size and room arrangement are calculated automatically. No manual adjustment needed!
- Flexible Customization: Fine-tune room sizes, wall thicknesses, roof shapes, and more. Adjust to your preferred size.
- Emoji Support: Use Noto Emoji to place emojis in empty spaces. Easily create a Christmas-themed design!
- Numbered Doors: Automatically generates numbered doors for each room. Color-coding for even, odd, and prime numbers is also possible.
- Staged Printing: Generate house body, roof, doors, screws, and more individually. Print only the parts you need and assemble in stages.
- 3D Printing Optimized: Designed with 3D printing in mind, including minimum thickness constraints and rounded corner processing.
- Automatic Tall Room Adjustment: By specifying the minimum number of tall rooms to generate, adjacent 1x1 rooms are automatically merged to create tall rooms. The layout is automatically optimized.
- Complete Cell Coverage: All cells are properly assigned as either rooms or empty spaces (emojis), ensuring no unused cells remain.
🎬 Usage Scenarios
- Christmas Season: Perfect as a 24-day advent calendar from December 1st to 24th, opening one gift each day
- Gifts: Handmade Christmas gift for family and friends
- Education: Educational tool to teach children about numbers and dates
- Interior: Christmas season decoration for the living room
- Events: Countdown calendar for weddings, birthdays, and other special occasions
🔧 Customization Tips
- Small Size: Reduce room sizes to create a compact advent calendar
- Large Size: Increase room sizes to accommodate larger gifts
- Color Coding: Use even, odd, and prime number color-coding for number learning
- Emoji Combinations: Combine various emojis to create original designs
- Size Flexibility: Each part can be freely sized and designed, making it easy to create both miniature advent calendars and large-scale advent calendars. By adjusting all parameters such as room size, wall thickness, and roof shape, you can flexibly customize to your preferred size.
📝 Notes
- Support material may be required when 3D printing
- Doors are automatically generated to match room sizes, but there may be slight variations from actual room sizes
- Adjust screw sizes to match the screws you plan to use
⚠️ Verification for Tight Settings
- When using tight settings (settings with strict constraints such as min_tall_rooms or min_empty_spaces), the model may not be generated exactly as specified
- In particular, setting min_tall_rooms to a large value or specifying many min_empty_spaces may result in the number of rooms or empty spaces not matching the specified values due to layout constraints
- Before printing, always verify that the number of rooms and empty spaces in the generated model match the specified values
- If the number of rooms differs from the specification, adjust the parameters (min_tall_rooms, min_empty_spaces, number_of_days, etc.) and try generating again
License
You shall not share, sub-license, sell, rent, host, transfer, or distribute in any way the digital or 3D printed versions of this object, nor any other derivative work of this object in its digital or physical format (including - but not limited to - remixes of this object, and hosting on other digital platforms). The objects may not be used without permission in any way whatsoever in which you charge money, or collect fees.
Comment & Rating (2)