BIC lighters case - Pine Makers


Print Profile(2)


Description
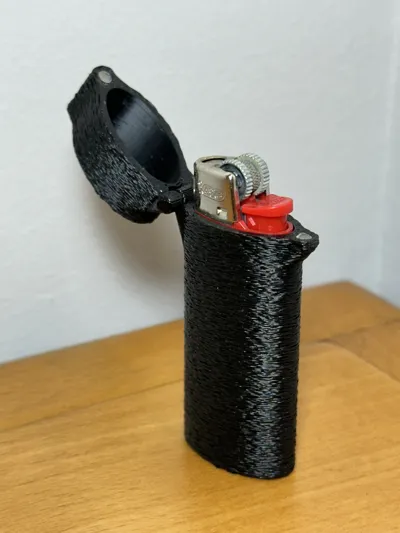
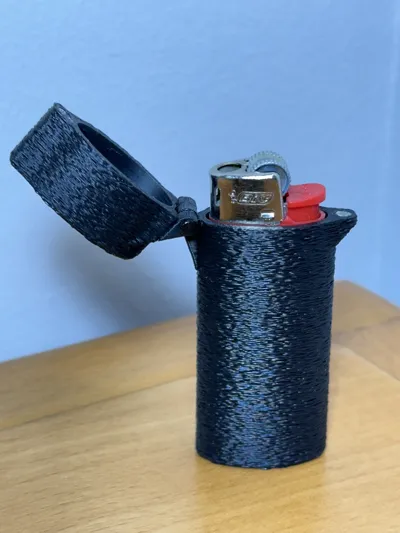
Flip-Top Bic Lighter Case
This custom-designed case transforms a standard Bic lighter into a sleek, flip-top lighter with a satisfying open-and-close action. The hinged lid adds a tactile and audible element to the lighting experience, combining style and functionality.
Note: .3mf files are sliced for the Bambu Lab X1C.
Like this design? Check out more creations and support my work over on Instagram:
https://www.instagram.com/pine_makers?igsh=MTNvaTR5N3IzeTZoNQ==
This 3D model is protected under a proprietary license. By downloading or purchasing this file, you agree to the following terms:
You are granted a non-exclusive, personal, and non-transferable license to use this file for personal 3D printing only.
You may not copy, modify, distribute, sell, or share this model or any derivative works in any form.
Unauthorized redistribution or commercial use is strictly prohibited and may result in legal action.
For commercial use, licensing, or collaboration inquiries, please contact me directly.
Thank you for respecting my work and supporting independent creators!
Print Settings
Material: PLA (A more heat-resistant material like PETG or ABS is recommended for better durability)
Layer height: 0.2 mm (Fuzzy skin finish is recommended for a smooth look)
Infill: 5-10%
Supports: None required
Print time: 30-45 minutes
Parts: Two printed parts (body and lid)
Assembly & Finishing Instructions
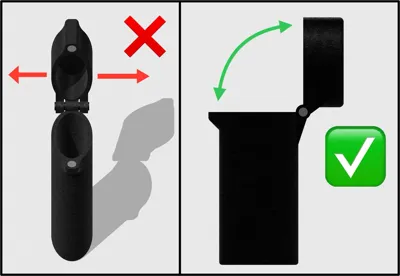
Clean the hinge holes: It is highly recommended to use a 2 mm drill bit to gently clear and sharpen the hinge holes. This ensures a perfect circle for a smoother flipping action and prevents stress on the printed hinge parts.
Insert the hinge pin: Use a small piece of 1.75 mm filament as the hinge pin to connect the body and the lid.
Install the magnets: Use two 3x1 mm magnets (N52 strength is highly recommended for the best snap).
Gluing tip: Apply a tiny drop of glue only to the bottom of the magnet slot. Do not cover the top surface of the magnets with glue, as this will weaken the magnetic pull and prevent the lid from closing perfectly flush.
Safety Notes
This is a functional accessory exposed to heat, please exercise fire safety when handling.
Small parts (magnets, filament pin) may pose a choking hazard - keep away from children.
Not certified for food contact.
Use caution as with any open flame accessory.
License
You shall not share, sub-license, sell, rent, host, transfer, or distribute in any way the digital or 3D printed versions of this object, nor any other derivative work of this object in its digital or physical format (including - but not limited to - remixes of this object, and hosting on other digital platforms). The objects may not be used without permission in any way whatsoever in which you charge money, or collect fees.
Comment & Rating (10)