Next Level Racing GTElite Caster Wheel Mod Parts


Print Profile(1)

Description
Boost Me (for free)
Please support the design and free publication of functional parts which return autonomy and control to the consumer. Every boost is greatly appreciated as it supports further time investment in creating these models!
These are modification parts for the Next Level Racing GT Elite sim rig, but technically these parts will work for any square/rectangular frame built out of 4080 aluminum extrusion, using the caster wheels listed in the bill of materials.
Bill of Materials
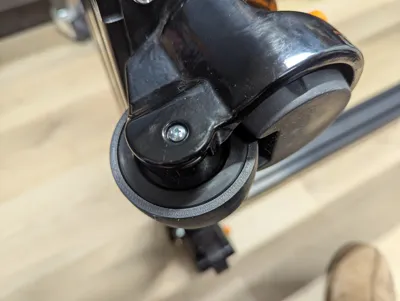
- Vevor GD-80FD 2.5" Levelling Caster wheels, or any other caster wheel with 70x70mm mounting hole spacing.
- 8x M8x25 SCHS
- 20x 4040 extrusion T-nuts (M8)
- 12x M8x16 SCHS for caster wheel to aluminum extrusion assembly
- 4x M8 nuts
- 4x M8x20 SCHS or M8x20 SEMS screws (Note: If you use the Vevor GD-80FD 2.5" caster wheels, the set will come with 16 of these screws and nuts).
- Recommended: Print 8pcs of a drop-in T nut backer if you use drop-in T-nuts.
Printing and Installation
- Optional: TPU tires.
- Print 4x TPU tires for the GD-80FD caster wheels (hard plastic) so that these wheels are safe for hardwood floors. Print a test wheel first, if your TPU has a higher durometer you may want to print it only on the 0.2mm standard profile, rather than 0.2mm strength profile.
- Loosen the 2x screws which retain the wheel/axle assemblies, and pull the wheel off the axle.
- Run hot water over the TPU tires to make them slightly easier to install onto the wheels. They are friction fit and will take a fair amount of force to go on. Slide the TPU tire over the plastic wheel as evenly as possible (sliding on at an angle will jam up). The tight fit is to ensure they cannot come loose and jam up while moving your simrig.
- Re-assemble the wheel-axle assemblies onto the casters.
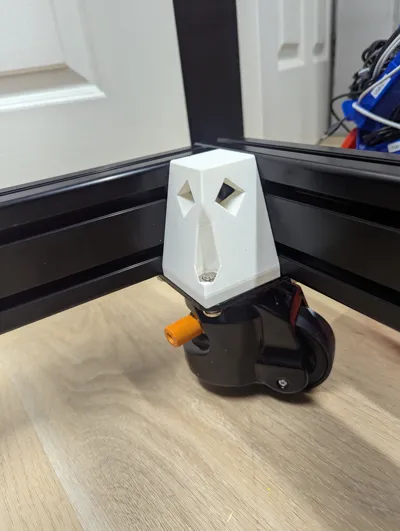
- Support Blocks and Casters:
- You will need to go ‘off script’ from NLR's assembly instructions - instead of using a single T-nut for each the included levelling feet, you will need to use 3x T-nuts, and 3x M8x16 SCHS to connect the casters to the 4080 extrusion frame.
- While the steel on the caster wheels is quite thick, extreme overloading may cause the steel to bend (thus jamming the caster bearing). As a precaution, support blocks can be printed and installed.
- The support block will be under a compressive load. Any caster baseplate bending forces will be transferred into the aluminum extrusion. Print the support blocks with medium-high infill and wall count. I have used the standard 0.2mm strength preset, with no supports.
- Pre-install 8x T-nuts (recommended use of T-nut backers linked above if you are using drop-in T-nuts) on the upper channel of the base frame.
- Use the engraved lines on the top of the support blocks as alignment guides for where the T-nuts should be. Secure the support block to the aluminum extrusion T-nuts using 2x M8x25 SCHS, and secure the caster wheel to the support block using a M8x20 screw and nut.
Boost Me (for free)
Please support design and free publication of functional parts which return autonomy and control to the consumer. Every boost is greatly appreciated as it supports further time investment in creating these models!
License
You shall not share, sub-license, sell, rent, host, transfer, or distribute in any way the digital or 3D printed versions of this object, nor any other derivative work of this object in its digital or physical format (including - but not limited to - remixes of this object, and hosting on other digital platforms). The objects may not be used without permission in any way whatsoever in which you charge money, or collect fees.
Comment & Rating (0)