The Modular Lantern - Tiny Christmas Edition


Print Profile(2)


Bill of Materials


Description
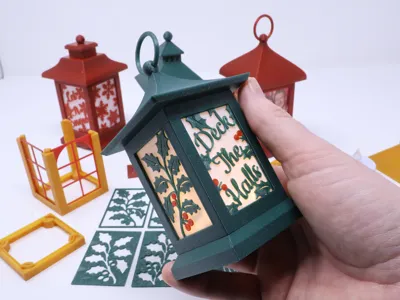
Welcome to The Modular Lantern, a fully stackable system of cross-compatible parts. The idea behind the system is simple — you can completely change the look of your lantern with the seasons, not just by the patterned inserts but also by picking different lantern components and attaching them to the core.
This is a new Tiny version just 5cm wide large enough for a Tea light and great for hanging on a tree. It also makes a wonderful picture frame for a truly personal decoration.
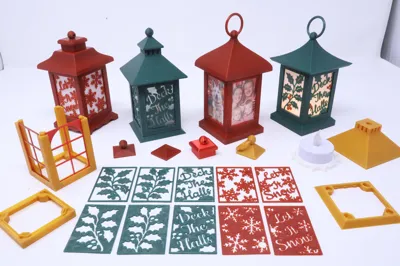
I like choice but so as to not overwhelm plate 1 contains all the parts you need for a complete lantern except the inserts and clips.

Boost Me (for free)
A boost is just that! A huge boost to me and reason to keep creating and sharing knowing that people are enjoying my creations and appreciating the time spent preparing them for others to print. Thankyou!
Printing
Start by printing Plate 1. Then pick a colour to go behind the inserts and print plate 7 (Panels) it can be any PLA they all semi transparent at 3 layers thick.
Now you also need some inserts there is a Christmas Print Profile included on this page which has some snow and holly themes along with a couple of basic window frames.
Assembly
Push a tea light through the base plate as shown:

Once half way through place on a table and push the base plate down onto the table, this prevents you pushing the tea light all the way through. If you have a different Tea Light to the ones supplied by Bambu, see the section below on how to customise the fit via the slicer.
Now push the base into the lantern core:

Then insert a solid panel followed by an insert of your choice in each side.

Add the spacer to the top of the core, the side pictured below snaps onto the core:


You now have a complete core and it has 4 holes in the top and bottom. You can either use 6mm diameter magnets (See section below on magnets) or with no extra hardware using MagFit clips which can be downloaded here. Just push 4 clips into each hole in the top using the provided tool.

Push on the top and add a clip to it's top surface:

On top of tops we add the topper and then the ring decorator:

Wait you're not quite done, you can optionally add a skirt to balance the looks using 4 more clips:

Turn over the lantern and switch the Tea Light on you are done :-)

Unless you like to experiment like I do in which case continue reading.
Experimenting
Plate 2 contains 3 alternative tops and a set of toppers. Plate 2 has 2 alternative skirts.

The great thing with this tiny version of the Modular Lantern is you can print all these quickly without much filament and start to experiment. The toppers all fit onto the top on plate 1 or the one with a flat top on plate 2 for which you need the connector, a cylinder which takes two clips:

Add the clips and then insert it into the top:

Then pick a topper and the square chimney part shown above. Insert the square into the groove on the underside of the topper and click onto the top.

Dealing with translucent issues
Some PLA is quite translucent and you often only find that out when you have printed and put the lantern together. For example the Bambu Red Sparkle PLA lets the light show through the top:

There is a solution :-) You can use the flat base on plate 5:

While this can be used as a base to stick any LED onto with some velcro or similar it can also be placed upside down in the spacer:

Now when you switch the light on it blocks it:

Note on this exposure you can also see through the lantern uprights slightly, it's not too noticeable but if you have a filament that does this and you dislike it increase the number of walls in the slicer and print a new core.
Adjusting the Tea Light holder
I have constructed the holder out of 3 models allowing you to scale the size of the hole.
Load the print profile into your slicer and select the TeaLightPositivePart:

Then open the scale tool, untick uniform scale, and set the X and Y Scale to 2 diameter in mm. So in the above image it's set to 74 which is 2*37 and the Bambu Tea light is 37mm in diameter.
Repeat this for the negative part (NegativeTinyBaseTeaLight)
Mini RGB Tea Light
These are available from makerworld and other places and come with a remote which makes turning the lanterns on a tree on and off much easier! On plate 4 you will find a special holder for this which clamps the LED higher up and allows the base to freely rotate, as that's how you manually turn the LED off/on and replace batteries.


You can adjust this to fit other fittings to in a similar way to the larger tea light fitting above.
Note you can place bases in the skirts too which offsets the light lower in the lantern, often resulting in better lighting:


Bonus
This whole lantern and it's tops and skirts fit as toppers on the Medium and standard size Modular Lanterns, yup sorry way too many options! I look forward to seeing your photos of unique combinations!

On plate 6 there is a part you've not used it allows you to connect two toppers together without using the magfit. It's not really needed BUT solves the problem of trying to connect two straight skirts together where there is not enough vertical space for two clips. Note on the straight skirt (on plate 1) there are arrows inside, that points to the side which does NOT have magfit holes, you can insert this joiner there. Or of course use it in other topper parts.
Inserts
This lantern accepts 38mmx57mm inserts with up to 2mm depth.
You can scale these inserts to fit the other lanterns and I may well upload pre-scaled print profiles for them. If you are considering shrinking other inserts to this lantern then double check that everything stays intact at this smaller size, you may need a 0.2mm nozzle for some that were not designed to be this small. I will be releasing more inserts for this new size as the seasons roll on.
You do not need an AMS for these inserts but there is a bonus plate configured to use an AMS to paint the berries red.

Photos!
Yes the aspect ratio is a common photo one of 2:3 just print on normal paper and insert in front of a white PLA panel. I also use the PVA sheets available from makerworld to go in front of the picture, just use scissors to cut them, using a panel as a guide:


6mmx4mm Magnets
If you want a really easy way to remove the top I suggest using magnets and you have several options here. The holes are 6mm diameter by 4.2mm, you can simply use 6x4mm diameter magnets which will provide a super strong connection or…
6mmx2mm Magnets
I suspect many of you have 6mmx2mm magnets if you’ve played with gridfinity. If you want simplicity, print 2mm spacers and pop these in with opposing poles facing each other, you know how magnets work.
Want a smarter setup? Alternate the magnet poles as you go around the Core instead of keeping them all the same.
Why? Because it keeps the system reversible — you can flip or stack sections in any orientation without losing alignment.
Make the magnets Stand proud, use a 1mm spacer with the south pole and 3mm with the North pole. Now when you put parts together they can’t slide!
Proud Without Spacers
If you purchase 6mm x 1mm magnets and 6mm x 3mm magnets then you can follow the same approach as above but without the hassle of adding spacers!
Additional Tiny Tested Inserts:
I will be releasing more inserts tested for this size as the seasons roll through.
License
You shall not share, sub-license, sell, rent, host, transfer, or distribute in any way the digital or 3D printed versions of this object, nor any other derivative work of this object in its digital or physical format (including - but not limited to - remixes of this object, and hosting on other digital platforms). The objects may not be used without permission in any way whatsoever in which you charge money, or collect fees.
Comment & Rating (71)