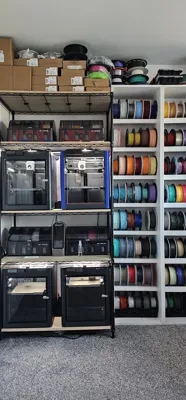
Reinforced Wire-Rack 3D Printer Tower


Print Profile(5)


Description
GeckoGrid is now in pre-launch on MakerWorld Crowdfunding.
Follow the campaign to support the launch, get notified when it goes live, and stay updated as new features and stretch goals are revealed.


Membership
Prefer to stay on MakerWorld? Subscribe here to access MakerWorld-exclusive models, get a commercial license for all MakerWorld uploads, and receive access to my free Patreon tier for updates & news.

Reinforced Wire Rack 3D Printer Tower – Full Build Guide & Bracket System
If the world was perfect, I would never recommend using a wire rack for 3D printers.
But space is limited, proper custom stands with pull-out shelves cost more than a new printer, and this particular rack happens to fit two P1S printers like a glove — with enough room in the middle for a shared poop chute tray and rear diverting channels.
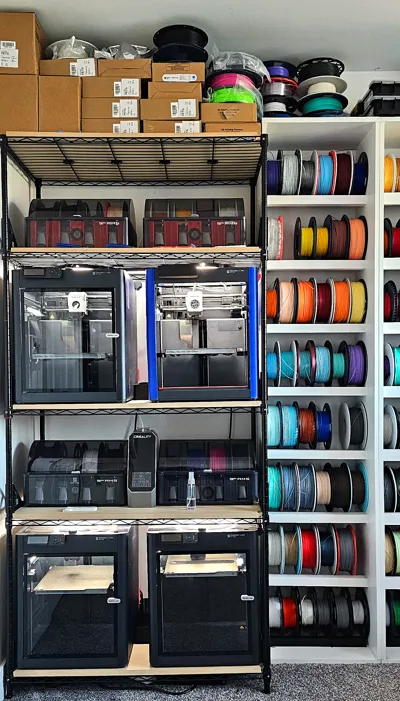
This project shows you how to turn a cheap wire rack into a stable, rigid printing tower using MDF boards and a full set of 3D-printed reinforcement brackets.
If you follow the steps below, you can build exactly what I built: a 4-printer, 4-AMS vertical setup that has now run 24/7 for over a month with zero wobble.
Why This Rack?
I chose this rack for three very practical reasons:
- Perfect width – fits exactly two P1S printers side-by-side
- Cheap – far more affordable than building a wooden multi-printer cabinet
- Customisable – shelves are adjustable, modular, and easy to modify
With the right brackets and boards, it becomes surprisingly solid.
What You Need Before Starting
✔ MDF Boards (cut to your shelf size)
IMPORTANT:
Cut the boards 10–20 mm smaller than the shelf dimensions.
They must drop behind the wire lip that runs around each shelf.
✔ Corner Cutting Jig
Choose the jig that matches your rack’s pipe leg diameter.
This is used to mark perfect rounded corners on the boards.
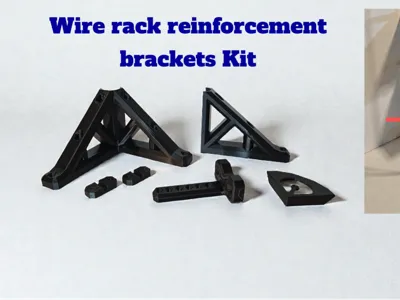
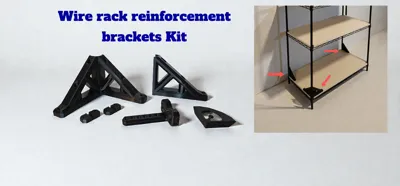
✔ Wire-bottom brackets
These secure the MDF to the wire shelf from below.
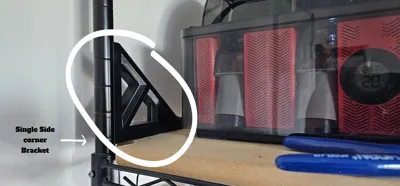
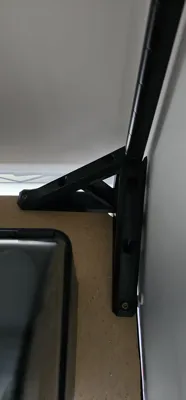
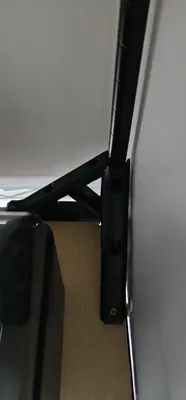
✔ Corner brackets
- Double brackets → back corners
- Single brackets → front corners for full access
All brackets are designed to be printed upright in PETG or stronger.
✔ Basic tools
- Jigsaw or hole-saw drill (for MDF corners)
- Screwdriver or drill
- 3.5–4 mm self-tapping screws
- 15–20 mm wood screws
Step-by-Step Build Guide
1. Cut & Prepare the MDF Boards
Use standard 18 mm MDF.
Get them cut to size in-store (B&Q will do this), but remember:
- Make each board 10–20 mm smaller than the shelf dimensions
- This ensures the board drops behind the wire perimeter
2. Mark Corners Using the Jig
Select the jig size that matches your rack legs.
Place it on each board corner and:
- Trace the correct arc
- Use the jig’s center mark if using a hole saw
- Cut the corner using a jigsaw or hole saw
Each board will now seat perfectly around the rack legs.
3. Set Shelf Spacing Correctly
For P1S printers I used:
- 51 cm between shelves
(measured from the top of the lower shelf to the bottom of the next shelf) - Wire shelves have a 2 cm lower lip / skirt, so measuring top-to-top gives 53 cm
- 51 cm spacing accounts for the 18 mm MDF thickness
For AMS shelves I used:
- 36 cm (or 38 cm if you measure lip-to-lip)
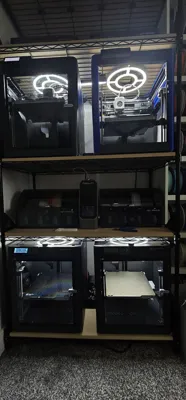
My full tower layout:
- Bottom: 2× P1S
- Above: 2× AMS
- Above: 2× P1S
- Above: 2× AMS
- Top shelf: free for storage
4. Install the MDF Boards
Place each MDF board on its shelf.
Flip the rack or crouch underneath and use the wire-bottom brackets:
- Choose the bracket size that matches your wire diameter
- They should click onto the wire if the size is correct
- Screw them upward into the MDF
- 3–4 brackets per shelf is plenty
These prevent the boards from sliding.
5. Install the Corner Brackets
Use:
- Double brackets for both back corners
- Single brackets for both front corners
Attach them in this order:
- Screw bracket into MDF board
- Screw bracket into rack leg using a self-tapping screw
TIP:
Pre-drill with a smaller bit — it makes the self-tapper go in cleanly.
With all four corners installed, each shelf becomes locked to:
- the legs
- the MDF
- the wire frame
6. (Optional) Add Extra Security Screws
Because I like to sleep at night:
After everything was set perfectly, I also drove one more self-tapping screw through each metal shelf collar into the leg.
The corner brackets already lock the shelves, but this extra screw removes all possible micro-movement.
Do You Need to Anchor It to the Wall?
I didn’t — my tower is stable with no wobble.
But depending on your floor or rack, wall-anchoring is optional extra safety.
Final Thoughts
This setup is only needed when space is limited and furniture isn’t an option — but if you must use a wire rack, these printed parts transform it from a shaky chrome noodle into a rigid multi-printer workstation.
Even if you’re not building a printer tower, these brackets still massively improve the stability of any wire shelf system.
🛠 Corner Brackets (Shelf + Leg Locking)
These are the core of the system.
Double Corner Brackets (18–28 mm pipe)
Placed on the back corners.
They screw into:
- The pipe legs (via self-tapping screws)
- The MDF board
- The MDF board is already screwed to the wire shelf below using the underside brackets
This effectively clamps the shelf, the board, and the leg together as one locked piece.
Once installed, the shelf cannot move, twist, or creep downwards over time.
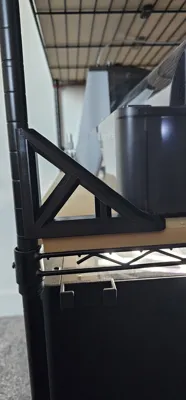
Single Corner Brackets (18–28 mm pipe)
Installed on the front corners where access is needed.
Same locking principle as above, but with a slimmer footprint.
These corner brackets already lock the shelf in place.
Any additional screws directly through the metal shelf collar into the leg are purely for extra peace of mind.

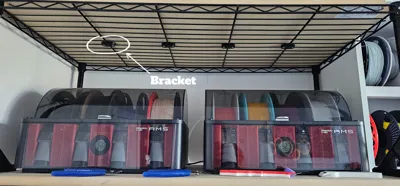
🛠 Bottom Wire-Shelf Brackets (4.5–6 mm wire)
These sit under the wire shelf and screw into the MDF from beneath.
The wire rod is captured between the screw positions so the board cannot slide.
Bonus:
They accidentally became the perfect support stop for AMS lids when fully open — the lid gently rests against the bracket and stays upright.

🛠 Corner Marking Jig (24–38 mm pipe)
Since B&Q cuts MDF to size but does not do corner shaping, this jig lets you mark:
- the correct semicircle radius
- the exact centre point for hole-saw drilling
- consistent corners on every board
Slip it onto the board corner, trace, drill, done.


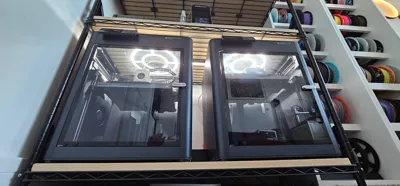
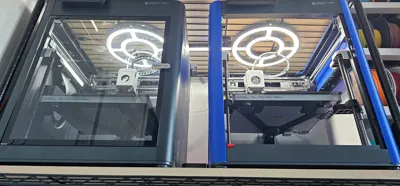
💡 Modular LED Lighting System
The lighting modules shown in the images are designed to sit between printer levels.
They consist of two circular frames connected by a straight bridge.
Each section contains multiple LED channels.
You can install LEDs in:
- the outer rings
- the inner rings
- the small radial arms
- the central bridge
- both circles
- or in every single available channel if you want maximum illumination (or to punish yourself with wiring)
This creates extremely even lighting above each printer.
LED files will be published as a separate release once finalised.


📁 Included Files (current)
- Double Corner Bracket (18–28 mm)
- Single Corner Bracket (18–28 mm)
- Wire Bottom Bracket (4.5–6 mm)
- Corner-Cutting Jig (24–38 mm)
More sizes will be added over time.
📌 Final Notes
Wire racks will never be the ideal choice for 3D printing — but when space is limited, this reinforcement system transforms them from unstable, wobbly structures into surprisingly solid multi-printer towers.
If your rack size differs or you need custom dimensions, feel free to ask.
Thanks for scrolling all the way down — you’re officially a real one 🫶
Your support makes this possible and keeps creators like me designing through midnight prints and caffeine crashes.
💛 Want to support more?
Buy Me a Coffee
Boost Me (for free)
Hit that boost if you liked it — it helps way more than you think 💫 Thanks for the support!
🧭 Check out more models:
MakerWorld Profile
Thangs3D Profile
License
You shall not share, sub-license, sell, rent, host, transfer, or distribute in any way the digital or 3D printed versions of this object, nor any other derivative work of this object in its digital or physical format (including - but not limited to - remixes of this object, and hosting on other digital platforms). The objects may not be used without permission in any way whatsoever in which you charge money, or collect fees.
Comment & Rating (0)