Search models, users, collections, and posts

Leather Belt Embossing Machine

GIF

Print Profile(1)

All
P1S
P2S
X1E
X1
P1P
H2D Pro
H2C
H2S
H2D
X1 Carbon
A1
X2D
A2L

Super Strong
Super Strong
Designer
175.2 h
8 plates
5.0(4)

Open in Bambu Studio
Boost
393
1117
39
23
215
29
Released 

Bill of Materials

List other parts
  • Alloy Steel Cup-Point Set Screw, M8 x 1.25 Mm Thread, 6 Mm Long x 2: https://www.mcmaster.com/catalog/131/3512/91390A553
  • Pointed Screws For Plastic, 410 Stainless Steel, Number 8 Screw Size, 2" Long x 21: https://www.mcmaster.com/catalog/131/3432/92325A103

Description

Membership

Get Your Commercial License! Want to sell physical prints of my designs? Join my Membership Program! Basic: Says thanks for all time, effort, and filament I've spent to give you these models! Stamp Only: Gives you full commercial  rights to all my Stamp heads, handles, and tools! Full Catalogue; Gives you full commercial rights to all stamp heads, handles, tools, rollers, and roller embossing machines! Click Join to get Started!

Join

Leather Belt Embossing Roller Machine!!!

There is a newer version out! This version is outdated! If you printed this version all parts are forwards and backwards compatible with the new version! Find the new version here ------ > V2.0! Leather Belt Embossing Machine


I'd like to introduce you to a nearly 100% 3d printed leather belt or strap embossing roller! Only requiring 21 screws and 2 set screws this model is height adjustable, compatible with most rollers, and has a multi width guidepost system! Leatherworking is a very cost prohibitive hobby to get into. Let alone getting any sort of machines to help you along the way. This is my latest design to make it easier for anybody to start to get into the hobby I've grown to love so much! While it will never be as durable as the full metal $200 - $800 commercial rollers any part can be easily reprinted if you eventually wear a part out!
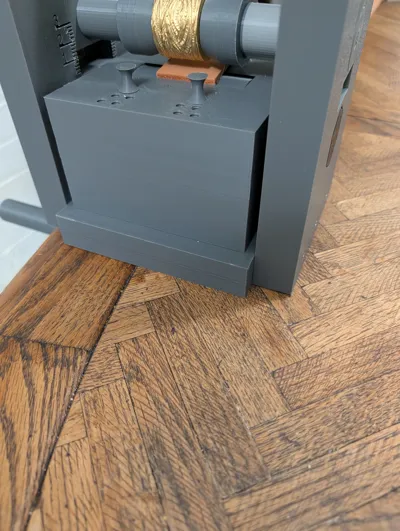
 

Height Adjustable

The stamp roller can be raised up and down to set to the thickness of any leather. There is a metric scale on the walls to ensure your roller is level with the leather. Though you could get real crazy and purposely leave it tilted to give a gradient effect of your stamp!


Multi-width Guideposts

There are guideposts that can be screwed into the preset holes to keep your strap or belt centered under your stamp. The holes are set for 1". 1 ¼", 1 ½", 1 ¾", and 2" wide leather. You can use other sized belts and straps but you'll have to take care to keep it centered.


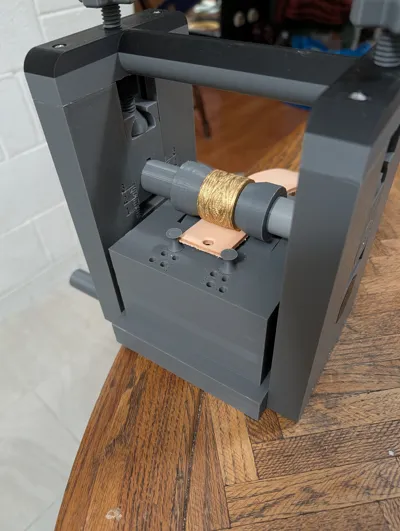
Roller Compatibility

The model is designed to be compatible with most if not all standard belt roller stamps found online that use a keyed groove to lock it in place. It is designed to be a tight fit to prevent slipping so sanding may be required for your specific roller. 


Parts used

I used Sunlu's PLA+ 2.0 for its strength and rigidity, though any filament of similar strength should work fine. I printed all parts that would be put under strain at 10 walls and 99% infill. It requires a lot of pressure to stamp leather!


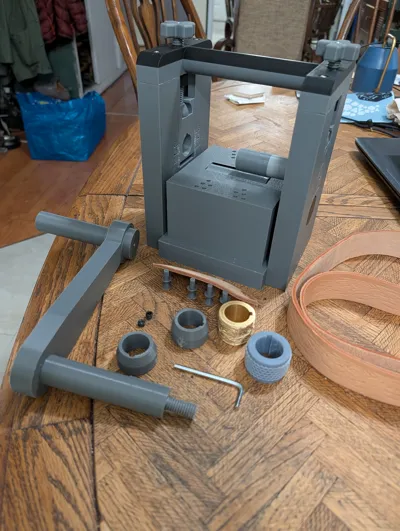
I required 2 types non printed pieces of hardware for this print:

21x Pointed Screws For Plastic, 410 Stainless Steel, Number 8 Screw Size, 2" Long for attaching all parts together

2x Alloy Steel Cup-Point Set Screw, M8 x 1.25 Mm Thread, 6 Mm Long for the stamp retaining rings to lock the stamp in place and prevent it from sliding side to side

Boost Me (for free)

Hello! Thanks for viewing my model! I spent a ton of time designing, printing, testing, redesigning, reprinting, and retesting this model to make sure it worked well and reliably. I'd appreciate any boosts given greatly. I'm hoping this is an inexpensive alternative to the normal $200-$800 price tag on any commercial belt roller machines and makes this normally expensive hobby easier for newcomers or experienced hobbyists to enter or use!

Comment & Rating (39)

(0/1000)

Just send a boost your way, thank you for all the time and hard work. I am printing the last plate and so far the press looks great can wait to used it. I also printed some of your rollers they are asowme. Thanks again
(Edited)
The designer has replied
0
Reply
Thanks so much! I appreciate your kind words a ton! I'd love to see pictures of it being completed! If you have any questions, concerns, or recommendations about any of it let me know!
1
Reply
I try using it but the split shaft cant hold the presurre from the roller into the belt and snap. My recommendation probably be to make the shaft one piece that attaches to the handle and a screw hold it to the handle. That way you can used a smaller screw in the opposite side and when exchanging rollers you lose the locks and can slide the whole shaft in and out, plus I believe it will give it more strength overall.
0
Reply
Replying to @JesseFrank :
Hi! I also noticed this is the weakest point and have a new version coming out in the next week or so that fixes this issue! It also has some quality of life changes and reduces the print time and filament usage. Keep an eye out for it. It is backwards compatible to the original and if you don't want to re-print the whole thing you can just reprint the 2 shaft parts!
2
Reply
Boosted
Just gave you a boost 😊 I finished printing everything and I have the HW ready. Newb question, is there a how-to on assembling it?
The designer has replied
0
Reply
Part 1 Thanks a ton! There is not a how-to guide but I can quickly upload one this weekend for you and everybody else. Until then heres a quick step by step guide: Using the following photo for directional guide and the part names in the files 1: Screw on the Roller Body with the large roller already inside it to the base with the Text on it towards the front 2: Screw on the side walls with the measuring scale facing inwards, The Right side wall has the hexagon hole 3: Install the Roller shaft (Hexagon ended cylinder) through the roller and attach it with the retaining cap on the other side. (Don't screw it super tight you want it to free spin, not clamp itself stiff) 4: Slide in the two sleds, the one with the keyed hole goes on the left side, these may be stiff and require sanding. 5: Screw the nut onto the screw posts THEN screw the posts through the Wall cap with the handle THEN screw on the knobs for them (Part 2 in the next comment)
(Edited)
1
Reply
Replying to @Commando1998 :
Part 2 6: slide the screw posts into place in the sleds and screw on the cap to the walls 7: Screw on the stamp roller shaft into the right sled (remember not too tight) 8: Attach the Turning handle with the end cap to the Roller shaft handle 9: Slide the handle through the sled screw it on, its reverse threaded so lefty tighty righty loosy 10: for exchanging stamps unscrew the handle and slide them on using the retaining rings to lock the stamp in place on the shaft if you have any questions either let me know or look for the instructions with photos this weekend!
(Edited)
1
Reply
Boosted
Replying to @Commando1998 :
Thank you, I appreciate the help. Got it put together and it works great--yay . The only tricky part is getting the strap to stay straight, the little guide pins are a little off, but I'll get it working 😊
0
Reply
I love that someone made one, I've been working on one myself.. but 175 hours is craaazy long
The designer has replied
0
Reply
yeah I probably could shorten it some by decreasing the infill on the side walls, but it wouldn't be by much, the issue being it has to be printed pretty much solid to withstand the pressure applied to the leather. if you can find a stronger more rigid filament to use you could cut down on a lot of the time to print by decreasing the infill.
0
Reply
Replying to @Commando1998 :
Hey Boss Man, I revised your print, I took out all the structural parts so if someone wanted to make one using real world parts like metal and other materials. I can send you over the file if you'd like.
0
Reply
Replying to @Commando1998 :
Total Print time 23 hours 29 minutes - Bambu X1 Carbon. 0.4mm nozzle
0
Reply
Boosting again, I reworked this a bit, not reworked, but made some filament changes. Frame and Base Blocks: PETG / PCTG Axle / Roller Housing: PCTG or ASA if you can print in it. Crank Handle: ASA or some sort of Nylon (PA12) Knobs: PETG Honestly, though, PCTG is an amazing Filament and if I have to ever print this ever again it'll be in PCTG the whole way around.
The designer has replied
1
Reply
Thanks again! I bet it's much tougher with those filaments, If you don't mind I'd love it if you added those print profiles to the model so myself and others could use it too they sound great! I haven't used ASA before due to poor ventilation or PCTG, but I've done some nylon and some petg. I considered using different filaments but I really wanted to focus on ease to print and costs hence the all PLA. I do have a new version to add to the profile here in the next week or so that reduces the print time to ~4 days and uses 600 grams less of filament with the addition of a metal rod that fits through the two shafts. Keep an eye out for it! Again thanks for all the support!
0
Reply
can it handle the brass emboss attachment rollers?
The designer has replied
0
Reply
Yes it can! I have one that I used fory testing and it's what is in the photos, works great with the brass rollers.
1
Reply
Replying to @Commando1998 :
awesome you saved me be because I was looking at the cost for these embossing machines!
0
Reply
what parts did you print out at 99%?
The designer has replied
0
Reply
It is easier to list what wasn't printed at 99% lol. everything printed at 30% is the base plate, roller body, RSW body, and LSW body. the rest was printed at 99%, for the reason of being put under a lot of pressure/tension, being a thin piece that a screw was going through and would collapse from the screw head otherwise, or was such a small piece there'd be no infill anyways.
0
Reply
Replying to @Commando1998 :
Thank you, for responding!!
0
Reply
Could the strength issues be solved by using ball bearings and threaded rod as the axle? (perhaps with a 3d printed part threaded onto it with locknuts on either side?) Is the weak point the axle or the walls? Are you willing to share the cad files? I have wanted one of these for a long time but $500 ish for a pretty simple basic machine seems insane. Many splitters also work on the same concept and are simmilarly priced.
The designer has replied
0
Reply
You could absolutely solve a lot of the strength issues with Bearings and rods. My goal was just to have one with as little hardware as possible to make it as easy for anybody to make. The weakest point is the actual rod that holds the Stamp roller as that gets pressed down on either side with the leather pushing up from the middle. The next weakest link would probably be the threaded rods raising and lowering the stamp roller though I doubt those are an actual break risk compared to the rod. From my experience with it so far its probably unnecessary to add any strengthening hardware unless you want to be able to stamp the leather dry. When its wet it has ample strength for it. I'm not willing to share the CAD files for it but if there's anything specific you have questions about id be happy to answer if I'm able. The $500 price tag common for these is the exact reason I designed one instead. As for splitters i haven't considered them due to the excessive hardware they'd require.
0
Reply
Replying to @Commando1998 :
500? I cant find one for less than 800-1000
1
Reply
Just finished printing it. It's intelligently made and SOLID! Looking forward to designing some rollers for it.
The designer has replied
0
Reply
Thanks! Send me a ping when you make some rollers would love to see them!
0
Reply
Amazing Work ! I'm in the middle of printing this, I'll report back in like 160 more hours lol
1
Reply
I've given you a boost. I'll print it soon. I'm curious about the result
The designer has replied
Show original
0
Reply
Thanks a ton! let me know how the print goes!
0
Reply

License

If you want to use this model commercially, please join my membership.
Join Now
This user content is licensed under a Standard Digital File License.

You shall not share, sub-license, sell, rent, host, transfer, or distribute in any way the digital or 3D printed versions of this object, nor any other derivative work of this object in its digital or physical format (including - but not limited to - remixes of this object, and hosting on other digital platforms). The objects may not be used without permission in any way whatsoever in which you charge money, or collect fees.