Genshin Impact Claymore Redhorn Stonethresher (Multi-part, Multi-color, 420mm version, A1 mini printable)


Print Profile(1)

Description
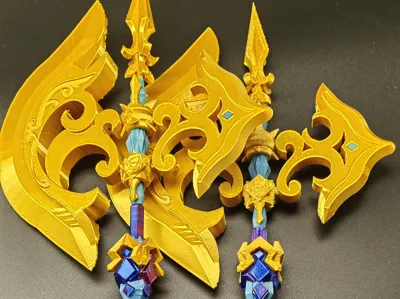
Genshin Impact 5-star weapon greatsword Verdict multi-part multi-color version。
Repeatedly modified and printed, it took a long time, please boost me!
Boost Me (for free)
Please boost me, thank you!
Please note:
1. For printing safety, please clean the build plate and apply printing adhesive。
2. Sharp corners require more supports. Please be careful when removing supports, especially for the two parts with arrow decorations; cut the supports as shown in the diagram。
 |  |  |
3. Print the blade at a forty-five-degree angle to ensure a smooth surface。
4. Before assembly, please sand all pins, and slowly insert them into the slots by rotating; rotate a few more times to ensure smooth insertion, then assemble and glue them。
5. Due to the material, the connection points are relatively fragile; please treat it as a delicate work of art, do not swing vigorously or impact it。
6. Enlarged life-size version, not yet tested, are there any friends willing to try it? Looking forward to wonderful shared prints。
Assembly steps are as follows:
| A) Pole Assembly | |
 |  |
1. Middle decorative part | 2. Finished appearance |
 |
 |
3. First glue the gem | 4. Snap it on, the position can move up and down. Secure with glue |
 |
 |
5. Snap it on, secure with glue | 6. Snap it on, glue the connecting surface. It can still wobble after gluing, but you can also fix it with glue |
 |  |
7. Decoration for the middle-lower section of the long pole | 8. The slots at the end of the patterned pole have different sizes |
 | 9. Please note that the hole facing the tip is larger, and the hole facing the middle is smaller. Secure with glue |
| B) Blade Assembly | |
 |  |
1. All blade parts | Finished appearance of the blade assembly |
 |  |
| 2. Please note the direction marks on the parts; first test the smoothness of screwing them in, then pull them out and reassemble | 3. Add two decorative pins and reassemble |
 |  |
4. Insert the spearhead | 5. Sand the pins |
 |
 |
6. Rotate the pin smoothly | 7. This is the most delicate and difficult part, please be very careful not to break the pins. Secure with glue |
| C) Assembly Completed | |
 | Please slowly insert into the slot by rotating |
For Genshin Impact series props, please click the links on this site:
- Verdict Print in Place version: https://makerworld.com/en/models/1990593-genshin-impact-greatsword-verdict-total-length-310#profileId-2157077
- Staff of Homa Print in Place versionhttps://makerworld.com/en/models/1989480-genshin-impact-polearm-staff-of-homa-a1-mini-can-p#profileId-2157068
License
You shall not share, sub-license, sell, rent, host, transfer, or distribute in any way the digital or 3D printed versions of this object, nor any other derivative work of this object in its digital or physical format (including - but not limited to - remixes of this object, and hosting on other digital platforms). The objects may not be used without permission in any way whatsoever in which you charge money, or collect fees.
Comment & Rating (0)