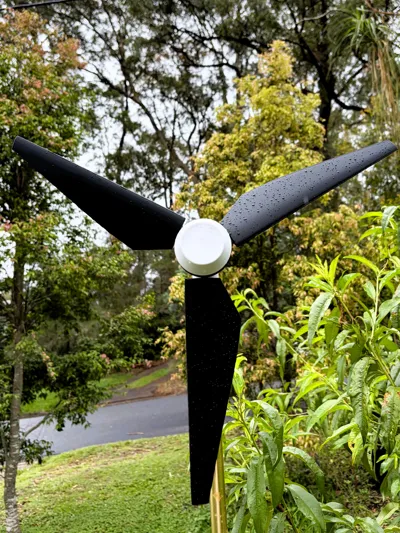
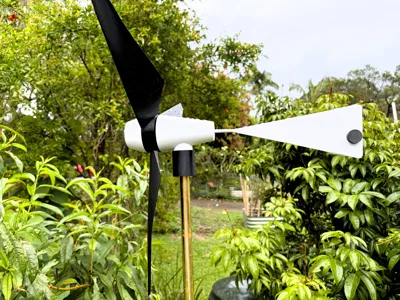
Garden wind turbine


Print Profile(5)


Description
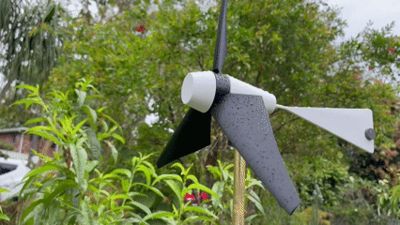
🌬️ Modular Wind Turbine – Compact, Swappable, Weather-Ready
(Note: This turbine does not generate power—designed for aesthetic appeal only)
This printable wind turbine is designed for real-world outdoor use, with modular components and interchangeable blades to suit a range of wind conditions. It’s compact, easy to mount, and optimized for smooth rotation and alignment.
🧩 Key Features
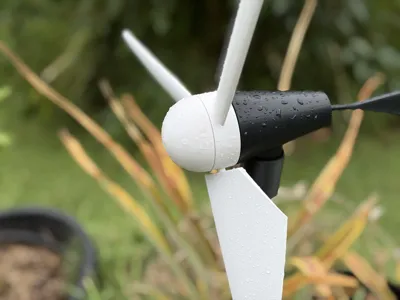
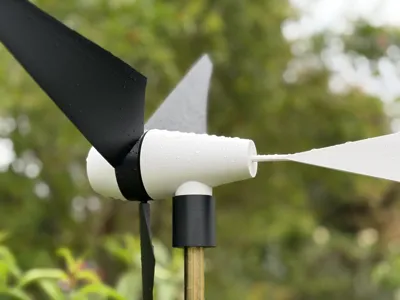
- Hub: Uses dual 608 ball bearings for stable rotation in gusty conditions. For outdoor durability, 608-2RS bearings are recommended.
- Tail and Rear Section: Self-aligns the turbine into the wind. Tail balance improves alignment—use magnets or clips to fine-tune.
- Support: Fits snugly onto a standard 16 mm post (curtain rod, aluminum tube, etc.). Includes a bearing for smooth yaw rotation and small drainage holes to prevent water buildup.
- Blades: Interchangeable designs for different wind profiles:
- S1223 Airfoil (210 mm): 80 mm root chord, 20 mm tip, 20° twist. Ideal for low wind speeds—this blade is my favorite and rotates with just a breath of wind.
- NACA 4412 (300 mm): 80 mm root chord, 30 mm tip, 15° twist. More efficient in high winds—requires diagonal printing on the Bambu P1S plate. These blades are heavier and take more wind to get going, but look amazing in moderate wind. The 300 mm blades create a massive 600 mm diameter!
🧩 Assembly Instructions
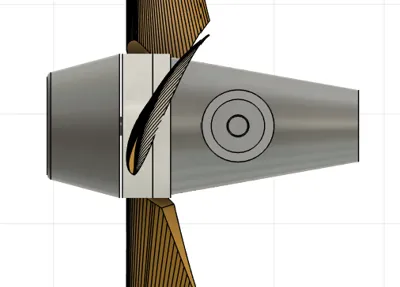
- Remove all supports, including from sockets in the hub, nose cone, and tail.
- Push bearings into the hub—this should be a snug fit.
- Insert the shaft into the hole in the nose cone.
- Push the hub onto the shaft.
- Attach the hub to the rear section.
- Add blades, aiming for a 2–5° angle from flat at the tip (refer to image for ideal orientation).
- Attach the tail.
- Mount onto 16 mm tubing.
- Use clips or magnets to help balance the tail. The goal is to match the weight of the parts forward of the support (blades, nose cone, hub). This isn’t essential but helps with self-aligning in light winds. Experiment with the balance—sometimes a little resistance prevents over-hunting in gusty conditions.
🖨️ Printing & Assembly Tips
- Recommended material: ASA for UV and weather resistance.
- ASA’s dimensional accuracy can vary due to uneven cooling—snug fits may require trimming with a hobby knife.
- Blades are thin and tall—use a 15 mm brim and set the volumetric limit to around 9 mm³/s to control speed (@0.2mm layer height). It’s slow, but worth it.
- Once you’ve selected your preferred blade set, use super glue to secure them.
- For optimal performance, orient blades with a slight angle of attack at the tip (a few degrees above flat). Due to blade twist, the root will naturally sit at a higher angle of attack (refer to image for ideal blade orientation).
- Smooth-spinning ball bearings are essential. I had to oil mine to get them rotating freely (cheap bearings from Amazon). Once assembled, a small spin should keep the blades turning for 10+ seconds. Sewing machine oil or similar works well.
📐 Turbine Design Theory
Small wind turbines operate at low Reynolds numbers and benefit from blades with high lift-to-drag ratios. Airfoils like the S1223 and NACA 4412 are well-suited for these conditions. Blade twist ensures that each section maintains an efficient angle of attack across its radius. The goal is to maximize torque at startup while maintaining efficiency at higher rotational speeds.
🎨 Aesthetic & Prototyping
I’ve printed several prototypes—feel free to ask for alternate blade designs. If you’d like to design your own, just add a 6 mm × 10 mm socket at the blade root to fit into the hub.
For visual appeal, I recommend printing blades in one color and all other components in another (2-plate model). The 1-plate version is great for an easy, all-in-one print—or print multiple plates in different colors and mix-and-match during assembly.
🧰 Equipment
- 3 × 608 ball bearings (22 mm OD, 8 mm ID, 7 mm width). These are readily available online. The “2RS” refers to dual rubber seals—608-2RS bearings are ideal for outdoor use. Other 608 bearings will work too, but may degrade over time if unsealed. That said, loads are very low—so the best bearings are the ones you already have!
- Glue (optional): Super glue works well to fix blades, secure the shaft, and attach the tail. Hot glue or other strong adhesives will also work. I haven’t needed to glue mine yet.
This has been a fun project for me, and I hope you enjoy it too.
Happy printing!
Comment & Rating (50)