Adapter for H2D and A1 Hotends for Elegoo CC


Print Profile(2)


Description
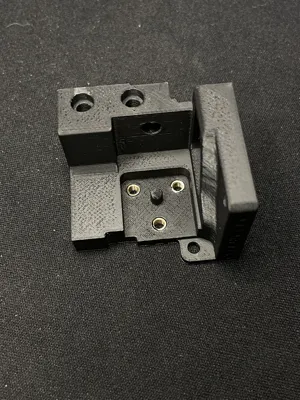
Adapter for Elegoo Centauri Carbon for Hotends from Bambulab (H2D & A1)
FINAL UPDATE — Complete Adapter Release for Using BambuLab H2/A1 Hotends on Elegoo Centauri Carbon:
Hi everyone,
This is the final update for the project. After several days of testing, gathering feedback from the community, fixing small issues, and validating prints, I’m releasing the complete and final set of files.
File Packages Now Available on MakerWorld
You now have multiple versions of the adapter available:
1. FDM Printing Version (for brass inserts)
Designed for users printing in PETG, ASA, PPA-CF, etc.
Includes holes sized for 3 mm brass inserts.
2. Resin Printing Version
Internal threads are already modeled into the part.
Perfect for high-temp engineering resins.
3. CNC / SLM Metal Version
The adapter and fan shroud are separated.
Available with modeled threads or with 2.5 mm pilot holes so you can tap threads manually.
Versions are available as, 3MF, STL and STEP files so you can edit or inspect the parts however you want.
If something is missing in the files, text me.
- CNC - ADAPTER WITH M3 THREADS.step (or the .STL for SLM) - CNC or SLM but you should indicadte to the company (like JLCPCB or PCBWAY) where are the threads. Talk to them before purchasing anything.
- 3D METAL - ADAPTER WITHOUT THREATS.step and WITH THREADS (or the .STL for SLM) - This have a post process of tapping the M3 threads manually.
And print in 3d the shroud fan:
- FAN SHROUD ALONE.stl
For 3D Print you have two option, FDM or RESIN. For filaments or resin material, read the info, but the files are:
FDM: - H2-A1 ADAPTER REDESIGN V2 FOR INSERTS.stl
You just need to use your own setting, but the adapter print itself with auto orientation and only support in the rear side.
RESIN: - ADAPTER WITH THREADS V2.stl - I didn't printed in resin yet (I don't have heat resistant resin) but it a simple part to add your support and orientation.
For the FAN SHROUD:
- FAN SHROUD ALONE.stl and step is for 3D print in plastic, you don't need to add weight to the adapter. It's like the actual hotend from Elegoo, one is build in metal (the hotend) and the other one is in plastic (fan shroud).
The plastic version is completely joined to reduce vibrations and forces with more points of support. In the case of metal, this is not necessary.
I order a metal version, when it arrive I will show the results in the post, if you want to wait.
SMALL REDESIGN:
During testing, I discovered that the screw holding the fan shroud caused a small deformation due to a ~0.4 mm offset in the stock Elegoo head plastics. Elegoo is weird designing things.
I fixed this by adding a relief cut in the adapter.
Now the deformation is isolated to that small area and does NOT affect the adapter’s functionality. I’m very sorry for the people that already print and test the Adapter. I highly recommend to reprint it or made a cut in that part if you don’t use the adapter yet.
Deformation without the fix and with the fix:
Deformation and Deformation with the fix


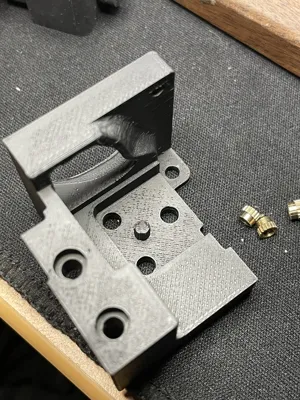
PARTS OF THE PROJECT:
- 3× M3×6 mm screws (7 mm works, but don’t go longer)
- 3× M3×3 mm brass inserts (2.5 mm is better if you find them)
- Phillips screwdriver
- Allen keys from the printer (you will need a small Allen key for the Heater Assembly screws)
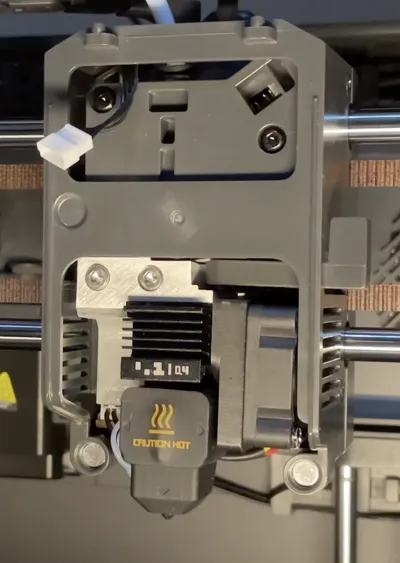
HEATER ASSEMBLY GUIDE (Check the new video for more instructions)
I’ve created a new video showing the full process :
- Disassembling the Elegoo hotend
- Transferring the ceramic heater and thermistor
- Reassembling the BambuLab Heater Assembly
- Installing it into the Centauri Carbon
- Calibrate the printer
- Running the first Benchy print
Buying the heater + thermistor separately (optional)
If you don’t want to tear down an Elegoo hotend, user u/Charon711 found a compatible Amazon option for the ceramic heater + thermistor:
(Example link; search for your local region)

https://www.amazon.com/dp/B0FNC62ZQW?
Compatible Heater Assemblies:
- BambuLab A1
- BambuLab P2S
- BambuLab H2D / H2D-S → Right-side block ONLY (left side has different hole spacing)
Charon also shared high-temperature rear support blocks (black stone and white zirconia).
The white zirconia version is BambuLab’s latest design.
Clones work perfectly fine.

Example:
https://www.amazon.com/dp/B0F8V6NMXH
MATERIALS FOR THE ADAPTER
Aluminum
Ideal for long-term reliability.
You can order CNC machining from PCBWay / JLCPCB or similar services for $30–50 in SLM or CNC.
In this case the shroud fan is separated to reduce weigh and cost. Just print in 3D the shroud and the adapter in Aluminum.
Just to have in mid, the Elegoo Hotend without the shroud fan weigh 40 gr. You can get something like this with an Aluminum and all the assembly. The printer will not suffer.
For Resin Printing:
Use high-temp engineering resins (or a good engineering resin).
Do not hollow the part; print it solid. It small, you aren’t going to waste to much resin.
The STL didn’t includes the correct orientation for resin printing. It is an easy part to print.
For FDM Printing:
- PPAHT-CF or PPA-CF
Expensive, but excellent thermal performance.
Users have reported great results.
Other notes:
- u/L1berty0rDeath1 suggested adding mica insulation sheets between the heater and adapter could work.
- Spray-on thermal barriers may work, but I don’t have enough info about this. Share your experience in the comments if you have more knowledge about this.
PETG and ASA (with CF or not) work, but rear screw heat may cause long-term deformation.
Check periodically because it’s normal.
For the best surface quality and dimensional accuracy:
- Infill: 30–40%
- Ironing ON for the top surfaces. It's important to get better dimensions.
- Print on the smooth side of the build plate if possible
- Sand the filament entry hole with a 2 mm bit
- Sand the rear support-contact surface so it’s flat and smooth
Why Aluminum or Technical Materials Matter
High temperatures from the Heater Assembly can soften consumer-grade plastics over time.
If using PETG or ASA, monitor the rear screw area for early deformation.
The STEP version is provided so anyone can adapt the design to their own material or manufacturing method.
FINAL IMPORTANT NOTES:
When everything is installed:
You MUST calibrate your printer.
Follow the steps shown in the video.
- If you only use H2D hotends, no need to re-level.
- If you switch between H2D and A1, you MUST run Automatic Leveling. Their nozzle lengths differ, calibration is essential.
The adapter works perfectly for both after many redesigns, but recalibration is mandatory when switching.
FINAL VIDEO (Full Guide)
This final video gathers every detail I could include, heater assembly, installation, calibration, setup, and testing.
Please use both the written guide and the video together for the best results.
I’ve also uploaded the video to YouTube for convenience:
CNC VERSION VIDEO - FILES SOON
For do the file in metal check "CNC" and "3D METAL" step files and the PDF in documentation
Here’s the files uploaded to MakerWorld, completely free (of course).
For those wondering why that platform, it’s so I can use the points to improve the adapter in future versions, using Bambulab’s own materials directly.
This is a project for the community.
I know someone will eventually try to profit from it, but I don’t care.
Mass production is not permitted from my design or redesign. If you make money with this, just donate a portion for charity.
The design is free, open, and meant to help everyone.
If you have feedback, suggestions, thermal protection ideas, or redesign proposals, feel free to comment or remake the adapt in MarkerWorld.
Thanks to everyone who helped test, share data, and improve this project.
Happy printing!
Comment & Rating (185)