Mini F1 Display Stand


Print Profile(1)

Description
Glad you're here, hope this model works for you!
🧱 (Toy Brick Company) Mini F1 Display Track
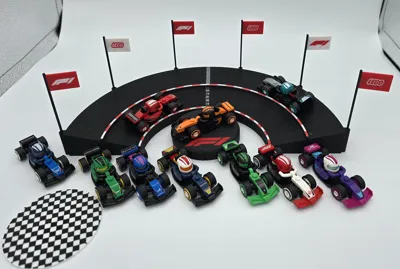
Display Stand for use with 🧱 F1 Mini cars.
This past year I’ve gotten much more into watching Formula One. My wife surprised me with a couple of these neat little 🧱 F1 cars…so I had to get all twelve. Then I had to figure out a place to put them! Here’s my simple Display Stand Track, it won’t hold all twelve (12) but you the display stand acts as sort of a centerpiece that you can just set the remaining cars around.
I got the 🧱(toy brick company) and the F1 logo svg files from Wikipedia Commons. This Display Stand model and the designer are not affiliated with 🧱 (toy brick company) or Formula One and its use in this model’s design is just meant to proudly display their designs and work, with a personal display stand for their products.
As you can hopefully tell by the pictures, it printed pretty good. The design took several iterations (specifically the flags) and so I had a number of files working toward getting it right…then I put all the different plates, with different settings into one 3mf file. I hope I made the proper adjustments to each of the objects print settings when I moved them over. PLEASE REVIEW EACH OBJECTS SETTINGS AND ADJUST ACCORDINGLY TO YOUR EXPERIENCE WITH YOUR PRINTER AND FILAMENT.

There are nine (9) plates in the file:
Plate 1:🧱 Flags (2hr)
Plate 2: Track Left (3hr 15)
Plate 3: Start Line (38m)
Plate 4: Winner’s Circle Checkered (1hr 10)
Plate 5: Track Right (3hr 21)
Plate 6: Checkered Line (11m)
Plate 7: Curbs (19m)
Plate 8: F1 Flags (2hr)
Plate 9: Winner’s Circle F1 (1hr 3)

I printed this on my P1S using E l eg oo PLA+ filament, White, Red, and Black.
Please look over the pictures thoroughly, it should be easy to understand the models assembly from them. The model goes together well with medium 20-30 second super glue. You must dry test fit all the pieces before glueing, adjust as necessary.
Have the Start Line and Checkered Line at the ready. Glue together the two sides of the track, quickly before the glue sets/cures, place the Start Line and Checkered Line into their grooves with glue. This will aid in keeping each side of the track perfectly aligned. Once fully cured, move onto the curbs.
First dry test fit the curbs. Notice in the pictures there is some spacing at the ends. Then glue one end of the curb and hold in place (I used tweezers). Once the glue is cured, align the curb and glue down carefully. Then do the other curb.
Choose whether you want to use the F1 logo Winners Circle or the Checkered Winners Circle, glue in place as necessary.


Hope you enjoy it!
Please leave a comment, feedback, suggestions, or even a boost if you're feeling generous. It does help me improve my models and really makes my day. Be kind, I’m old and still sort of new at this. Seriously, thank you for printing my models!
Before you go, if you’d take a look at my other models under my profile I’d appreciate it: GrayGav @JGray_3D
License
You shall not share, sub-license, sell, rent, host, transfer, or distribute in any way the digital or 3D printed versions of this object, nor any other derivative work of this object in its digital or physical format (including - but not limited to - remixes of this object, and hosting on other digital platforms). The objects may not be used without permission in any way whatsoever in which you charge money, or collect fees.
Comment & Rating (8)