Modified Belt Tensioner Z-Axis X1/P1


Print Profile(2)


Description

Boost Me (for free)
⚠️ Caution: I assume no liability for any consequential damages to the printer caused by the use of this file!!!
After about 1000 print hours, it also happened to me. The Z-axis belt started to squeak, especially during short up and down movements (e.g., during bed leveling).
I implemented all the advice I found online, but it was only short-lived. The squeaking kept coming back.
Another solution was needed.
In search of the cause, I came across the following.

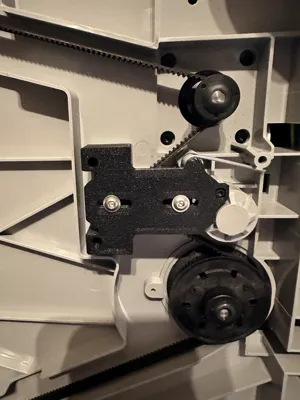
As can be seen in the picture, the idler pulley holder was slightly warped for me.
In my opinion, the design of the Z-tensioner is not optimal.
The small M3 screw & M3 nut is located on the far left of the pulley holder. However, the force of the belt acts on the opposite side. This creates a certain leverage effect on the holder, which pushes it upwards (in my case, the web on the printer base had already warped inwards, see pink frame in the picture).
Due to the resulting minimal misalignment of the pulley, the belt moves upwards and rubs against the edge of the pulley.
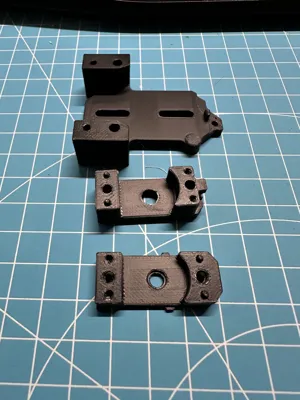
My solution is that the holder for the pulley should be fastened with two screws, each as far out as possible.
This model was created from that!
Nothing has squeaked for me since then!
Required Materials
- 2x M3 nut
- 2x M3x20 pan head screws with flange
Assembly
- Remove the original Z-tensioner according to the Bambu Wiki Replacing the Z timing belt | Bambu Lab Wiki
- insert the two M3 nuts into the lower half of the holder. the nuts fit a bit tighter so they don't fall out
insert the lower half into the printer (see picture)

insert the original pulley into the counterpart

Bring together the upper and lower parts of the pulley holder

- Insert tension spring, as with the original
- place the holder and screw it tight
Fix the belt tensioner with the M3x20 screws

- Squeak-free Printing
P.S.
The modified Z-tensioner could also fit the H2 series (if I look at the pictures in the Bambu Wiki).
Comment & Rating (25)