Digital Sundial V2

Print Profile(2)

Description
Description:
I was inspired by the Digital Sundial put together by Mojoptix.
I downloaded his design from Thingiverse and learned more about
the design by watching his podcast at the following site:
http://www.mojoptix.com/fr/2015/10/12/ep-001-cadran-solaire-numerique
The engineer in me was captivated. I had to try and 3D print it.
However, my 3D printer struggled to print this design well ...
especially the minute-tens digit. This got me thinking about
changing the design to make it more 3D printer friendly.
As I was coming up with my design, I did some additional research
and found another digital sundial design that was along the lines
of what I was thinking.
http://digitalsundial.com/
They improved the non-linearity of the grating pattern by
using the index of refraction of a piece of plexiglass
between two masks. This was a super-slick solution however this
seemed impractical for what I wanted so I just decided to live
with the inaccuracy of not having this element.
I ultimately decided to just try and generate a version of this design
that could be printed with a normal 3D, FDM printer with 0.4mm nozzle
diameter and 0.2mm layer height. Since I needed really good resolution
on the slots and on the digit mask, I decided to split the design into
two pieces where the fine resolution portions of the design would be
on the build plate or on a stable/flat surface. I also used 2 different
color filaments (one white and the other black) for the digit mask so that
I could block the light with the dark filament but pass the light through
the lighter one. Since the color transition occurs at a layer boundary,
I expect even printers that don't support multi-color prints could still
implement the design.
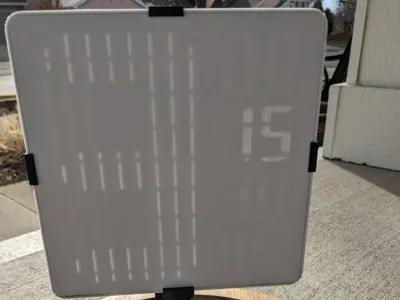
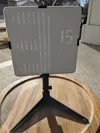
The perimeter of the Gnomon has a groove that allows clips or mounts to
attach to it. I designed some simple stands that clip to the bottom
to allow it to stand upright on a level surface that work to demonstrate
the sundial but it won't keep accurate time in this orientation. For that
you would need a stand that tilts the Gnomon towards true North and twists
to allow you to set the correct time. I designed a mount that uses GoPro
style mounts. You can either use the stand I included here or use one
of the many GoPro mounts available online.
The following code is my attempt to merge the best of both
these design ideas into an easier to print Gnomon.
I heavily leveraged Mojoptix's original OpenSCAD source file
to get started but I expect there isn't much of his original code
remaining at this point so I want to thank him for making this so easy to
understand and inspiring me to learn more about OpenSCAD, sundials,
optics, etc.
To see the Sundial in action and get a description of how it works, you can view it at the following link:
Printing
I did have to make some changes to get the best results when printing this design
on my printer:
* Nozzle Diameter: 0.4mm
* Layer Height: 0.2mm
* Wall Generator: Arachne
* Elephant Foot Compensation: Disabled (especially for GnomonSlot)
* Bottom Surface Pattern: Aligned rectilinear (especially for GnomonSlot)
* Infill: Gyroid/Honeycomb (something that doesn't cross especially for GnomonSlot)
* Number of Top/Bottom Layers: Enough to cover DisplayThickness (especially for GnomonDigit)
* Precise Z Height: On (since distance between the parts of the Gnomon halves matters)
Be careful when removing the GnomonSlot from the build plate as many of these
elements are a bit fragile.
The GnomonDigit and GnomonSlot parts are to be printed while sitting on their
outward facing sides. The stand/mount pieces can be printed in their normal
orientation shown in the "Parts". None of the pieces should need supports.
Since it is a sundial, it will be in the sun and as such needs to be printed
in a material that is stable when placed in the sun (PLA is not such a
material). I've been using PETG but there are likely some other high-temp,
non-flexible material will likely work.
Assembly
The two Gnomon halves fit together fairly easily. Just make sure the minute
slots are over the minute digits when assembling it. The stand pieces fit
together fairly well but you will need 2 M5 bolts (one at least 25mm long
and the other at least 15mm long) and 2 M5 nuts. To prevent breaking the
tabs when pressing the nuts into the holders, I usually make sure the StandArm
is in the StandBase when pressing the nut into the StandBase and the StandArm
is straddling one of the StandBase legs (since these are the same thickness)
before pressing the nut into it.
I also cap my M5 bolts with thumb friendly handles to make them easier to use
(similar to https://www.thingiverse.com/thing:5532943).
To view the assembly of the Sundial and the stand, you can go to the following link:
Special Thanks
I want to thank the following sources for inspiration and/or OpenSCAD code
that helped me put this project together:
Sundials (especially of the digital variety):
https://www.thingiverse.com/thing:1068443
https://mysundial.ca/tsp/tsp_index.html
https://www.hineslab.com/optical-projects/digital-sundial-2/
Seven-segment Display:
https://cults3d.com/en/3d-model/various/seven-segment-parametric-openscad-7-segment
GoPro Adapter:
https://www.thingiverse.com/thing:1546101
M5 Handles:
https://www.thingiverse.com/thing:5532943
Revisions
V2 - Initial release
V2.0 - Added thumb screws and reworked some of the OpenSCAD code to make it easier to read
V2.1 - Added "StandParts" as an output option
V2.2 - Updated to support the Customizer
V2.3 - Added "SkinnyDigits" as an option to make the Gnomon smaller
Comment & Rating (10)