Modular Floating Coffee/Tea/Herb Holder


Print Profile(1)

Description
Do you ever have to root around for your tea and risk an avalanche spilling out of your cupboard? Some might say you have too much tea, but we both know that can't be the problem.
I made this wall-mounted storage system so I can see my teas at a glance and grab one without digging through cabinets. It also works great for coffee, herbs, or anything that fits the canisters.
___
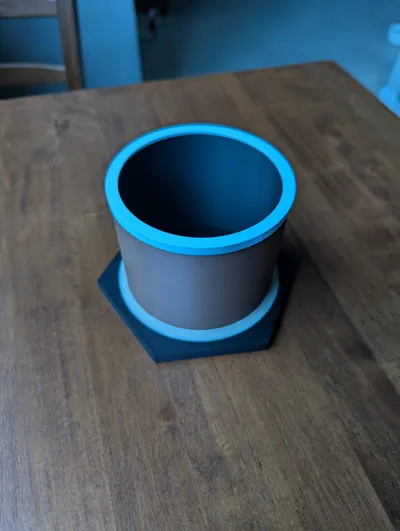
Canisters
This system is designed for these specific canisters from Amazon.
Dimensions:
- bottom lip diameter: 76mm
- body diameter: 74.5mm
- total length: 116mm
If you’d like to use a different canister size, feel free to reach out, I can try and tweak the design.
___
Printing
- No supports required
- Back plate:
- Can be printed in two colors. The inner color should be dark if you want the “floating” effect for the canister.
- Cylinder (3 parts):
- Interior cylinder (use a dark color for the “floating” effect)
- Interior shelf (use a dark color for the “floating” effect)
- Outer sleeve with notches to prevent slipping
- Optional parts:
- Transition piece (purely decorative)
- Cap (can hide seams or be color-coded)
- Clip (only needed if combining plates)
- Mounting bracket (screw holes or a platform for sticky tabs)
___
Mounting
- Attach the mounting bracket to the wall
- If combining plates, using two clips will prevent the plate from fitting properly (see photo).
- Each plate can connect to others using the included clips (two fit between plates, though one is usually enough).
- The design also works with Customizable Hex Wall Art clips, though those were a little weak and can slide a bit.
- If you’re creating branching arms, any unsupported section will need a bracket plus a bit of mounting tape.
- To strengthen joints between plates that flex under pressure, add a strip of double-sided mounting tape along the clips.
- Mount the back plates to the wall before inserting cylinders.
___
Assembly
- Slide the interior shelf onto the rail inside the interior cylinder.
- Fit the outer sleeve over the cylinder, align the notches at the bottom.
- Line up the cylinder’s rails with the slots in the back plate and twist to lock in place.
- The furthest-back inner shelf should end up at the top.
- Add the transition ring and cap if you’re using them.
___
If you print this, let me know how it goes! I’m considering adding:
- Decorative cap covers for empty cylinders
- Patterned sleeves or cutouts
- Specialty shelves (for a pu’er cake, air plants, etc.)
If any of those sound fun, comment and I’ll prioritize them.
License
You shall not share, sub-license, sell, rent, host, transfer, or distribute in any way the digital or 3D printed versions of this object, nor any other derivative work of this object in its digital or physical format (including - but not limited to - remixes of this object, and hosting on other digital platforms). The objects may not be used without permission in any way whatsoever in which you charge money, or collect fees.
Comment & Rating (0)