Desktop Notifier with ESP32 vroom


Print Profile(1)

Description
If this design is useful to you, a like helps me create more 🧡!
---
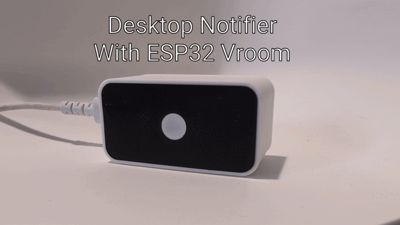
A simple and clean desktop notifier made with an ESP32 and a red LED. When you receive a notification (or trigger any webhook), the LED glows through the minimalist diffused panel.
⚠️ Important Notes Before Printing
Some parts are intentionally thin and delicate to achieve the clean, minimal design:
- The LED diffuser ring is very thin (1-2 layers) to let light pass through beautifully
- The front panel cover has thin walls for the sleek look
- The LED holder clips are designed for a snug fit
Print carefully and handle gently during assembly! These thin parts are what make the design look professional, but they require a bit of care. Slow down your print speed if needed for better quality on thin sections.
How it works
The ESP32 runs a basic webserver with a /notify endpoint. Call this URL from your phone, home automation, or any service, and the LED lights up. That's it!
What you can do with it
- Get a visual alert for phone notifications (Line, Messenger, WhatsApp...)
- Monitor your server (ping when it goes down)
- E-commerce alerts (new order = LED blinks)
- Home automation triggers
- Discord/Slack mentions
- Really, anything that can send an HTTP request!
What you need
Electronics:
- ESP32 WROOM board
- Red LED (5mm)
- 220Ω resistor
- Some jumper wires
- USB cable
Wiring :

Assembly
- Print the case (white PLA) and front panel (black PLA) or other color as you want :)
- Solder your LED + resistor + wires
- Put the LED diffuser ring into the front panel (face down)

- Add the LED holder on top

- Screw the ESP32 into the case base

- Clip the LED into the holder

- Close everything up (no screws needed for the case!)

Software Setup
- Download the code from my GitHub here : source code
- Open in Arduino IDE
- Change your WiFi name and password in the code
- Upload to the ESP32
- Check the Serial Monitor (115200 baud) to get your ESP32's IP address
Phone Setup (Android example)
I use the Automate app (free):

Notes
- The case clips together, only the ESP32 needs screws
- LED diffuses really well through the white PLA circle (1-2 layers)
- Runs great on a Raspberry Pi USB port or any 5V source
- You can customize the code for different blink patterns
Boost Me (for free)
If you like this work, and you would like to thank me, you can boost me. Thank a lot if you do
License
You shall not share, sub-license, sell, rent, host, transfer, or distribute in any way the digital or 3D printed versions of this object, nor any other derivative work of this object in its digital or physical format (including - but not limited to - remixes of this object, and hosting on other digital platforms). The objects may not be used without permission in any way whatsoever in which you charge money, or collect fees.
Comment & Rating (0)