Search models, users, collections, and posts
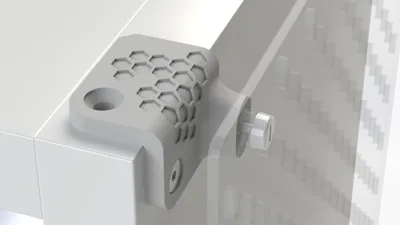
Skadis-Kallax-Adapter


Print Profile(4)

Version Honycomb 20mm (0.2mm layer, 4 walls, 10% infill)
Designer
1.4 h
1 plate

Version Glatt 20mm (0.2mm layer, 4 walls, 10% infill)
Designer
1.3 h
1 plate
Older Kallax with 25mm hole spacing
Designer
1.5 h
1 plate
0.2mm layer, 4 walls, 10% infill
1.6 h
1 plate
Open in Bambu Studio
Boost
406
2066
47
16
332
212
Released
Bill of Materials
List other parts
- M4 Mutter x 2: M4 Mutter
Description
Content has been automatically translated.
Boost Me (for free)
✨ Do you like my project? Your boost gives me the power to develop even more creative designs and share them with the community! 🚀 👉 Click BoostMe and support my work – every boost makes a difference!
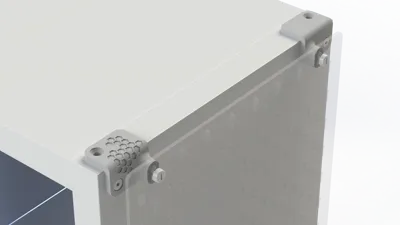
Skadis–Kallax Adapter (2 variants: smooth & Honeycomb)
Connect your IKEA Kallax shelf in no time with the IKEA Skadis pegboard system – for more order and flexible organization in your workshop, office, or hobby room
✅ Features
- Flexible mounting: Suitable for Kallax vertically or horizontally
- Precise fit & stable: Developed for a secure connection between Kallax and Skadis
- Two designs:
- Smooth – minimalistic and functional
- Honeycomb – modern honeycomb structure with a grippy surface
🎯 Advantages
- Use your Kallax as a base for Skadis boards – without drilling into the furniture
- More storage & order in just a few steps
- Choose the look that suits your setup: clean or structured
🛠️ Printing & Assembly Instructions
- Inserts: Insert 2× M4 nuts during printing. The printer pauses automatically
- Material recommendation: PLA+ or PETG for good rigidity
- Orientation: Lay flat on the back (honeycomb/smooth side up)
- Recommended settings (approximate values):
- Layer height: 0.2 mm
- Perimeter/walls: 3–4
- Infill: 20–30 % (for the honeycomb variant, the pattern already provides stabilization)
- Support structures: not required
- Fan: standard according to material
- Assembly:
- Align the Skadis board with the adapter
- Engage and tighten M4 screws into the embedded brass/steel nuts
- Position the adapter on the Kallax and screw it on or hook it in (depending on your personal solution)
Note: The automatic pause for inserting nuts requires a suitable slicer event (Z-Pause) or M600. Check if your printer/filament change workflow supports this
License
This user content is licensed under a
Creative Commons Attribution-Noncommercial-Share Alike
Comment & Rating (47)