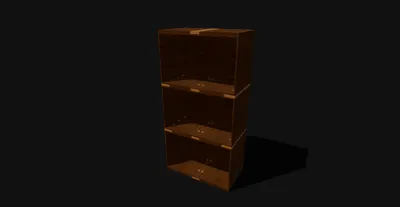
Assembled small cabinet with expandable stacking height and customizable layers


Print Profile(1)

Description
Boost Me (for free)
Original creation is not easy. If you like this model, please boost me
I happened to have a space at home that could be utilized, so I designed a set of small, stackable cabinets with expandable height. Friends who like it can use it.
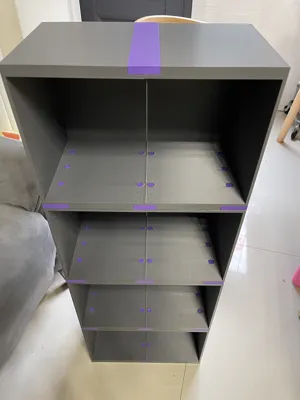
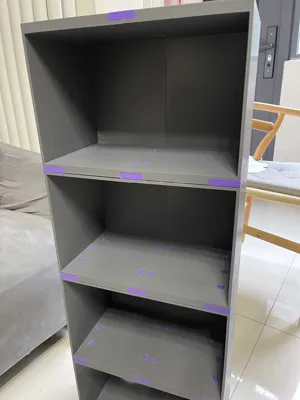
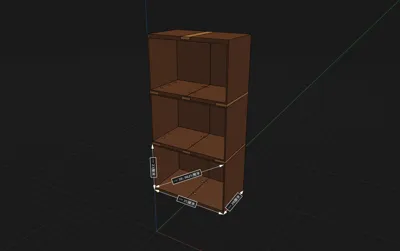
Regarding dimensions, half of this small cabinet measures 17.5 cm in width, 20 cm in depth, and 23 cm in height. When two cabinet halves are combined, a single layer will have a total width of 35 cm. Please refer to the dimensions in the design drawings I uploaded for details. Since I do not have an A1 mini, I am unsure if an A1 mini build plate can accommodate it, but all printer models except the A1 mini can print it.
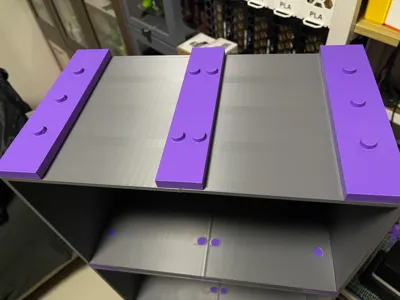
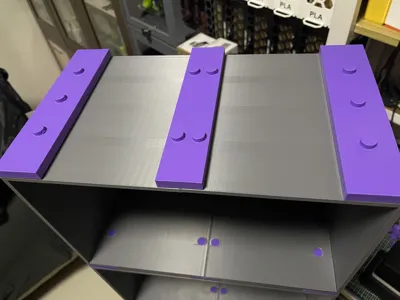
The design of this small cabinet set draws inspiration from the interlocking structure of LEGO bricks. Since current printer models do not support printing large-sized models, and smaller cabinets lose their storage function, an assembled structure was necessarily used. However, considering strength and durability, I designed connecting components and reinforcement components using a stacking and interlocking structure similar to LEGO bricks. There are a total of 5 connecting components: one for the bottom layer and one for the top layer, used to connect and reinforce the left and right cabinet halves. Expandable middle layers use a total of 6 connecting components, 3 for connecting to the lower cabinet and 3 for connecting to the upper cabinet. The middle connectors are responsible for connecting the four half-cabinets (top, bottom, left, right) and are positioned and reinforced by connectors on both sides. Simply put, if you only need a 2-layer cabinet, you will need to print 1 set of upper and lower reinforcement components (2 pieces total) from plate 7, and 1 set of connecting reinforcement components (3 pieces total) from plate 8, used to connect the upper and lower cabinet layers. If you need to extend the height, for example, to make 3, 4, or more layers, in addition to printing 2 sets of top and bottom cabinet bodies from plates 1-4, you will also need to print one set of expandable layer cabinet bodies from plates 5 and 6. Expandable layer cabinet bodies can only be used for additional layers and not for the top or bottom layers.
Considering strength and durability, PETG is recommended as the printing material. I tested printing with Bambu Lab's PETG HF and Caiduo's PETG, and encountered no issues. Other brands of filament have not been tested, and your feedback is welcome. I left just enough tolerance; after printing, you can press it into place with a little force, just like assembling LEGO bricks. However, due to differences in material brands, sinkage rates will vary. Materials with a larger sinkage rate may result in non-circular holes or excessive burrs. If this occurs, you can slightly enlarge the holes with a small file, but be careful to test the fit as you go, and do not enlarge them too much, as this could lead to a loose connection that affects strength. If you find your connections too loose, or if you require weight-bearing capacity for heavier items, you can apply a few drops of 9406 model glue to the seams of the connectors, allowing it to penetrate the gaps. Once bonded, it can be used with confidence. If you have aesthetic requirements, B7000 adhesive is recommended, as it will not leave white marks after drying.
The model's layer height is 0.2 and infill is 15%. Through my testing, it works perfectly. Of all 8 plates, only the 3 reinforcing connectors on the last plate require support. The parts on other plates do not require support and can be printed directly. Please do not randomly adjust the plate arrangement, as this may increase material consumption. For the connectors on plate 8, tree supports are enabled. It is recommended to use different materials for support, as this makes it easier to remove after printing. Since the connectors need to be installed into the cabinet holes, cleaner support removal with fewer burrs will make assembly easier. Actual testing shows that each cabinet layer (including one set of connectors and the two cabinet halves on the left and right) requires approximately 1KG of material, so it is still recommended to use more economical PETG material for production.


License
You shall not share, sub-license, sell, rent, host, transfer, or distribute in any way the digital or 3D printed versions of this object, nor any other derivative work of this object in its digital or physical format (including - but not limited to - remixes of this object, and hosting on other digital platforms). The objects may not be used without permission in any way whatsoever in which you charge money, or collect fees.
Comment & Rating (0)