Search models, users, collections, and posts

Ratjob's Grimdark Chainsword Mk.2 - Mechanized!

Print Profile(5)

All
P1S
X1E
H2S
X1 Carbon
P2S
P1P
H2D Pro
H2D
A1
X1
H2C
X2D
A2L
A1 mini

Grimdark Chainsword Mk.2
Designer
55 h
11 plates
5.0(7)

Optional Battery Monitor Panel
Designer
20 min
1 plate
5.0(1)

Updated Drive Gear for Chainsword Mk.2 - 5 sprockets
Designer
1.4 h
2 plates
5.0(1)

Ratjob's Chainsword Mk.1 to Mk.2 Upgrade parts
Designer
22.4 h
3 plates
Click to see more

Open in Bambu Studio
Boost
368
921
110
61
275
70
Released 

Description

UPDATE:  Corrected model file to have fixed the motor housings and added a NEW drive gear.  there should no longer be any binds in the mechanism.  Ad Imperator.


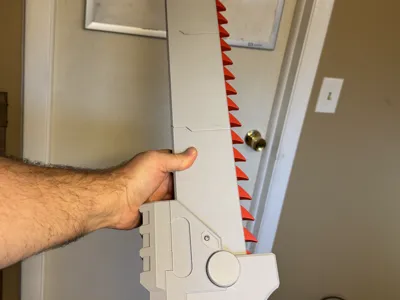
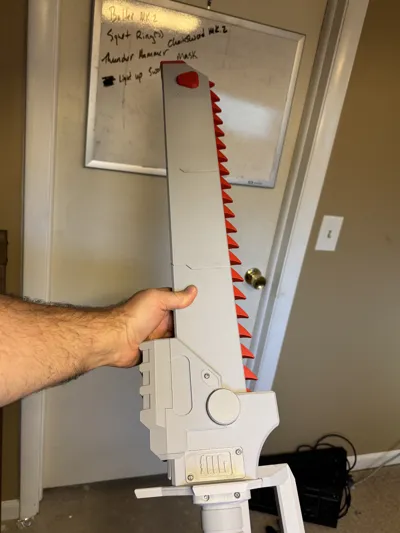
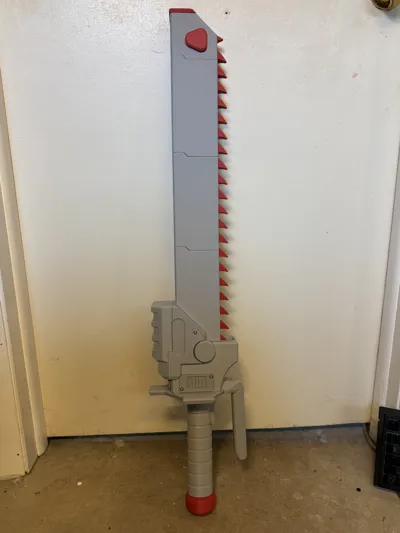
This is a Motorized version of my Chainsword.  This guide describes how to build it.  You will need a few parts that are found in many places online, details are in the guide.


This model is mostly the same as Ratjob's Chainsword Mk.1.  It is possible to upgrade your original to this model by printing the select few parts that are different, and then rebuilding your original to these specifications.


However, if you used glue to assemble your original, you will find that you have to start fresh.


The motor contained in it drives the chain with the pull of the trigger in the grip.  A power management board allows you to turn it on and off and adjust the speed of the chain.  IT also uses an 8 x 1.5 V “AA” battery pack instead of LiPO batteries because these are safer, cheaper, easier to aquire.


There are also two plates at the end of the profile for those people who have an A1mini and cannot print parts taller than 180mm. 


Happy Printing!  Please reach out if you are having difficulty building this model.  Its a ton of fun to run once its up and spinning.

Comment & Rating (110)

(0/1000)

Is this normal? The 5 teeth gear doesn’t fit correctly, the teeth don’t align on the chain, not in a straight line, not in a corner, but the round version from the MK1 does fit nicely. Am I doing something wrong?
The designer has replied
designer
1
Reply
great comment. I have found that the chain needs to be looser so it does not bind. the extra play allows all the parts to move past each other. it is designed to have what would be considered large “gaps” in the tolerances. when I originally made the 4 prong gear, it would drive the chain…but ever so often it would bind and would be very hard to jostle free. on the larger project I am working right now the new drive gear with 5 teeth has not bound up at all, and that chain has 72 teeth! if you find things are binding when you get the motor installed and running please reach out to Techpriest Support so This One can continue to help.
0
Reply
Replying to @ratjob :
Hi, first of all, awesome project! I just finished printing most parts (I started with the MK1 as I didn't notice the mechanized version already exists). I printed a lot (not all, yet) of the MK1 -> MK2 upgrade parts - mainly the motor housing parts due to being PETG I just assembled the chain/motor/blade portion and I'm experiencing massive binding in the gear chamber. I can feed in roughly 2 links before I have to manually push it free as the teeth don't seem to align with the recesses. Do I need to print the MK2 links as well? The overall dimensions of the links in MK2 seem equal to MK1, so I thought I'd get away with them
designer
1
Reply
Replying to @user_4097054510 :
thanks for your commitment to this build! my first tip is to avoid using the top tensioner. it seems to be causing binding in many people’s builds. I did not experience this in my personal build, but the proof is in the comments. also, I am currently finishing the Mk.3 Chainsword, which addresses many of the things people have run into with the chain binding up. it’s designed for easier assembly and dis-assembly. with respect to the 4 sprocket vs. 5 sprocket gear, I designed the tolerances to be a bit loose on purpose. so no, it shouldn’t be a very tight fit. in the next iteration of this build, there will be a new chain linkage that has a greater flexibility (less moving friction), and I have cleared up some tolerances that were not as well aligned as I had wanted.
0
Reply
Amazing model. Didn't use the motor (broke highschooler problems.) But looks absolutely stunning. The only thing is that the knob that goes on the right side of the body (where the vent is) is missing and I had to go and grab it from the v1. Thank you for your assistance. Can't wait to paint it when I get time.
The designer has replied
designer
1
Reply
I forgot the knob! I will try and remember this and get it added. thanks for the heads up! Rip and Tear! and fear not…you can always add those mechanical parts in as you get them over time.
0
Reply
also, nice looking Bolter on the wall in the background there. I was not trying to snoop, but I recognize it. May Thr Emperor’s Light shine upon you this day!
0
Reply
Replying to @ratjob :
lol thanks. I try to crop my photos to keep personal info “personal”. My old chainsword is what is on top of it.
designer
1
Reply
Print Profile
Grimdark Chainsword Mk.2
i printed out the mk1 and mk2. they came out great! i printed out another blade section and more chain links to make it just a bit longer so it looks close to the correct size (in my eyes). I had to dremel out the bottom slot for the chain just a little bit wider because the gear is just slightly offset. other than that, it went together perfectly, and the chain rolls smooth. the parts I had to order from the links to Amazon made it easy to get everything for the build. the mk2 is a great print (so is the mk1). had to print out a seal and chain to make it accurate. now it's time for paint!
The profile uploader has replied
profile
1
Reply
This Techpriest is Humbled! please reach out to TechpriestSupport if you are in need of assistance with the mechanization of this most holy relic. on a side note - I am glad you could tell that the blade length is “variable” and chose to make it more bigger! also, I am personally very happy how the hand guard with the skull that I made adds to this model, it’s an easy add-on. the pictures are great and I look forward to your success with the mechanization. (be sure to use the 5 sprocket gear profile and also…the top tensioner may not be required…I skipped it for my builds and things go smoothly.)
0
Reply
I can see you found the hand guard already. sorry for the shameless plug! also, you are going with the fwd&reverse power board. excellent choices. looking forward to it ripping and tearing!
0
Reply
Replying to @ratjob :
the 4 tooth sprocket works great with the slight chain guide modification i did around the gear. I'm going to build 1 more that is motorized, but the chain will have some serious speed. I'm great at modification and fabrication, but I need work on being able to do design. the prints you have made all look awesome. Halloween will be awesome this year!
(Edited)
profile
1
Reply
loved this build. turned out great add battle damage for some additional fun.
The designer has replied
designer
1
Reply
looks fantastic! love how you added another blade section to make it more to your desired size. thanks for the photo!
0
Reply
Replying to @ratjob :
thanks
0
Reply
Printed it all out well enough! couldnt get the chain to catch and pull though on its own. it seems the gear when printed was shifted about 2mm back and seemed to jam up the teeth. Regardless, it was a fun printed and I think it looks awesome!
The designer has replied
designer
1
Reply
I have released an upgraded gear with additional teeth that should solve that problem for you. it is attached as a profile to the original model. I have also found that leaving out the top tensioner gear can help if things jam. please let me know if you need any further support. the photos are fantastic. thank you!
0
Reply
there is also another hand guard that you may like, check out my models page. it has a full finger guard and skull pommel. an easy upgrade if you like the style.
0
Reply
Oh what a glorious peice of machinery. I promise to return one day and motorize it but for now this will do. Thank you so much for the files they look incredible.
The designer has replied
designer
1
Reply
it looks fantastic! I love the colors you painted it. really makes it look grim and dark. you, sir, are a skilled maker! your future is bright, may the Emperor’s Blessings find you this day.
0
Reply
Replying to @ratjob :
Thank you so much. May the Emperor guide you on your path as well.
0
Reply
Boosted
Can you create a stand for it
The designer has replied
Show original
designer
1
Reply
oooh! I typically use my wall hangers to put it on the wall. but are you thinking like a vertical stand like for umbrellas or a guitar? what exactly did you have in mind?
0
Reply
Boosted
Replying to @ratjob :
and it is also lifted horizontally it comes out well with some 40k emblems
Show original
designer
1
Reply
Replying to @Redeyes79 :
I have been asked to make another style of wall hanger that is more like a shelf or helmet holder. I will design that soon with hanging swords in mind. thanks for the ideas and request! stay tuned!
0
Reply
Boosted
got it all put together but the chain doesn't seem to want to move. do you think I might need a stranger power source for it? if so what would you suggest 🤔
The designer has replied
designer
1
Reply
heard. I have some updated files I was going to drop this weekend. fixes that exact problem. some warp gremlins got into a couple pieces and threw some tolerances off. if you email me and I will a get you them before I drop the mk.3. check your direct messages for my email
(Edited)
0
Reply
ack! I cannot direct message you until you reply to the ones Insent you previous. I just prefer not to put my email out on the comments forum.
0
Reply
Boosted
Replying to @ratjob :
ok thanks
1
Reply
What motor did you use? I'm relatively new to cosplay and electronics so and I didn't see it here. Awesome model by the way, can't wait to print it.
The designer has replied
designer
1
Reply
thanks! there should be a Google document in the model description that has a bill of materials in it with direct links to Amazon listings. but, I believe it is a “12V DC worm gear motor, 250rpm”. you need a motor that has enough torque to overcome the friction in the linkages and track to turn the blade. the trade off is speed of chain. higher torque = lower RPMs
0
Reply
Replying to @ratjob :
omg I didn't see the link. Thank you so much for your patience. This is really helpful.
0
Reply
The Emperor’s Grace is Given to All. please let me know how things go!
0
Reply
@ratjob Do you also need to buy wire for everything? i did not see it on the list
The designer has replied
designer
1
Reply
I suppose you do, although in the Chainsword there is probably less than a foot of wire in total used. I just repurposed some electrical wire I had salvaged from other things I had taken apart.
0
Reply
what gauge would you recommend?
designer
1
Reply
@ratjob is 18g wire to small?
designer
1
Reply

License

This user content is licensed under a Standard Digital File License.

You shall not share, sub-license, sell, rent, host, transfer, or distribute in any way the digital or 3D printed versions of this object, nor any other derivative work of this object in its digital or physical format (including - but not limited to - remixes of this object, and hosting on other digital platforms). The objects may not be used without permission in any way whatsoever in which you charge money, or collect fees.