Workout Playing Cards - US Forest Service Themed


Print Profile(2)
Bill of Materials

Description
Intro:
US Forest Service workout themed deck of playing cards!
I got the idea from a friend working fire there, they just had a sheet of paper.
They are the size and thickness of a normal plastic deck, and close to that of a paper deck!
They even shuffle really nicely!
How it works:
Shuffle the deck, and start drawing. Whatever you draw is what you have to do.
Once you go through all the cards, shuffle and start again!

Print Information:
Filament:
Highly recommend BLACK Matte Filament to prevent color bleed-through!
The rest is up to you!
I find the Silk looks great on the backs.
For the fronts, bright colors recommended as the black will dim them.
Machine:
0.4mm nozzle.
3-Color printing required. 3 total filament changes per plate.
Build Plate:
This is the hardest part. Also the most important!
1- When using 3D Effect plate (recommended), Still select Textured PEI Plate setting when printing.
^Why? Doing this will show up better, help with adhesion, and make life WAAAAAY LESS PAINFULL!
2- Do not use smooth plate. The cards will look terrible.
^Why? (If you want to go for it, do smooth plate setting, and wait until bed is below 35C before removing cards to reduce white creases)
3- Use Textured PEI only if you do not have a 3D effect plate.
^Why? More color bleed through, and a thicker end-product. Also not as smooth to shuffle.
4- Clean plate with Isopropyl Alcohol before EVERY print!
^Why? Adhesion is a big challenge with these cards.
5- Make sure your initial layer temperature is 60C instead of default 55C for Textured PEI Plate.
^Why? Better initial layer adhesion. File should already be set.
I have had great success with the Carbon Fiber and Diamond pattern plates. Smooth plate works, but is more tedious and not recommended. Textured plate is just also not recommended… at all.
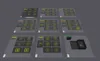
Stress Test:
Please start with the Stress-test
1- It helps you know if you have good layer adhesion. (Clean plate, black last, and initial temp 60C).
2- It lets you test out colors of filament, and whether you want the default 2 layers or set it to 1 layer.
3- If the smaller details look bad: check/dry your filament, and/or check the layer order of filament.
Finer details look better if the card base-color is printed AFTER the details.
Note - The stress test is Helldiver themed, it has smaller points and smaller “JOKER” text than what is used in the actual deck. If the test's “JOKER” text or symbol below the “3” look a little funky, it's okay.
Messing with your file:
1- If you want to do a not-black card, or a really strong color is shining through, select the card's face SVG (facing build plate) and move it (by object coordinates) down to -0.01. This will make it 1 layer thick instead of 2.
2- if you are adjusting plates, make sure to go into the plate settings and make black the last filament for layer 1. The faces of the cards will turn out much better.


https://makerworld.com/en/models/606189-dual-deck-playing-card-case#profileId-1767577
MrMoonlight designed the deck holder and allowed Share-alike.
So, If you like the Card Case - boost him! Not me.
License
You shall not share, sub-license, sell, rent, host, transfer, or distribute in any way the digital or 3D printed versions of this object, nor any other derivative work of this object in its digital or physical format (including - but not limited to - remixes of this object, and hosting on other digital platforms). The objects may not be used without permission in any way whatsoever in which you charge money, or collect fees.
Comment & Rating (0)