Search models, users, collections, and posts

KAIZEN PEGBOARD Modular System - SKÅDIS compatible

IP Report

Print Profile(10)

All
A1 mini
A1
H2C
X1
H2D
H2S
P1S
X1E
H2D Pro
P1P
X1 Carbon
P2S
X2D
A2L

Hardware - Kaizen Pegboard - 0.12mm, 3 walls, 90% infill
Designer
6.9 h
10 plates
4.7(64)

160x160 Kaizen Pegboard - 0.16mm, 2 walls, 4% infill
Designer
3.1 h
1 plate
4.9(53)

200x200 Kaizen Pegboard - 0.16mm layer, 2 walls, 4% infill
Designer
4.7 h
1 plate
4.9(35)

240x240 Kaizen Pegboard - 0.16mm layer, 2 walls, 4% infill
Designer
5.8 h
1 plate
4.8(37)
Click to see more

Open in Bambu Studio
Boost
2136
7015
561
206
2.8 k
1.5 k
Released 

Description

KAIZEN Pegboard Modular System: Your Fully 3D-Printable Organization Solution

Sick of stuff everywhere? I created the Kaizen Pegboard as a completely customizable, 3D-printable answer to expensive pegboard systems like IKEA's SKÅDIS®. It's all about giving you ultimate flexibility with that clean, minimalist look we all crave.

The name Kaizen is a Japanese term for "continuous improvement," and it's the core principle of this project. I am constantly working on refining print profiles and model construction details. The Kaizen Pegboard was created to be a better solution than existing options—a precision-engineered system that offers 100% compatibility with the extensive SKÅDIS® accessory ecosystem, providing a sturdy and infinitely customizable system with its unique accessories. With your help, feedback, and suggestions, I am dedicated to making it even better.

Key Features

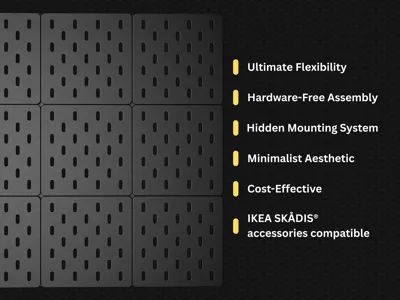
Why You'll Love This System

  • Everything's 3D-Printable
    Seriously, everything. The panels, mounting hardware, and connectors—just hit download and start printing—no hunting around hardware stores for missing pieces.
  • No Tools, No Headaches
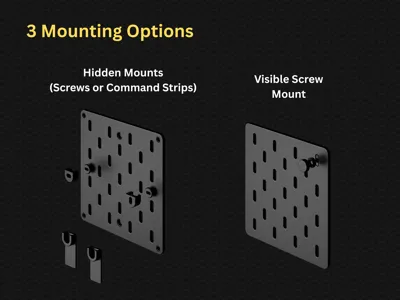
    I designed this with 3D-printed fasteners and panel connectors. 
  • Clean, Hidden Mounting
    Your pegboard floats perfectly off the wall with consistent spacing. All the mounting hardware stays hidden because nobody wants to see ugly screws ruining their clean setup.
  • Works with IKEA SKÅDIS® Stuff
    Here's the best part—you can use all those affordable IKEA SKÅDIS® accessories you already have. Hooks, shelves, containers, the whole ecosystem works perfectly.
  • Built for Your 3D Printer
    I made two sizes that fit perfectly on popular printer beds: A1 (240×240mm) for the Bambu Lab A1 printers, and A1 mini (160×160mm) for the A1 Mini printers.
  • Print What You Need, When You Need It
    Print exactly what fits your space and your needs.

    What You Get

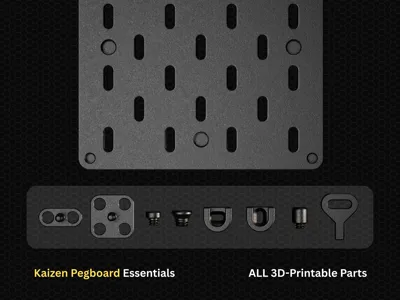
    Everything you need to build your system:


  • A1 or A1 Mini pegboard panels (240×240mm and 160×160mm)

  • Panel connectors and fasteners for joining panels
  • Wall mount brackets and mounting bolts
  • Corner spacers for the panel's corner support
  • One simple assembly tool (the only tool you'll need)


    Basic Set Configuration: The included printing profile is designed for a 3×3 panel setup (9 panels total). All the required fasteners, connectors, and mounting hardware are pre-calculated and included in the profile, so you don't need to figure out quantities yourself.

Print Times & Planning

Heads up: Building your first Kaizen Pegboard system takes some patience, but it's worth every minute!


Quality Takes Time: My priority is still quality over speed—I want to make sure you get a reliable, durable print. But I know that faster printing is important. I continually refine my printing profiles to optimize print times without compromising quality. The current settings prioritize precision and surface finish over speed because every tolerance matters for that perfect, hardware-free assembly.


Current print times:

  • 160x160 panel: 3h 1 min (66.73 g)
  • 240x240 panel: 5h 47 min (146.90 g)
  • 200x200 panel: 4h 42 min (123.36 g)
  • 80x160 panel: 1h 51 min (34.84 g)
  • 120x160 panel: 2h 24 min (50.79 g)
  • 160x200 panel: 3h 18 min (82.57 g)
  • 200x160 panel: 3h 31 min (83.02 g)
  • NEW 240x80 panel: 2h 30 min (61.20 g)
  • Mounting and assembly parts (for 3x3 panels set): 13h (53 g)

I'd love to hear from the community on this! If you experiment with faster printing settings and get good results, please share your print profiles. Let's optimize this together!

Material Recommendations

For optimal performance, I strongly recommend using different materials for different components: 

  • Panels: Print in PLA for best surface finish and dimensional accuracy 
  • All other components (connectors, fasteners, brackets, spacers): Print in PETG for superior strength and durability under stress

Why PLA is Essential for Panels: Through extensive testing, I discovered that PETG panels warp significantly during printing due to thermal stresses. PLA's minimal shrinkage and excellent bed adhesion ensure perfectly flat panels.

This material combination ensures your panels look great and maintain perfect dimensions, while the structural components can handle repeated assembly/disassembly and long-term use.

Built by a Maker, for Makers

I spent countless hours designing, testing, and refining this system because I wanted something better than what was out there. This isn't just another 3D model dump—it's a precision-engineered system that actually works.

Every tolerance has been dialed in for perfect, hardware-free assembly straight off your print bed. Minimal cleanup, maximum satisfaction.

I didn't just copy the original IKEA design—I improved it. The Kaizen Pegboard is sturdier, cleaner looking, and gives you 100% compatibility with the massive SKÅDIS® accessory ecosystem.


What's Coming Next

This is the beginning. I am actively expanding the Kaizen Pegboard ecosystem with:

  • More panel sizes for different printer beds and spaces
  • Custom accessories designed specifically for this system.
  • Features and improvements based on community feedback

CAIZEN CUBE Development Update: PUBLISHED (Nov 12, 2025)


Your feedback is crucial to making this system even better. I continuously refine the design based on the needs of real users.

------------------------------------

Help Me Make This Even Better

I'm just getting started with the Kaizen Pegboard system, and I need your help to take it to the next level!


  • Share your thoughts: What panel sizes would be perfect for your space? What accessories are you missing? Your comments and suggestions directly influence what I design next.


  • Spread the word: If this system solves a problem for you, share it with your maker friends! The more people using it, the more motivated I am to keep expanding the ecosystem.


  • Show some love: Hit that boost button, leave a comment, or just let me know how you're using your Kaizen Pegboard. Every bit of support helps me justify spending more time perfecting this system instead of doing boring day-job stuff!

------------------------------------

LAST UPDATES:

  • 80x160mm, 120x160mm, 200x200mm panels added (more sizes are coming soon)
  • Command Strip Mount added
  • Print profiles updated! Decreased filament usage and print times:

    160x160 - 79.8g, 3h13m => 66.73g, 3h1m

    240x240 - 179g, 6h49m => 146.9g, 4h42m


Thanks for being part of this journey. Together, we're building something that actually makes our maker spaces better!


Pro tip: Use my recommended printing profile for the best results!

Boost Me (for free)

Thanks for checking out my work! I'm passionate about creating practical, well-designed models for the maker community. Your support means everything and keeps me motivated to design more awesome stuff.

Comment & Rating (561)

(0/1000)

Pinned by Designer
3 by 3 Assembly
1
Reply
🔧 Desk Organizer Edition Development Update The Kaizen Pegboard journey continues! I've been working on a desk organizer version using the same proven panel system. ------------------------------ What you're seeing: Modular desktop organizer with Kaizen panels Same SKÅDIS® compatibility - all accessories work perfectly Clean look, flexible configuration for any workspace ------------------------------ Why this matters: Not everyone needs wall storage. Sometimes you need organization that moves with you or creates defined zones on your desk. This gives you all the pegboard's benefits in desktop format. ------------------------------ Development status: Still refining design for optimal stability and modularity. Two ideas I'm developing: a rotating platform base for 360° tool access, and a clamp-on version for tight desk setups where every inch counts. What do you think? Would this solve organizational challenges in your workspace?
(Edited)
The designer has replied
15
Reply
this will be an absolutely beautiful must have for my printer tool zone
0
Reply
I want this
1
Reply
In principle, really well made, thank you very much for that. However, I'm having problems printing on an X1C (with PLA), both with the 240x240 plate and with smaller ones. I've tried different colors which worked excellently in projects printed immediately before and after, so I'm ruling out the filament as a "source of error". Any ideas how I can get the print error-free?
The designer has replied
Show original
0
Reply
I think you should dry the filament. The problem is clearly related to insufficient adhesion.
0
Reply
Try to use these speed settings. This should reduce the speed when printing these holes. I would recommend printing a small part for test, not the full panel size, to save your time and filament.
(Edited)
0
Reply
Replying to @pavanji :
I had the same issue with ESUN PLA (just finished my bambu PLA). I'll try these settings tomorrow. I've been able to play with SMB hot hair and some tools to "rebuild" the holes. But reducing the speed might help
designer
1
Reply
Hello everyone! I've updated the printing profile with added Command Strips mounts. Please let me know how it works for you, and what other sizes should I make? And great thanks to everyone for boosting this project!
(Edited)
The designer has replied
4
Reply
I don't see the mounting screws/hardware for P1S profile. Is there another way I can print those?
0
Reply
Replying to @nsarver :
you can download A1 mini profile and just switch to your printer model
0
Reply
Replying to @pavanji :
it won’t let me transfer it over to my PS1 for all the mounting hardware is there something special to do?
0
Reply
Print Profile
160x160 Kaizen Pegboard - 0.16mm, 2 walls, 4% infill
Amazing print! I ran it at 124% and found that it came out cleaner than at 100%, and it cut down the time significantly.
The profile uploader has replied
profile
3
Reply
Wow amazing! Please could you share the screenshot of your print settings? I will test it and update the print profile
(Edited)
2
Reply
Grateful for the picture! very nice setup. it’s inspiring to see how people use it!
(Edited)
2
Reply
check out my Perfect Cable Organizer https://makerworld.com/models/1084935 Hope you’ll love it!
(Edited)
1
Reply
Boosted
I haven't printed this out yet as I could not get it to slice on the X1C due to it encroaching on the bed exclusion zone. However, you can into the printer settings under the Basic Information tab and remove the exclusion zone parameters of 0x0, 18x0, 18x28, 0x28 (I'd save it as a new printer profile too) and then you will be able to slice and print for the X1C. I have been using Multiboard, but not too far into it to not try this and I like the IKEA SKÅDIS system a bit better and it has better aesthetic. I'll see if I can get a few panels printed out to test with. At this point the only thing I think might be a nice addition would be a way to mount using 3M VHB or Command Strips. Both of which I have used for Multiboard and they work well. Just don't use VHB on drywall. Don't ask me how I know. :)
The designer has replied
designer
1
Reply
Thanks so much for the X1C solution! I wasn't aware of the bed exclusion zone issue, and your fix is a huge help. I'll add this tip to the project description to help other users. Your suggestion for Command Strip mounts is also valuable. It's a popular request, and I've added it to my development roadmap. Thanks again for taking the time to share your feedback!
1
Reply
Boosted
Replying to @pavanji :
The bed exclusion zone is at the front left of the build plate (facing the printer) and, as I understand it, is there to prevent the hot end from crashing into objects as that is where the tool head goes in order to actuate the filament cutter. It seems odd to me because the build plate lowers as the height of the printed object increases, so, by default, the tool head should be higher than any printed object. Unless I am badly mistaken. So, unless you are printing by object rather than the default entire bed at once, you shouldn't be crashing into anything. There are probably some exceptions to this, though I have never encountered any. The point being you should not have any issues, but I did save it as a different profile just in case.
designer
1
Reply
Boosted
Replying to @RedDirt :
Alright, hope you don't think I am spamming here, just trying to help out because I really like what you are doing here. I have a panel printing out and what I am noticing, with respect to the X1C is that you have to remove the exclusion zone on the bed or it simply will not slice and thus not print. When you do that, you have to move the panel as far back and as far to the right as you comfortably can otherwise the tool head will come around to the bottom right corner (using the image uploaded) and just brush against the spring loaded actuator that sticks out for the filament cutter. So there is some risk with the 240 x 240 panel on the X1C that may make most a little squeamish and for those new to printing it may be easily missed and eventually cause a big issue. I know with Multiboard the biggest panel I can print is 9 x 9 which is 225 mm. If one of these panels could be in that range, no user changes/modifications would be needed and still get a decently sized panel to print.
designer
1
Reply
Thanks for this! I was looking to do Skadis but I just did not like the design of other fasteners. This one seems very well designed. Hoping you can do the Command Strip solution as soon as possible as it would be nice to have a temporary solution. I will print out the boards for now.
The designer has replied
designer
4
Reply
Hi! Please could you tell me the Command Strip you are planning to use?
0
Reply
Replying to @pavanji :
Hello, I have 20 lb XL Heavy Duty Command Strips but they could be too big. What do you think? If there's a better size I can definitely change. I have printed 4 200mmx200mm Kaizen Pegboards so far and am currently printing more. Thanks for this design!
designer
1
Reply
Replying to @awesomeandrew :
I've updated the printing profile with added Command Strips mounts. Please let me know how it works for you, or if any changes are needed.
(Edited)
0
Reply
attempting to print the 240x240 on my p2s but keep getting inner wall layer failures after the first layer. tried default settings, thicker 0.8mm wall like some have, tried slowing down around inside walls, dried PLA for 12 hours overnight so not a damp filament issue.
The designer has replied
designer
1
Reply
Hi! Thanks for the image! Please try these speed settings. It will slow down the printing speed on these areas
0
Reply
Replying to @pavanji :
I tried this and it failed again. then I tried again but also decreased the Aux fan as someone else recommended and that didn't help either. my filament is ELEGOO basic PLA which has worked really well on other print jobs so not sure what the issue is here causing the initial inside wall of the slots to fail
0
Reply
Replying to @Dimensional :
trying again but this time I reset all custom setting back to default and as of layer 4 it seems to be doing fine. your settings must be hyper specific to Bambu's PLA or there is just something different about Elegoo PLA
(Edited)
0
Reply
im really confused about this! When i open the parts i only have 8 plates and no command strips
The designer has replied
0
Reply
it would be easier if i could just have the stl files. why must it be plates?
0
Reply
Replying to @user_1216274422 :
Hi! Because it's 3mf files with ready to print settings. The last plate is command strip mount
0
Reply
Replying to @user_1216274422 :
I'd like to avoid situations where users use their own settings and then leave negative comments because they couldn't print my model. I recommend using my settings to ensure a high-quality result.
0
Reply
Print Profile
Hardware - Kaizen Pegboard - 0.12mm, 3 walls, 90% infill
printed out perfectly
The profile uploader has replied
profile
3
Reply
NICE!!! Thanks for the picture! I hope you'll have a good experience using it.
0
Reply
Overall- not a bad model. However, I’ve seen multiple comments about issues when printing with PLA on a Bambu P1S (or some P2S). I had an adhesion issue with the filament in the peg holes that caused the filament to kinda string up and lose its shape during printing. It looked fine for the first couple layers, but then I came back about 30 min later and they had deformed. SOLUTION: I changed the outer wall line width from 0.5mm to 0.8mm and also lowered the aux fan down from 70% to 10%. The outer wall line width was suggested by @Majavis in the comments, and I saw somewhere that the aux fan may be cooling it too quickly before the layers above have a chance to lay on top of it. A glue stick on the plate may have helped, but I didn’t have one so I can’t speak to that solution. First pic is with the 0.5mm outer wall. Second pic is after settings changes.
2
Reply
I can confirm that on the X2D, you only need to update the outer wall weight to 0.8mm to prevent warping internally. Had a 240x240 plate where every single one warped as shown in the pics... ran a small test at 0.8mm and not a single hole warped. Thanks for sharing!
1
Reply

License

This user content is licensed under a Standard Digital File License.

You shall not share, sub-license, sell, rent, host, transfer, or distribute in any way the digital or 3D printed versions of this object, nor any other derivative work of this object in its digital or physical format (including - but not limited to - remixes of this object, and hosting on other digital platforms). The objects may not be used without permission in any way whatsoever in which you charge money, or collect fees.