WAC Fan Remote Control Magnetic Switchplate Mount


Print Profile(1)

Description
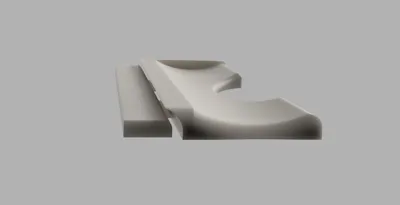
Keep ceiling fan remote control handy, no screws, nails or glue needed. This is for WAC lighting ceiling fan remote control (I think it's a RC-20WT). These have built-in magnets, so very easy to make a little outrigger for a switchplate that grabs the remote. Use controls in place or grab remote and go, then let it snap back into place. This is designed to meld into a white switchplate cover, it has a tab that tucks under the cover with a thin bridge that fits under the edge without pushing it appreciably away from the wall. Fits like a glove on these switchplates (https://www.amazon.com/Leviton-80409-W-2-Decora-Standard-Smooth/dp/B00006JPO6). Not sure how much different types vary – the key fit dimensions for these are about: 114mm tall, 7mm deep, 2.25mm wall thickness, and a 5mm radius around the edge. Let me know if variations would be useful, I should be able to publish an adjustable version with MW's fancy customization options.
There is a hole for an 8mm diameter magnet, up to 3mm thick, to press-fit into. Mine was a pretty strong neodymium, which works well. It's a common size I had lying around, not sure it's this (https://www.amazon.com/TRYMAG-Refrigerator-Neodymium-Whiteboard-Billboard/dp/B09QY94RBP/ref=sr_1_4?crid=3TOADDMIHEPQF&dib=eyJ2IjoiMSJ9.F8OIM7DVlpXSMZ45qZmwNonSITwZ98ksIRxt17X6iQ-fvcBxFU7r4-SteGl4junXKETqM9ParpKMIeVSietOYkMBrgHva2JH2zs7V27Y9FmAt12AFUvjO93bGew-F0dELcGJ29wcvoNpu7maPe1n63h099KxAJipqFdkatmST84q8s3d1EaQmtdDCvopSm11aiEFfuqUCZeZPMdR7RrbGnDxhi3jvxhoMKEFpyi9ro0.nXLmZNrc7GRDa16tzewKKUacHbnw0Ij2K1hY5986Vyc&dib_tag=se&keywords=neodymium%2Bmagnet%2B8mm%2B3mm&qid=1756232050&sprefix=neodymium%2Bmagnet%2B8mm%2B3mm%2Caps%2C99&sr=8-4&th=1) exactly, but these should do nicely. Take care to get the orientation correct before pressing it in, as it hard to get back out again if you get it wrong, in which case the holder will repel the remote, making it a less-than-ideal holder. Just let the magnet grab onto the remote, and note which side is facing the remote, before installing.
The thin bridges will flex a little to let the outrigger nestle around the curved switchplate edge. Among my many revisions I was able to get these to snap into place without any flex (which required little cut-outs in the switchplate), and I never had a bridge break from flexing, so it's certainly doable without issue, but it's worth being careful as I don't think it would take much to break these <0.5mm sections when bending.
Comment & Rating (0)