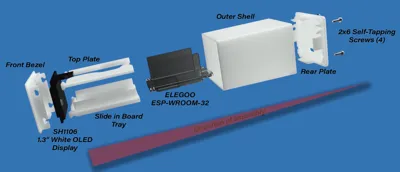
"Blinky" - the ESP32 Bezel Case with OLED Front


Print Profile(2)


Description
Boost Me (for free)
If you enjoy my creations, my humor or just like printing what I put out there - Show me your support by sending me a free boost. Your support encourages my future designs, my creativity and helps fuel my filament addition. Thank you
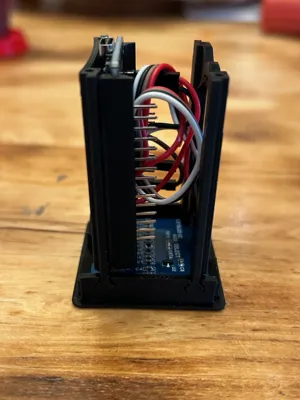
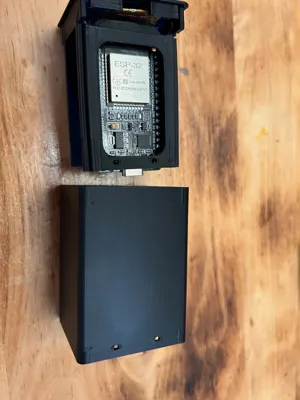
A minimalist, rounded-edge enclosure designed for the Elegoo ESP-WROOM-32 development board and a 1.3" 128×64 OLED display module. Built for clean looks, secure mounting, and easy assembly. Originally built for “Blinky” – my Eyes program, this case provides a clean, durable home for OLED-based ESP32 projects while keeping everything flush, secure, and easy to assemble.
Parts Used
- Elegoo ESP-WROOM-32 Development Board
👉 Amazon Link - 1.3" 128×64 OLED Display Module
👉 Amazon Link
Features
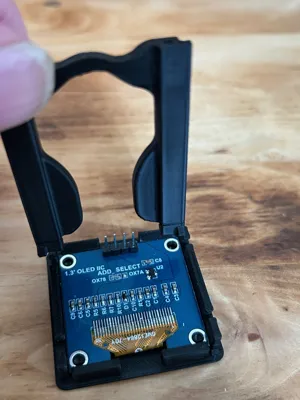
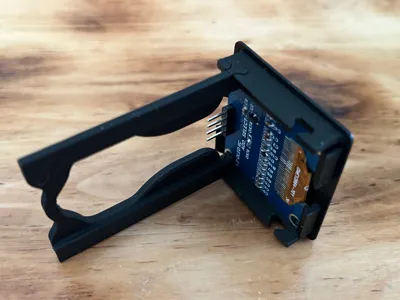
- Front Display Bezel: OLED snaps neatly into place with no glue required.
- Recess for Header Pins: Bezel top includes a cutout so soldered headers don’t interfere.
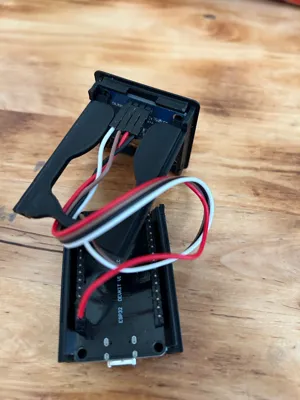
- Tray System: Internal trays align and compress the ESP32 board securely.
- Outer Shell + Rear Plate: Smooth curved enclosure with flush fitment.
- Flush Hardware: Screw heads sit even with the surface for a professional finish.
- Access Holes: Cutouts on the bottom of the case provide access to the boot and reset buttons of the ESP32.
- Compact Size: 43.15 mm (W) × 41 mm (H) × 63.6 mm (D).
Printing Recommendations
- Layer Height: 0.12 mm (for smooth bezel edges and rounded corners).
- Material: PLA (easy), PETG (durable), or ABS (heat-resistant).
- Infill: Solid infill — parts are thin enough that sparse infill is not required.
- Supports: Only minor supports for tray overhangs — they pop off cleanly using the recommended profile.
- Walls: No special wall settings needed since parts are solid.
Assembly Instructions
- Print the Case
- Print at 0.12 mm layer height.
- Upright orientation, with minor supports for tray overhangs.
- Prepare & Test the OLED
- Connect OLED to ESP32 (I²C: VCC → 3.3V, GND → GND, SCL → GPIO22, SDA → GPIO21 by default).
- Upload a test sketch to verify display function before assembly.
- Install the OLED in the Bezel
- Snap the OLED into the front bezel from the inside.
- The top recess ensures clearance for soldered header pins so the display sits flush.
- Install Trays & Slide in ESP32
- Place the board tray and top trays into the rear of the bezel cutout.
- Slide the ESP32 in from the rear — pins up, USB port facing rearward.
- Ensure it seats cleanly in the tray rails.
- Slide on Outer Shell
- Slide the outer shell over the bezel + board assembly from the rear.
- ⚠️ Important: Ensure the access holes on the bottom of the case line up with the ESP32’s boot and reset buttons — they must face the rear of the case.
- Push until edges mate flush with the bezel.
- Attach Rear Plate
- Position the rear plate.
- Secure with 2×6 mm self-tapping plastic screws.
- Snug screws evenly — just tight enough to hold firmly.
- Final Verification
- Confirm the OLED is flush and secure.
- ESP32 should be firmly seated.
- Power via rear USB and verify the display initializes.
Suggested Uses
- IoT dashboards & sensor displays
- Wi-Fi/BLE project enclosures
- Desktop or demo units
As always I encourage you to share pictures of your printed items… Additionally helpful feedback is always welcomed!
Check out my other models and feel free to like and follow me for future projects! If you have any requests I can see what else I can create for you.
🚫 Please Note:
Sharing, re-uploading, or selling my digital files without commercial licencing is strictly prohibited.
All designs are protected under digital licensing, and legal action will be taken in cases of unauthorized use.
Membership
Want to sell my work?
License
You shall not share, sub-license, sell, rent, host, transfer, or distribute in any way the digital or 3D printed versions of this object, nor any other derivative work of this object in its digital or physical format (including - but not limited to - remixes of this object, and hosting on other digital platforms). The objects may not be used without permission in any way whatsoever in which you charge money, or collect fees.
Comment & Rating (20)