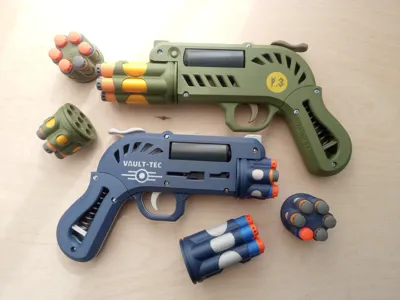
Finisher 3.1 Blaster - quick-swap drum upgrade!


Print Profile(1)
Description
Boost Me (for free)
If you appreciate my work, hit this button! Thanks ;)
Hey guys,
I didn’t plan this upgrade at first — I don’t think quick-swap drums are useful that much, especially since in the original design the chambers aren’t blocked by anything like in most revolver-style blasters, so you can reload fairly quickly without changing cylinders. Also, you’d have to carry spare cylinders somewhere…
But after some comments on Reddit under the release of the original design, I couldn’t stop thinking about it... and this is the outcome. And as it turned out, it looks pretty cool! 🙂
You can also switch drums for long and short darts without disassembling the whole blaster, if needed.
And of course, if you print it, I’d love to see it, so don’t hesitate to share your prints with me in the comments.
You can see all retlated models in this collection:
https://makerworld.com/en/collections/8400078-finisher
Changelog:
2025.08.09
- replaced incorrect part B01_Body L for correct one - sorry for any trouble it may have caused
As usual
I spent another tens of hours on this design, so if you like it — or if you're just curious about what might jump out of my head next time — you can support me here:
https://buymeacoffee.com/ssmithy
or here if you prefer crypto:
https://nowpayments.io/donation/SSmithy
If it happens that you'd like to use this design commercially, let me know in a DM. We'll see what we can do.
Changes
This model includes only the parts for the release mechanism itself and the components I modified from the original design. All other parts remain the same, and you’ll find them in the main project along with assembly instructions:
https://makerworld.com/en/models/1663472-finisher-3-0-nerf-blaster
This version differs only in the release mechanism above the drum — which unfortunately means replacing the two biggest parts, B01 and B02, and the Drum Bottom (D02).
I slightly altered the Drum Top (D01) for long darts too — I made the side holes shorter, since the original design rattled in this version. The short dart drum Top here is compatible.
I also altered the Spinner (S07), but only the diameter of the screw hole. In the original design, it was wider, and the screw could move freely through it. Now it’s tighter, and you can use a shorter screw as reinforcement. However, it seems reinforcement isn't necessary, so both versions should work fine.
Parts
Altered:
B01_Body L.stl
B02_Body_R.stl
D02_Drum bottom.stl
D01_Drum top
S07_Spinner.stl
New:
L01_Latch
L02_Spring
L03_Lever
L04_Button
Material
Spring (L02) have to be in PET-G, other parts can be PLA. This is the intended print orientation:

Assembly
1. Insert the Latch (L01) and the Spring (L02) into the slot in the Body_R (B02) part. Ideally, the spring will hold both parts in place — it shouldn’t be too loose.
Note: Don’t press the spring in immediately after printing — let it cool first.
Also 3D printed spring is quite stiff, you can replace it with metal one, if you have some.

2. Insert the Button (L04) and the Lever (L03) into the slot in the Body_L (B01) part. Insert a piece of filament into the prepared hole — it will hold the lever in place. Make sure it’s not too long, or it might collide with the piston.

Try assembling both body halves and press the button. The latch should retract into the body, and extend again when released.
3. You now need only 15 mm screw for assembly the detachable drum. You can use another screw for spinner reinforcement.

I had to make the fit between the Drum Bottom (D02) and the Spinner (S07) pretty tight, so now it’s quite dependent on printer settings and filament properties.
You could call it lazy design — but it's the price for a simpler mechanical solution with fewer parts.
If your print doesn’t fit perfectly (you can’t attach the drum, or the contrary it rattles when attached), I recommend reprinting the Drum Bottom (D02) with a slightly higher or lower flow rate.
If you hit the sweet spot, you should be able to attach the drum with just a little force, without pressing the release button. You should hear a click when it locks in place.
4. Now just follow the assembly guide from the original model here
Boost Me (for free)
If you appreciate my work, hit this button! Thanks ;)
Comment & Rating (14)