Beer Cooler - Peltier Powered mini Refrigerator


Print Profile(1)

Bill of Materials


- Peltier Module x 3: https://a.co/d/2iqpzWb
- Large switch x 1: https://a.co/d/6gdbNPO
- 40mm 12V Fan x 1: https://a.co/d/9FVATIE
- 3.7V Lithium Battery x 1: https://a.co/d/5iIxSb1
- Battery Charging Board x 1: https://a.co/d/8HIuUXA
- Thermal Paste x 1: https://a.co/d/5iIxSb1
Description
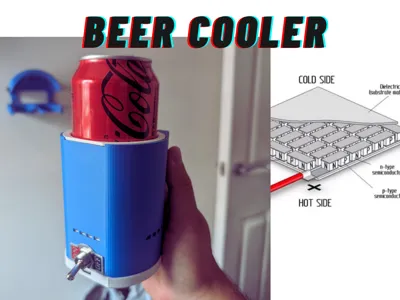
This is my prototype drinks cooler which happened to work pretty well at a music festival this summer.
What you will need:
3x Peltier modules (40x40mm) https://a.co/d/2iqpzWb
1x large switch: https://a.co/d/6gdbNPO
1x 40mm Fan: https://a.co/d/9FVATIE
1x 3.7V Lipo Battery - Largest dimensions: 69mmx45.5mmx10.5mm. This will work just fine: https://a.co/d/5iIxSb1
1x Battery charging board: https://a.co/d/8HIuUXA
1x Tube of thermal paste: https://a.co/d/5iIxSb1
You'll also need a soldering iron and ideally a multimeter.
Instructions:
- Solder your charging board first -
You'll want to solder the battery to the B+ and B- terminals.
Now for the O+ and O- terminals (your output), you'll want to solder the switch to the O-, which will connect in series with the 3 peltier modules, and in parallel with the fan. - Adjust your charging board voltage - I had mine at 8V which meant that enough voltage was running through the fan to at least have it work decently, while not being too much for the peltier modules (they only take 4.2V or so)
- Stack your 3 peltier modules into a block, and put put enough thermal paste between each module so that they make good contact but not too much that it spills out over the edge.
Assemble your cooler:
Place the peltier modules in the rectangular slot of the INNER CUP
Fix the fan to the bottom of the INNER CUP
Glue the charging board to the BASE (or use small self tapping screws)
Fix the switch to the OUTER CUP through the 10mm hole at the front.
Slide the battery into the slot in the handle of the OUTER CUP.
Glue the COASTER to the bottom of the BASE.- PUT A BEER IN THE DAMN THING AND ENJOY!
License
You shall not share, sub-license, sell, rent, host, transfer, or distribute in any way the digital or 3D printed versions of this object, nor any other derivative work of this object in its digital or physical format (including - but not limited to - remixes of this object, and hosting on other digital platforms). The objects may not be used without permission in any way whatsoever in which you charge money, or collect fees.
Comment & Rating (3)