Search models, users, collections, and posts

Spray Booth AirBrush Bucket 2.0

Print Profile(1)

All
P1S
X1 Carbon
H2D
A1
X1E
X1
P1P
H2D Pro
H2S
P2S
H2C
X2D
A2L

0.20 mm Standard @BBL X1C
Designer
18.5 h
4 plates
4.9(18)

Open in Bambu Studio
Boost
164
599
28
16
349
170
Released 

Description

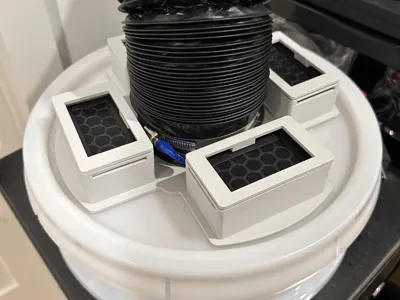
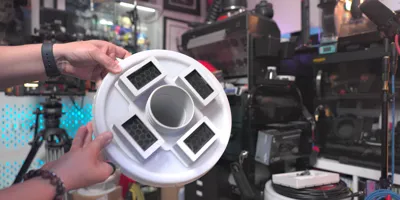
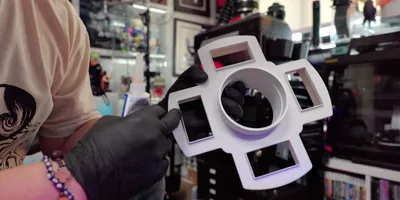
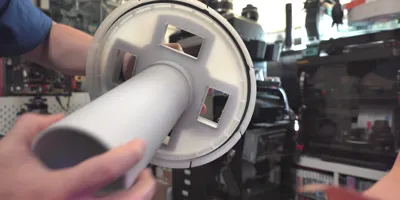
An upgraded DIY filtration system for airbrushing in small spaces, inspired by Barbatos Rex’s original design but improved for safety, easier assembly, and better performance. 

Features
Airtight seals (when sealed with silicone), screw-top intake, HEPA + carbon filter holders, and a fixed height exhaust that releases dirty air about 2 inches above the water surface for better particle capture. Designed to use easy-to-source off-the-shelf Bambu Lab P1S HEPA + carbon filters — no more jury rigging. Helps reduce fine particles and VOCs when using water-based acrylics — but always airbrush responsibly with proper ventilation and a respirator.

Explainer Video & Assembly Instructions


Filters can be purchased from:
AliExpress: https://a.aliexpress.com/_mOPeFPH
Voxel  (not tested but should work): https://tinyurl.com/2v2meuhh
 

Comment & Rating (28)

(0/1000)

Print Profile
0.20 mm Standard @BBL X1C
All you need is a good container and you're done. Thanks.
The profile uploader has replied
profile
1
Reply
TY
0
Reply
Print Profile
0.20 mm Standard @BBL X1C
Profile worked very well. Everything came out great and I'm hopeful for good results with my airbrush booth!
The profile uploader has replied
profile
2
Reply
Awesome
0
Reply
Print Profile
0.20 mm Standard @BBL X1C
System looks good but I'm not sure what the point of the template is... It sticks out and also doesn't sit flush and allow for marking on the lid that would allow the cutouts to fit the full setup. When I marked the insides using the template the lid piece wouldn't fit and I had to mess around making everything bigger anyway. An explanation on how exactly the template is supposed to be used would be helpful as right now it seems to be useless in this configuration.
The profile uploader has replied
1
Reply
The template I provided can be used as a guide for outlining where you’ll make your cuts. Since I’m using a transparent lid, I just mark on the opposite side. The template is meant to help get you started, but keep in mind that everyone will likely need to make small adjustments for their own setup. Hope you enjoy the free template—it should make the process a little easier
0
Reply
Print Profile
0.20 mm Standard @BBL X1C
Great solution to a problem that really exits.
The profile uploader has replied
profile
1
Reply
My pleasure
0
Reply
Worked well for creating my bucket. I appreciate the design and video.
The designer has replied
0
Reply
TY
0
Reply
I’m curious what ducting you used on yours. I haven’t been able to find anything that’s the right size to fit like in your pic. thanks!
The designer has replied
0
Reply
hello thank you for the very interesting file I had no printing problems
Show original
0
Reply
Some of the buckets I'm looking at online have ridges that would interfere with the printed design. Can you port a link to an afforable yet designed to fit Bucket? Also,..do you prefer a lid that screws on or one that snaps in place? It would seem that one that screws on would provide a better seal,...but at the same time be more difficult to screw on and off once the hose is in place.
0
Reply
Print Profile
0.20 mm Standard @BBL X1C
(Edited)
0
Reply
Print Profile
0.20 mm Standard @BBL X1C
0
Reply