


Print Profile(1)
Description
UPDATED VERSION V2: more adjustment possibilities for the stand + bigger drip tray + better stability (back feets)
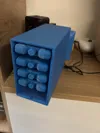
This project was born out of necessity on a hot summer day at my desk. I wanted a simple and effective way to keep a cool head without running a loud and expensive air conditioning unit. The result is this modular air cooler.
Optimal Usage & Features
This device is ideal as a personal desk fan.
- Targeted Cooling: Place it 1-2 meters (3-6 ft) away to feel the cool airflow directly.
- Cooling Duration: With a set of freshly frozen ice packs, it provides a pleasant, cool breeze for approximately 1 hour.
- Condensation Management: The stand is designed so you can tilt the entire unit forward. This cleverly directs any condensation that forms inside to run neatly into the optional drip tray, keeping your desk dry.
Important Note: Personal Cooler, Not a Room A/C
This device is designed to cool a person, not an entire room. With a calculated cooling power of about 74 Watts, it creates a localized cooling effect that feels very pleasant on the skin but cannot offset the much larger heat load of an entire room. It's the perfect desktop solution!
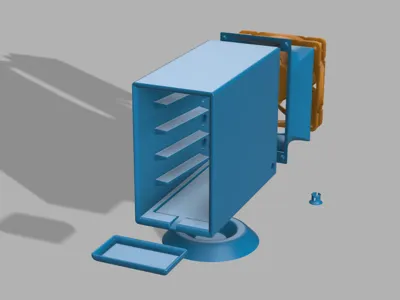
Assembly & Required Parts
The design is optimized for easy printing and a clean final look. Virtually no supports are needed; only the main housing requires minimal support for the internal shelves. Assembly requires gluing and some basic soldering.
Printed Parts:
- 1x Main Housing
- 1x Fan Adapter
- 1x Stand
- 8x Stoppers (these are small parts, print a few extra just in case!)
- 1x Drip Tray (Optional)
Required Non-Printed Parts & Tools:
- 1x 120mm PC Fan: A model with high static pressure is recommended.
- 4x Small Ice Packs (max. 80mm wide, ~140-180mm long, max. 17mm high)
- 12V Power Supply Kit: You'll need a 12V power adapter and a matching female DC barrel jack connector. The hole in the housing is 10mm in diameter for a panel-mount jack. Kits like the "Gonew21 12V 2A" on Amazon are perfect as they include both parts.
- 4x Standard Fan Screws (or suitable M4 screws)
- Super Glue or a similar plastic adhesive
- Soldering iron and solder
Assembly Steps:
- Print all the necessary parts from the file list.
- Install Power Jack: Press-fit or glue your DC barrel jack into the 10mm hole on the side of the Main Housing.
- Glue Stoppers: Glue the 8 printed stoppers inside the Main Housing. Place one at the back end of each shelf (top and bottom surfaces) to prevent the ice packs from sliding backwards into the fan.
- Glue Stand: Apply glue to the top of the Stand and firmly attach it to the bottom of the Main Housing. Let it dry completely.
- Mount Fan: Attach the 120mm fan to the Fan Adapter using four screws. Important: The fan must be oriented to blow air INTO the housing.
- Wire the Fan: Route the fan's power cable through the small cable management channel at the bottom rear of the housing. Solder the fan wires to the correct terminals of the DC barrel jack you installed earlier (usually red to positive/center, black to negative/outer).
- Attach Fan Assembly: Carefully slide the fan adapter (with the fan now wired) onto the back of the Main Housing.
- Final Touches: If you printed it, place the optional Drip Tray in the slot at the front.
- Freeze your ice packs, slide them in, plug your 12V power supply into the jack, and enjoy the cool breeze!
Comment & Rating (4)