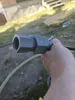
16mm PEM fitting with 3/4" G thread and TPU seal


Print Profile(2)


Description
Title:
PEM Hose Connector with TPU Seal – 16mm to 3/4" G Thread
Description:
This is a robust, watertight connector designed for 16mm PEM hose and standard 3/4" G (garden hose) threads. The model includes an integrated TPU sealing element for optimal leak protection.
Key Features:
- 💧 Watertight – Thanks to the TPU seal, the connection remains secure and leak-free.
- 🔄 No Hose Twisting – When tightening the threaded connection, the PEM hose remains stationary.
- 🧵 Standard Threading – Compatible with typical garden hose systems using 3/4" G thread.
- 🛠️ Sturdy Design – Engineered for strength and durability under repeated use.
This model is ideal for garden irrigation setups, DIY water systems, or any use case where a secure and reusable PEM connection is needed.
Assembly Instructions:
1:Insert the bottom part first, then feed the 16mm (14mm inside) PEM hose through it.
2:Push the TPU fitting in as far as possible by hand. Make sure it doesn’t twist inside the hose.
3:Use a 9mm drill bit to slowly drill into the center of the TPU part. The drill bit will grip the TPU and gradually pull it in. Soap can be used as a lubricant.
4:Carefully reverse the drill while holding the TPU part in place. Be cautious not to injure yourself – use thick gloves for safety.
5:Attach the front part of the connector and screw it in until it gently touches the TPU seal – don’t overtighten it yet (you’ll tighten it fully later).
6:Insert the TPU sealing ring into place.
7:Connect the assembly to the fitting where you want the PEM hose attached.
8:Now tighten the front part fully, so the TPU seal is pressed snugly into place. This step is done last to prevent the seal from twisting while connecting the hose.
9:Secure the connector with an M5 screw. There are also two additional holes available for smaller screws if needed.
✅ DONE!
You now have a watertight connection!
Double-check for any leaks and retighten if necessary.
⚠️ DISCLAIMER:
I take no responsibility for any water damage caused by using this 3D printed part. Proper installation is crucial for a leak-free result. Always ensure everything is correctly assembled before use.
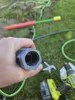
I am working on the other part that you see in the picture , 4 way spread from pump.
Documentation (19)


License
You shall not share, sub-license, sell, rent, host, transfer, or distribute in any way the digital or 3D printed versions of this object, nor any other derivative work of this object in its digital or physical format (including - but not limited to - remixes of this object, and hosting on other digital platforms). The objects may not be used without permission in any way whatsoever in which you charge money, or collect fees.
Comment & Rating (3)