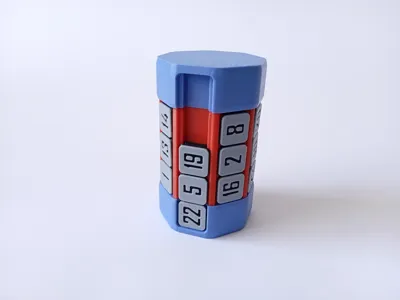
Sliding Puzzle Tower


Print Profile(8)


Description
This sliding puzzle is a further evolution of my previous sliding puzzle.
This time 24 tiles are arranged around a 8 sided cylinder. Individual tiles can only be moved left-right and the cylinder that holds the tiles can be freely rotated. Two side openings on the endcaps allow you mix or solve the puzzle. Because of the unique movement restrictions for the tiles, puzzle can be challenging to solve, especially the last 2 columns.
Puzzle can be solved in a multiple ways, here is just two examples:
you can arrange tiles like this
| 1 | 2 | 3 | 4 | 5 | 6 | 7 | 8 |
| 9 | 10 | 11 | 12 | 13 | 14 | 15 | 16 |
| 17 | 18 | 19 | 20 | 21 | 22 | 23 | 24 |
or like this
| 1 | 4 | 7 | 10 | 13 | 16 | 19 | 22 |
| 2 | 5 | 8 | 11 | 14 | 17 | 20 | 23 |
| 3 | 6 | 9 | 12 | 15 | 18 | 21 | 24 |
Update 28.10.25.
I have just uploaded print profile for a 5 layer version of the puzzle with 40 tiles.

Update 15.08.25.
I have just uploaded print profile for a 4 layer version of the puzzle with 32 tiles.
Also I have updated the main print profile with the updated shape for the tiles. New tiles should slide better, especially when the cylinder is not perfectly aligned with the endcaps.
You can see the comparison between the new tile on the bottom vs old tile at the top.

New tiles have slightly larger tolerances on the rails. Few people had issues with sticky tiles that where to hard to move, this should help with that.
Update 23.07.25.
I have just released a new version of Sliding Puzzle Tower. It is very similar to this one. Now you have 2 cylinders with 16 tiles on each cylinder.

Boost Me (for free)
If you like the model.
Printing instructions:
All parts of the puzzle are 100% 3d printed without any supports and you don't require glue or any additional tools for assembly.
I've included 3 different plates for the tiles: single color, 2 color AMS and 2 color with manual filament swap. You only have to print one of these plates. If you're printing 2 color version with manual filament swap, print will pause at 5th layer where you have to swap filament to the second color.
Assembly instructions:
Assembly is fairly simple and straightforward.
Start by inserting the inner cylinder into one of the endcaps. Pay attention to the part orientation, 3 guides are not equally spaced. There is only one way the parts will fit correctly. Press down until it snaps into place.


This second step is optional. If you want the outer cylinder with the tiles to spin freely you can skip it. If you want it to index in 8 positions you can install the springs into the 2 side openings in the inner cylinder.


Place the outer cylinder over the inner cylinder.

Place all of the tiles on the outer cylinder.

And finally complete the puzzle by placing the other endcap on the inner cylinder. As with the first step pay attention to the part orientation. Press it down until it snaps into place.


License
You shall not share, sub-license, sell, rent, host, transfer, or distribute in any way the digital or 3D printed versions of this object, nor any other derivative work of this object in its digital or physical format (including - but not limited to - remixes of this object, and hosting on other digital platforms). The objects may not be used without permission in any way whatsoever in which you charge money, or collect fees.
Comment & Rating (1826)