MDL-3 Solid State Dehumidifier for AMS


Print Profile(1)

Description
I'm lazy. Or perhaps more accurately, I'm lazy about maintenance tasks that need to be done periodically. I'll happily spend days or even weeks creating a solution to automate such repetitive tasks even if it'll be 100x as much effort building that solution than the few minutes here and there I would have spent over the rest of my lifetime doing that maintenance.
When I got my first 3D printer, a Bambu X1C with AMS unit, I knew right away that I would be lax about replacing the desiccant keeping the filament dry so when I saw Stefan's solid-state dehumidifier video, I knew what I had to do.
I wanted to learn CAD and the parametric ideas (and price) behind FreeCAD are right in-line with how I think of things. So I took Stefan's idea but otherwise started from scratch. He did mention, at the end of his video, some things he learned so I tried to correct for those; namely:
- There was very little space between the unit and the last AMS spool: I put the MDL-3 on the _outside_ of the AMS.
- With a full AMS and no use, there is little air movement: I made use of that extra space inside to add a small fan.
12V, 0.1A Brushless Blower Fan (40x40x10mm): https://www.amazon.ca/dp/B0BNZGWMBK
Powering that fan off the same supply as the MDL-3 means it runs slow (about 1/4 speed) but it's enough to move the air around inside the AMS over the timeframes we're interested in here.
This has been running for most of a year and the hydrometer inside the AMS (embedded in the extra desiccant holders I added previous to this project) typically shows 11% humidity even when it's 50+% humidity in my basement. However, I don't think the meter is very accurate at low humidity as I've almost never seen it show anything but 11%. The old Bambu firmware showed a consistent "1" for humidity and the new firmware has ranged between 7% and 9%. So... excellent over all!
Filament gives up water even without being heated if the air around it is drier so this will dry all filament in the AMS, though certainly more slowly than a heated version. This project was more about prevention. And learning. And fun.
There are 4 parts to the design:
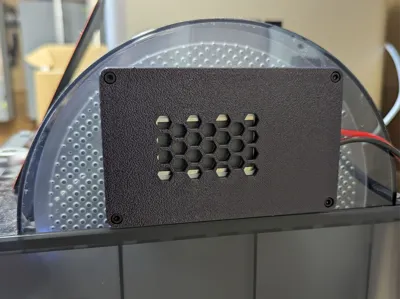
- The outside enclosure. This holds the MDL-3 unit itself with space to connect wires to the outside.
- The inside enclosure. This covers the inside with space for a blower fan to friction-fit inside it. If you don't want the fan, there's a thinner version.
- A template. This thin slice is just enough to position on the side of the AMS cover, indicate where to drill the holes, and show where to cut an opening.
- A gasket. This soft TPU part seals the MDL-3 to keep the AMS relatively air-tight.
I printed the first three in PETG because I wanted something better able to withstand impact than PLA should it get bumped while working around it. I printed it in purple PETG because I didn't look closely when ordering and thought it was black in the photo. Oops.
There are a few small supports to remove from the bolt holes and the outside wiring slot. I'm sure there are non-support ways to do this but this was my first "big" CAD project.
Putting it together:
- Do a dry-run through these steps, practicing putting everything together! Once you start to drill and cut for real, there's no "undo".
- Use some tape to position the template on the side of the AMS cover in the most central location possible. The big center hole should be towards the FRONT of the AMS.
- Drill 3.5mm holes in the corners.
- Mark the cutout area. Remove the template. With a Dremel or other cutting tool, remove that marked section of plastic.
- Align the printed pieces with the holes. If you're using the (recommended) internal blower fan, drill another small hole near the wiring of the fan but away from the MDL-3 area; the fan wires will run through this from the inside to the outside for power.
- Insert four M3 hex-nuts into the corners of the inside enclosure. Push them all the way down.
- Fit the MDL-3 into the outside enclosure and connect all the wiring. The POSITIVE (+) terminal MUST be visible, facing the AMS; this is the dehumidify side. (I don't have instructions on the best way to wire everything, unfortunately, but use wire rated to 5A.) Ensure the inside fan, if being used, turns and moves air. Sometimes it won't start turning until bumped.
- Cover the MDL-3 with the gasket and press it against the AMS. Feed four M3 "socket head" bolts (16mm if using a fan, 10mm if not) through and tighten them lightly into the nuts of the inside enclosure.
- Check that the fan still turns and the dehumidifier membrane gets warm.
- Finish tightening the bolts so everything is firm.
That's it. You never need desiccant again!
About the MDL-3 solid-state dehumidifier:
These units work using electrolysis. They break down water molecules touching the inside membrane, move the hydrogen atoms to the outside, and release them into the atmosphere where they quickly combine with free oxygen to once again become water. The little extra free oxygen on the inside is insignificant, increasing the O2 in the air from 20% to maybe 22%.
They run at low voltage (about 3V) but aren't really current-limited. If they have been powered off for a while, moisture can accumulate on the membrane and the unit will then attempt to draw significant amps when first powered on. Most power supplies have current-limiting protection but they do so by simply turning off. This means the unit cannot clear the accumulated moisture so it never gets to a working condition.
As such, the MDL-3 (and friends) should have a current-limiting power supply. I just bought a matching one with the MDL unit itself and didn't worry about it after that. Instead of cutting out, these drop the voltage to prevent over-current until the water is reduced and then resume normal operation.
I bought my MDL-3 and LS25-3.3 power supply from here:
https://micro-dehumidifier.com/products-rosahl/membranes/
They were very helpful and gave me the explanation above about how these devices operate.
If I were doing it again, I would probably go with a complete "module" solution and use a simple, but beefy, regulator attached directly to the 24V power of the AMS, like this:
https://www.reddit.com/r/BambuLab/comments/1gfyuon/another_mod_m1j1r_solid_state_dehumidifier_inside/
Finally, a big thanks to Stefan for the inspiration!
Comment & Rating (0)