Search models, users, collections, and posts

Z Axis Dust Cover 3 Sets

Print Profile(3)

All
P1S
P1P
X2D
A1
X1
H2D Pro
X1 Carbon
H2C
A1 mini
H2S
X1E
H2D
P2S
A2L

P1S (3 Sets)
P1S (3 Sets)
Designer
32 min
1 plate
4.6(223)

P2S (3 Sets)
P2S (3 Sets)
Designer
20 min
1 plate
4.6(44)

0.08mm layer, 2 walls, 100% infill, thicker
52 min
1 plate
5.0(6)

Open in Bambu Studio
Boost
702
2280
289
34
1.9 k
1.7 k
Released 

Bill of Materials

Bambu Filaments
Select all
Bright Green (10503) / Refill / 1kg

Description

Boost Me (for free)

𝗬𝗼𝘂𝗿 𝗳𝗿𝗲𝗲 𝗕𝗼𝗼𝘀𝘁 = My design supply pack 📦 Click "𝗙𝗼𝗹𝗹𝗼𝘄" to get more useful models! 👀

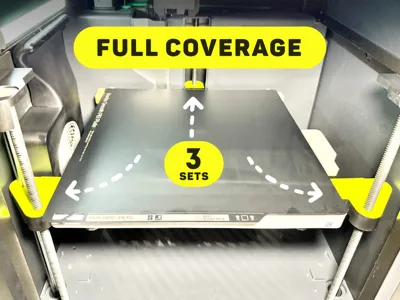
There are 3 locations on the Z axis that supports the up and down movement of the hot bed. These locations are very easy to accumulate dust or broken filaments

Not only are they easy to contaminate the bearings and affect lubrication, but if the debris falls into the gap, it is almost impossible to get it out. So I designed this very practical model that can solve your troubles at one time. Try printing it now!


 ( I am challenging to create 100 practical models. Follow me to get update reminder ) 


How to use it?  (Suitable for X1/P1)

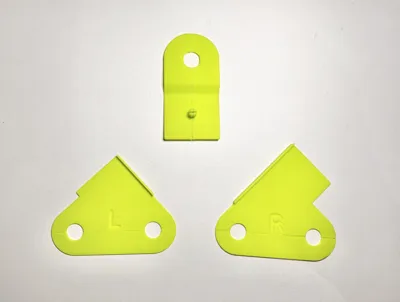
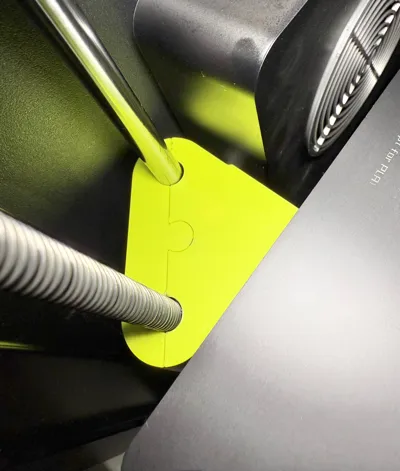
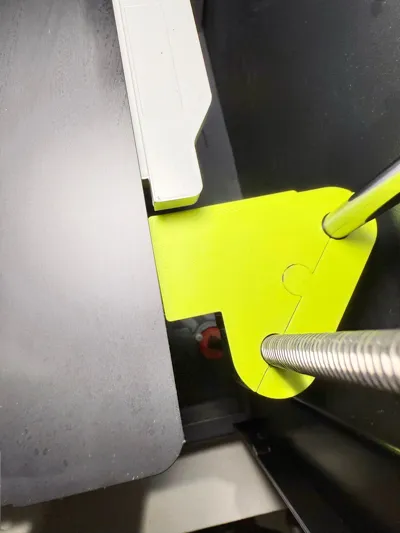
1. Install it with the letter side facing down.


2. When installing on the left and right sides, place the larger piece first.


3. The rear model connects the left and right halves through a circular hole, just press it. (Remove the printing plate before installing)


 - - - New models - - - 


Boost Me (for free)

𝗬𝗼𝘂𝗿 𝗳𝗿𝗲𝗲 𝗕𝗼𝗼𝘀𝘁 = My design supply pack 📦 Click "𝗙𝗼𝗹𝗹𝗼𝘄" to get more useful models! 👀

Comment & Rating (289)

(0/1000)

I printed in Bambu ABS via Bambu handy and got mixed results. The rear fits snugly. The right side is a little loose but works. The left side is quire loose and fell off. I might re-print with different settings to make the ABS work, or print with PLA. I was a little concerned about temperature with the plastic being close to the heated bed, but maybe it fine.
3
Reply
Print Profile
P1S (3 Sets)
The front covers went on without a fuss (I had a different type of cover on there at first, but they broke almost immediately), the rear one was a bit more of a struggle. While brims are great for tall skinny things, you need to make sure that you clean off every last vestige of it from the rear covers, or you'll never get them on. Especially if you have big man-hands like me (and that skinny gap in the back didn't make things any easier). Well done!
3
Reply
Print Profile
P1S (3 Sets)
Sieht super aus.
0
Reply
Print Profile
P2S (3 Sets)
I printed it for P2S. The left and right parts fit well, but the center part doesn’t fit very well. It’s very difficult to secure, and when the table moves up and down, it comes loose and falls off. We need to come up with something regarding the thickness or the mounting options. The idea itself is very good.
0
Reply
I think the design is too tight against the axis, it caused a failed bed leveling.
0
Reply
Print Profile
P1S (3 Sets)
Works great. Printed in Bambu PETG HF.
0
Reply
Print Profile
P1S (3 Sets)
turns out great! thanks! 🙏🏽 -esun pla+ red
(Edited)
0
Reply
front are fine, rear is not. you need to adjust the plug size as it does not fit.
0
Reply
Print Profile
P1S (3 Sets)
thank you everything is great for the P1S printer I thank the developers for these products
Show original
0
Reply
Print Profile
P1S (3 Sets)
Nice model, great profile. Fits perfect and snapped together just like a charm.
0
Reply

License

This user content is licensed under a Standard Digital File License.

You shall not share, sub-license, sell, rent, host, transfer, or distribute in any way the digital or 3D printed versions of this object, nor any other derivative work of this object in its digital or physical format (including - but not limited to - remixes of this object, and hosting on other digital platforms). The objects may not be used without permission in any way whatsoever in which you charge money, or collect fees.