Wind-up Swimming Fish


Print Profile(3)


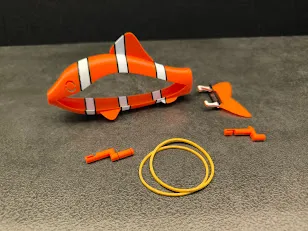
Bill of Materials

Description
Update 1 - 06.06.2025
There were some painting errors in the print profile that could cause the print to fail. I fixed it.
Update 2 - 08.06.2025
I added a new way of printing a fish tail. I cut it almost in half. After printing, you will receive two parts to glue together with super glue. This way it is easier to remove the supports and the quality of the tail is better. I tested it and the tail performance is very good.
Update 3 - 03.07.2025
I tested Basic Rubber Bands from Maker's Supply . I printed fresh fish and use 3 pieces 1.4x60 mm. Mechanism worked very well.
Overview
Wind-up swimming fish - a great companion for bathing in the bathtub and pool.

This project was a bit of a challenge.
I had to turn the rotation into a flapping tail fin.
At first, I designed this mechanism with a bendable wire and after a few attempts it even worked.

However, bending the wires was too difficult and time-consuming. I had to try with filament and surprisingly after a few more attempts the mechanism started working perfectly. And the filament withstood the load.
The next problem was the tail fin.
At first I designed it quite thick and unfortunately it didn't work. The fish swam backwards :) I tested different shapes and thicknesses. Ultimately, the solution turned out to be a 0.4 mm thick fin made of two 0.2 mm layers. Only such thickness provided the necessary flexibility and efficiency. Interestingly, a fin the size of a real fish provides the best propulsion. Bigger and smaller fins had worse performance. In the end, the fish worked as I imagined.
I love moments like this when the project works properly :)
Here most of my testing prints

Instructions.
The fish is printed vertically, starting from the head. For better stability, I added a brim. You can play with colors and print the fish in colorful stripes. There is a float in the dorsal part of the fish that provides buoyancy to the fish.
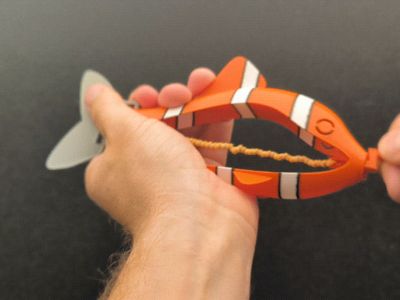
The fin is the most difficult part to print. It has a complicated and delicate shape and at the same time has to be printed on supports. The biggest problem is removing the supports. I recommend gently prying it with a knife as in the picture.

I also added a second way of printing a fish tail. I cut it almost in half. After printing, you will receive two parts to glue together with super glue. This way it is easier to remove the supports and the quality of the tail is better. I tested it and the tail performance is very good.

After printing, assemble the elements as in the picture. First insert the tail with the longer pin from the top and at the same time the rear connecting rod has to be in the middle of the tail.

Use two rubber bands for the drive. To insert them, you need a little dexterity. It is best to help yourself with small pliers.

Two rubber bands should easily allow you to wind 50 times. This allows you to swim to both sides of the bathtub :) About 3 meters.
I used rubber band with about 55 mm initial diameter and 1,5 mm thick. But after a few windings their diameter increases to 80 mm. And only when they stretch, does the mechanism start to work properly. If they are too short, they press the elements too much and the drive has too much resistance.

Update: (I also tested Basic Rubber Bands from Maker's Supply . I printed fresh fish and use 3 pieces 1.4x60 mm. Mechanism worked very well.)
At the beginning, the mechanism works quite hard and may jam. You need to wind up the fish several times and release it under water. The rubber bands must loosen slightly and the mechanism elements must adjust.

However, do the above operation in water or not too hard, otherwise the tail may fall off :)

If the model is still difficult to operate, try adding a small drop of e.g. silicone oil to the back. This helps a lot.
Have fun :)
Media:
License
You shall not share, sub-license, sell, rent, host, transfer, or distribute in any way the digital or 3D printed versions of this object, nor any other derivative work of this object in its digital or physical format (including - but not limited to - remixes of this object, and hosting on other digital platforms). The objects may not be used without permission in any way whatsoever in which you charge money, or collect fees.
Comment & Rating (202)