Search models, users, collections, and posts
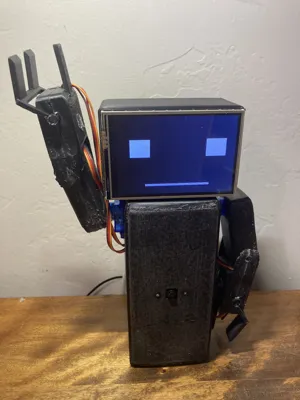
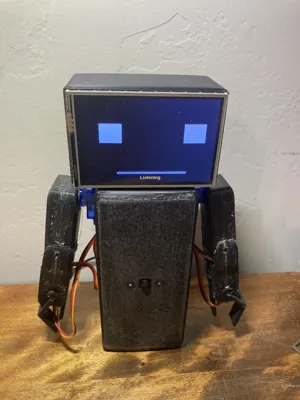
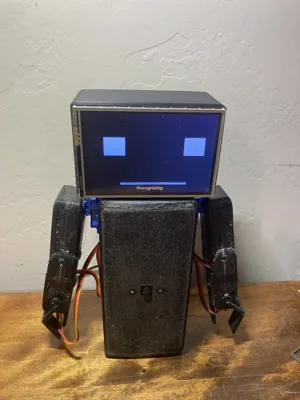
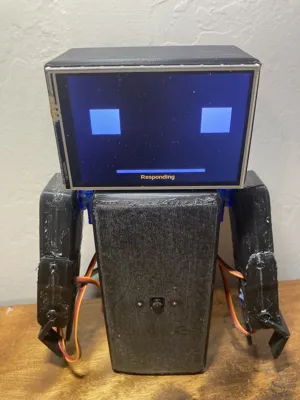
Robert the Raspberry Pi robot.
IP Report


Print Profile(0)
Add the first print profile to earn points
Boost
35
51
4
3
19
1
Released
Bill of Materials
List other parts
- Raspberry Pi 4 x 1:
- Raspberry Pi Power supply x 1:
- Raspberry Pi camera x 1:
- Speaker x 1: I used a external Bluetooth speaker but anything other than a HAT will work
- 3.5 in GPIO display x 1: I will post a link soon
- USB microphone x 1:
- SG90 servos and some of the hardware for them x 1: Not currently utilized by the code but two of them hold on the arms so you at least need those
- Jumper wires x 1: All kinds. I don't know how many
- Power supply for servos x 1:
- Servo driver board (Optional) x 1: The method currently used to drive the servos is not very good. This would fix that problem and make the servo movement much better. It would require modification to the code though
- Electrical tape x 1:
- Hot glue gun and glue x 1: Other glue will work too
Description
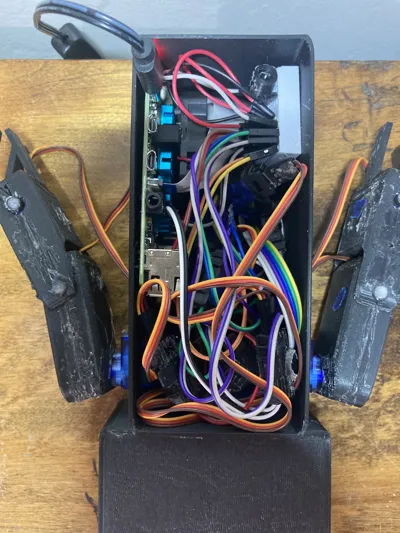
This is my 3D printed, Raspberry Pi AI robot assistant named Robert. It is very cheap and easy to make. This is definitely a work in progress. The model is finished, but I am still working on the code. Make sure to watch here or my github account (asherevan) for the code. If you have any suggestions, please let me know! I would be glad to make any changes you would like to the code or the model. If you like this project, please give it a like and a download!
Parts list:
- 1x Raspberry Pi 4
- 1x Raspberry Pi power supply
- 1x Raspberry Pi camera
- 1x Speaker (I used a external Bluetooth speaker but anything other than a HAT will work)
- 1x Raspberry Pi 3.5 inch GPIO display (will post link soon)
- 1x USB microphone
- 6x 9g servos and hardware (not currently utilized by the code but two of them hold on the arms so you at least need those)
- Jumper wires (All kinds)
- 1x Servo power supply
- (Optional) Servo driver board (The method currently used to drive the servos is not very good. This would fix that problem and make the servo movement much better. It would require modification to the code though)
- Electrical tape
- Hot glue gun and glue
Assembly:
- Print all of the parts
- Sand or file as needed. The tolerances aren’t great, so it might take a lot especially where the servos go.
- Insert RPI Cam and secure with electrical tape
- Assemble arms and insert servo cables through holes in the side
- Cover the bottom of the Raspberry Pi with electrical tape to insulate it
- Connect USB microphone to Raspberry Pi
- Insert screen into the head
- Wire servos and screen to Raspberry Pi and also the servos to the power source using the jumper wires
- Put everything inside the body. Make sure to attach the servo power source (And possibly the Raspberry Pi) to the side because you will be plugging and unplugging them
- Cut holes in the back plate for the cords. I didn't put the holes in the model because they will depend on the cords and servo power source you are using.
Boost Me (for free)
If you like this model, please boost me so I can make more great models like this!
Documentation (1)
Bill of Materials (1)
robert_schematic.pdf
License
This user content is licensed under a
Creative Commons Attribution-Noncommercial-Share Alike
Comment & Rating (4)