Weinmann Accuvac front panel 10623 10723


Print Profile(1)

Description
💥Все наши контакты на одной странице: https://hipolink.me/prosmp
Канал на YouTube: https://www.youtube.com/@prosmp
Канал "Про СМП" в Rutube: https://rutube.ru/channel/23667661/
Наш канал в Telegram: https://t.me/prosmp
Группа Вконтакте: https://vk.com/pro_smp
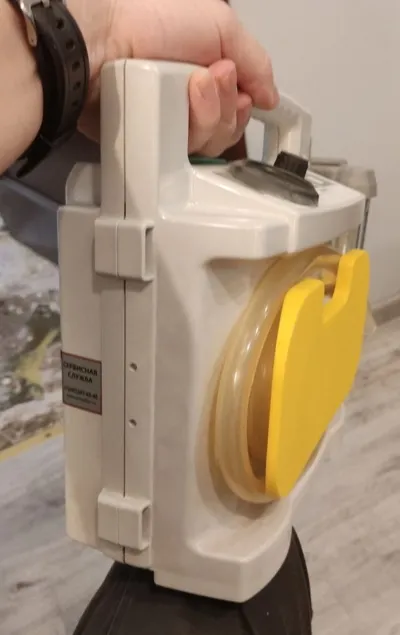
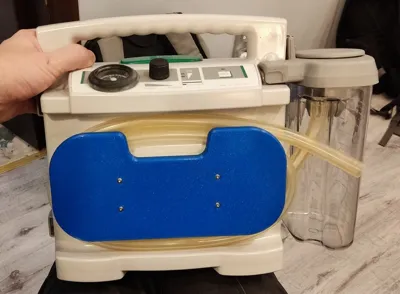
Передняя панель аспиратора Weinmann Accuvac (номер запчасти 10723 и 10623). Сделана в двух вариантах. Первая модель (accuvac_with_clip.STL) сделана с защёлками, как и оригинальная деталь. Из-за направления слоёв при печати, защёлки быстро отламываются. Кроме того, нужно после печати обработать нависающие части защёлок ножом, иначе они не влезают в посадочные прорези. Вторая модель (accuvac_bolts.STL) сборная, крепится при помощи четырёх болтов М2*20. Нужно распечатать четыре закладные (bolt_clip.STL), установить в них гайки М2, свободно прикрутить к панели винтами (на пару витков резьбы), установить на аспиратор и потом затянуть винты. Под головку винта желательно подложить шайбу (внешний диаметр до 6 мм).
Скругления на обеих моделях сделаны с бОльшим чем у оригинала радиусом, чтобы деталь поместилась на стол принтера. Влезает в печатную область 220*220, если разместить по диагонали стола. Несмотря на большие радиусы скруглений, свою функцию по удержанию смотанной трубки панель выполняет хорошо.
Файлы "accuvac bolts long.STL" и “accuvac_with_clip_long.STL” полностью повторяют размеры передней поверхности крышки аспиратора. Для их печати нужен принтер со столом минимум 242 мм (деталь помещается на стол, если разместить диагонально под 45 градусов).
Weinmann Accuvac aspirator front panel (part number 10723 and 10623). Made in two versions. The first model (accuvac_with_clip.STL) is made with clips, just like the original part. Due to the direction of the layers, the latches break off quickly. In addition you need to process the overhanging parts of the latches with a knife after printing, otherwise they will not fit into the mounting slots. The second model (accuvac_bolts.STL) is prefabricated, fastened with four M2*20 bolts. You need to print four mortgages (bolt_clip.STL), install M2 nuts in them, loosely screw them to the panel with screws (just a couple of threads), install them on the aspirator and then tighten the screws. It is advisable to place a washer (outer diameter up to 6 mm) under the screw head.
The roundings on both models are made with a larger radius than the original so that the part fits on the hotbed. Fits into a printing area of 220*220 if placed diagonally. Despite the large radii of the roundings, the panel performs its function of holding the tube well.
Files "accuvac bolts long.STL" and “accuvac_with_clip_long.STL” completely match the dimensions of the front surface of the aspirator cover. To print them, you need a printer with a hotbed of at least 242 mm (the part will fit on the hotbed if placed diagonally at 45 degrees).

💥 You can leave a donation here: https://boosty.to/prosmp/donate
💥All our contacts on one page: https://hipolink.me/prosmp
YouTube Channel: https://www.youtube.com/@prosmp
Our Telegram channel: https://t.me/prosmp
VK Group: https://vk.com/pro_smp
License
You shall not share, sub-license, sell, rent, host, transfer, or distribute in any way the digital or 3D printed versions of this object, nor any other derivative work of this object in its digital or physical format (including - but not limited to - remixes of this object, and hosting on other digital platforms). The objects may not be used without permission in any way whatsoever in which you charge money, or collect fees.
Comment & Rating (0)