Image to Polygon Fidget Maker


Print Profile(1)

Description
Welcome to the Image to Image to Polygon Fidget customisable fidget generator.
This model uses the Maker World Parametric Model Maker - OpenScad environment.
What you can do…
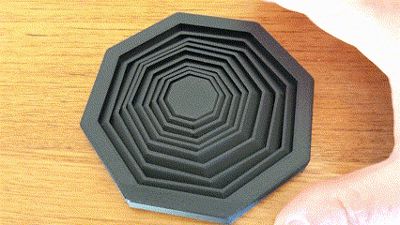
- Create a ring fidget of your own design - shape, size, thickness, number of rings etc
- Add your own text to the fidget if desired
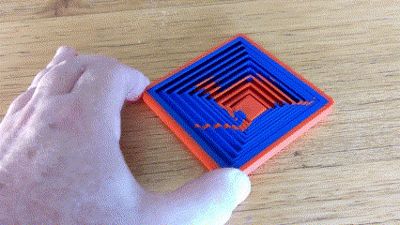
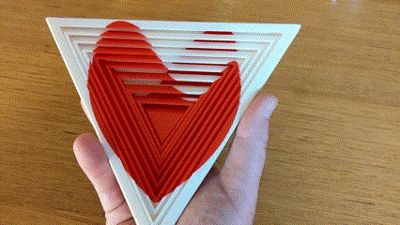
- Additionally add images with multiple colours to the fidget - both sides!
Easy to use!
See other fidget generators here…
https://makerworld.com/en/models/1071875-image-to-gyro-fidget-spinner
https://makerworld.com/en/models/678390-gyro-fidget-maker
Instructions for use:
To start:
Select the “Customize” button on the page (not supported on Bambu Handy App yet)
Basic Fidget
- Enter the number of rings you want
- Select the shape (triangle, square, pentagon, hexagon, heptagon ,octagon)
- Select the “looseness” - changes the amount of movement between rings
- Select the colour you desire
⚠️ Remember to hit “Generate” after each step to update the model
Text
- Text is added to each side of the fidget.
- Text will wrap to fill all sides
- If you want a side to be blank then enter a blank (space)
- You can select the font in the userFont selector
- Select the colour for the text
⚠️ Remember to hit “Generate” after each step to update the model
Logo (Image)
I recommend using Inkscape for creating and editing svgs - an awesome piece of software!
- Logo Select the logo arrangement -
- “duplicate” ( top logo placed top and bottom),
- “through” (top logo is pushed through to the bottom )
- “dual” (top and bottom logos are different)
- Mode - choose the editing mode
- Make Fidget - makes the final fidget
- Position Top Logo - allows positioning and scaling of top logo (not for printing)
- Position Bottom Logo - allows positioning and scaling of bottom logo (not for printing)
Logo Details
⚠️ Top logo is used for “duplicate” and “through” modes
- Upload your SVG file ⚠️ Layer Names need to match - see later section
- Enter the X and Y values of the centre of the logo
- Adjust the Logo Scale so that it is rendered in red fidget outline
- You can then use the logo offset controls to nudge the logo into place if required
- Adjust the logo orientation as required.
⚠️ Remember to hit “Generate” after each step to update the model
Layer Names and Colours
- Enter the Layer Name for each layer in the SVG file
- Enter the desired colour for each layer. ⚠️Set to “Not Used” if the layer is not used
Generate Fidget
- Go to the “Logo” section and select “Make Fidget”.
- Select the “Download” button below the rendered fidget and download the 3MF
- Open 3MF in Bambu Studio and print!
Notes:
Image Layers and Colours
The generator uses the Openscad SVG import functionality to import the SVG image. Each colour in the image needs to be a separate Layer in the SVG file. Make sure you use the Layer element not the Group element!

While most SVG file features are supported, I have found the following method to be most reliable.
- Use filled path elements for each layer. If your SVG has stroke elements , convert these to path elements using inkscape.
- I find combining all the path elements into a single path elements on each layer works the best (inkscape path/combine)
- Layers are drawn in the Fidget Maker from top to bottom in the list in the UI ("first layer" is drawn first, other layers on top of this). ⚠️This is the reverse order that they appear in inkscape.
- Use pixels (px) for the scale in inkscape - 1 pixel will be 1 mm in the Fidget Maker
If you do not have an SVG for your image then there are a lot of converters that can be used. I find picsvg works well. You can also use Inkscape to convert the image.
Note If your svg has only one colour then you do not need to put it in a Layer!
Advanced
For the adventurous, there are some advanced settings you can try:
- Inner dia - changes the size of the inner ring of the fidget. Dont make this too small or you may get plate adhesion issues.
- Ring thickness - the changes the thickness (width) of the individual rings
- Height - the height of the fidget. Larger values will produce a fidget with more axial movement.
Debug
For the very adventurous, there are some debug settings:
- debug section - creates a section view of the fidget (not for printing)
- resolution - changes the resolution of the graphics
- delta - used for ensuring image layers are separated correctly
- wrapper thickness - thickness of the rounded wrapper around the fidget
- l,n,t R - values for the radial looseness factors
- l,n,t A - values for the axial looseness factors
Note:
Radial looseness is the fraction of rotation allowed from none to free for each ring
Axial looseness is the fraction of overlap for each ring in the axial direction.
If you like my designs please
Boost Me (for free)
or even better Buy Me A Coffee
Comment & Rating (9)