Racks4All - Tagging System


Print Profile(1)

Bill of Materials

Description
Boost Me (for free)
I usually don’t ask for this, but I’ve noticed that many creators actively encourage it on other platforms—and it makes sense, as it helps increase visibility. So, if you can follow me, it would make difference. It’s a great way to support my work and show appreciation. For more insight subscribe my blog at: https://designrepcom.com/ This design is freely available for the community, but if you enjoy my work and would like to show your support, you can boost this project. Thanks!
What is this?
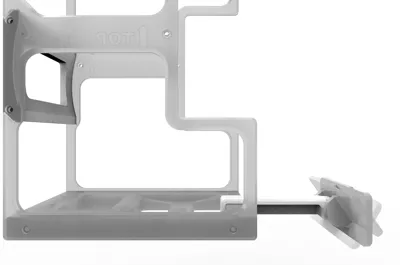
This is a modular tagging and tracking system designed for the Rack4All filament storage solution. It allows you to organize, identify, and manage your filament spools efficiently, whether you have a handful or a large collection. The system supports both visual and digital cataloguing, making it easy to know exactly what you have, where it is, and how much is left.

Key Features & Compatibility
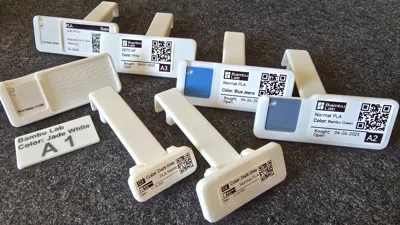
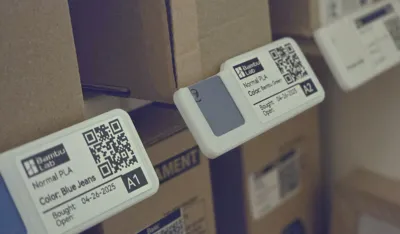
- Tagging system: Each rack module can be fitted with a tag that displays key information—QR code, coordinates (row/column), color code, and more.
- Pivoting tag: The tag pivots for clear visibility from any angle, whether the module is placed high or low.
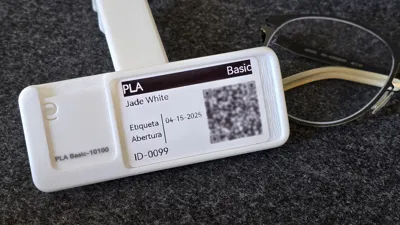
- Filament swatch area: Space for a small sample of the filament (e.g., 24x24x2mm), so you can see the actual color and finish.
- Customizable info area: Add details such as manufacturer, date opened, date purchased, material type, material variant (matte, spark, glow, carbon, glass fiber, etc.), or any other relevant information.
- Multiple tag formats: Several tag designs are available, including options for 3D printed labels, paper labels, and Dymo-style labels in various sizes.
- Rack compatibility: The bottom of the rack module has been updated to accommodate the tag. Two versions of the rod are available—one for the previous design and one for the updated version. If you plan to use the tagging system, print the new base.

1 — Tag with color Swatch and pocket for a label that can be 3d printed;
2 — Tag with color Swatch and embedded label that can be 3d printed or just an island to add a paper label of around 40x50mm;
3 — The same as 2 but the island is not detachable, only for paper labels;
4 — The same as the 3, but without the island;
5 — The Same as 4 but with lower color swatch;
6 — This is a sleeve for the Sample Card created by Mya
7 — Similar to 5, but without Swatch;
8 — Smaller version of with around 60x25mm;
9 — For labels similar to those found on Dymo labeling machines, around 40x12mm in size;
10 — Same as point seven, but wither with 60x12mm.

How to Use
- Digital tracking: Use Google Sheets to manage your inventory. Each entry can have a hyperlink, which you can turn into a QR code and print as a label for your spool (more information at: ).
- Physical labelling: Print labels using a label printer (e.g., Dymo or similar), a regular printer, or even 3D print them (with a 0.2mm nozzle, you can print a working QR code).
- Alternative methods: The new Bambu Lab H2D can do kiss-cuts on stickers, which is another way to create custom labels (not tested personally, but likely effective).
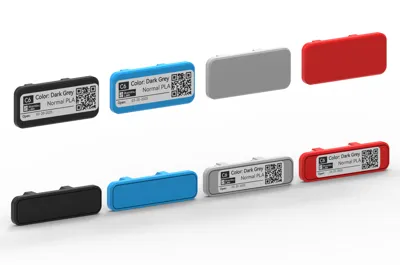
- Electronic tags: For those who want to invest more, electronic shelf labels are an option, though they require additional setup and are more expensive.
Practical Tips
- When moving a spool, scan the QR code to update its status (e.g., moved to a machine, returned to storage, marked as finished).
- Weigh the spool when removing it from the printer to keep track of remaining material.
- Use pivot tables in Google Sheets to avoid opening new spools unnecessarily and to track stock at a glance.
- If you want to color code by material (e.g., blue for PLA, red for PETG), use the swatch area and/or colored tags.
- Use a smooth build plate; the sticker will adhere better to a smooth surface. A textured build plate is not ideal in this case.
Non-Functional Sections
Remarks
You’ll also find a new bottom part for the rack, designed to better fit the tag rod. Don’t worry—you don’t have to reprint your entire rack; I’ve created a rod that works with the current system. However, if you plan to print more modules and use the tagging system, the new bottom part will provide a better fit.
Design Philosophy & Development
The idea for this tagging system grew out of the real-world challenges of managing a growing filament collection. While a modular rack provides structure, true organization requires knowing what you have and being able to access that information quickly. The first version of the tag was inspired by simple coordinate systems (like battleship grids or old map references), but after feedback and discussion with the community (notably Tierrie on Reddit), the concept evolved to include more visual and customizable elements.
The pivoting tag was chosen for its visibility and ease of use, regardless of the rack’s position. The system is designed to be flexible, so you can adapt it to your own workflow—whether you prefer spreadsheets, color coding, or detailed labelling.
Why Not Use Dedicated Software?
There are several dedicated apps and online platforms for filament management, and they can be a great fit for many users. For example, Mark’s website, 3dfilamentprofiles.com, serves as a comprehensive filament database, offering extra information such as recommended print temperatures and material compatibility. If you’re looking for a centralized resource to compare filaments and access technical data, it’s definitely worth exploring.
However, in my own workflow, I need a higher level of automation and flexibility. My goal is for each QR code to point directly to a specific spool, with the corresponding row in my spreadsheet selected and ready to edit after scanning. Most dedicated software and databases are built around a fixed set of features or someone else’s workflow, which may not match my evolving needs.
That’s why I rely on Google Sheets: it allows me to fully customize my inventory, add or remove fields as needed, and use pivot tables to track stock and usage in real time. Plus, the ability to generate hyperlinks for each entry means I can create QR codes that link directly to the relevant data for each spool.
If anyone with Google Sheets scripting experience knows how to display this information on a mobile device in a more user-friendly way—ideally, showing only the details for the scanned filament in a form-like view, rather than editing values in a spreadsheet row—I’d love to hear from you. It should be possible to create something like a mini-app for this, but that’s beyond my current skills.
For more information refer the post: Tagging, Tracking, and Colour Coding: Smarter Filament Storage for the Real World
Ongoing Improvements
- Several tag designs are in development, including options for different label types and sizes.
- The rack module base has been updated to better accommodate the tag, ensuring a clean look and proper fit.
- More news and downloadable files will be available soon in the 4All project collection on Makerworld.
Modules available for the 4All Ecosystem

Please refer to the 4All collection at: https://makerworld.com/en/collections/6004654-4all
Change log
- 12/05/2025 - Small update on the Swatch pocket for some of the tags. More space for better fit
Curious About My Tools? Check This Out!
For those of you who often ask about the tools I use to bring ideas to life, this article, The Journey From Idea To Object (Part I), offers some insights into the initial stages. It highlights the use of various tools, including software like Autodesk Fusion for CAD design, Blender for render and Bambu Studio for 3D printing preparation, and other... So, if you're curious about the software and hardware too, that I've incorporate in my workflow, take a look at the link for more details!" – Visit https://designrepcom.com/ for much more.
License
You shall not share, sub-license, sell, rent, host, transfer, or distribute in any way the digital or 3D printed versions of this object, nor any other derivative work of this object in its digital or physical format (including - but not limited to - remixes of this object, and hosting on other digital platforms). The objects may not be used without permission in any way whatsoever in which you charge money, or collect fees.
Comment & Rating (35)