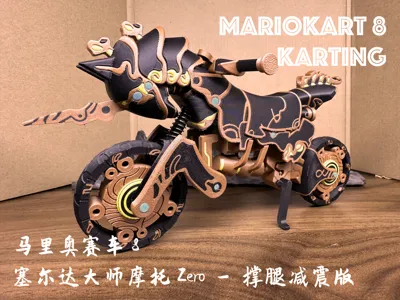
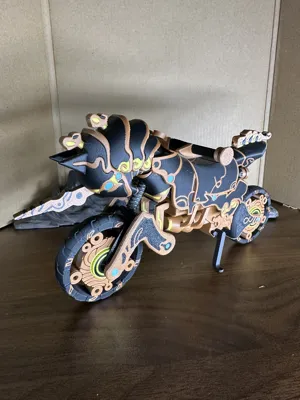
Mario Kart 8 Zelda Master Cycle Zero with Shock-Absorbing Leg Supports


Print Profile(3)


Description
Assembly video at the bottom!!!
Model Description:
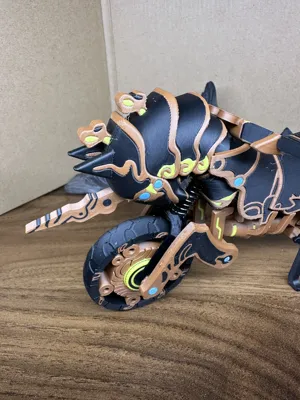
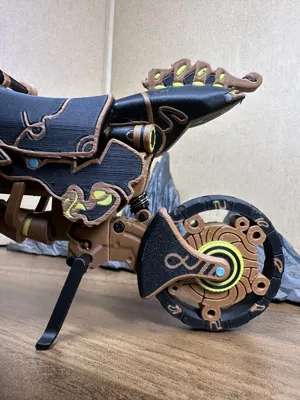
Mario Kart 8 Deluxe - Zelda Master Cycle Zero
Features the original color scheme from the game.
Modified from the original design, with improved shock absorption and stability.
View the original model via the link below
Mario Kart 8 Zelda Collaboration Master Cycle Zero Multicolor Print
Multicolor print
Requires AMS
Requires hardware
Hardware Specifications:
M3*25 pan head screw *1
M3*10 pan head screw *1
0.6*8*Length to be cut as needed
The 200% size was added at the request of fans, altering the fit.
Due to the long printing time and potential for inadequate machine maintenance, there's a significant risk of print failure, including nozzle clogging, inconsistent material feed, and PTFE tube wear.
Beginner users are advised against printing this model.
Hardware:
M3*50 pan head screw *1
M3*25 pan head screw *1
1*16*Length to be cut according to elasticity
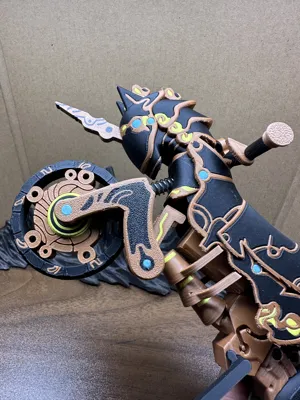
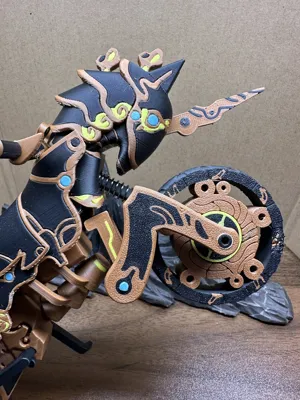
Shock Absorption:
Both front and rear wheels feature spring suspension, providing superior performance compared to the previous version.
Recommended Filament:
The test print used four colors of matte PLA filament: brown, black, yellow, and light blue, brand R3D.
Due to size constraints, the steering rod may be prone to damage; originally a single print, an additional plate has been added.
Should the steering rod break during assembly, reprint the separate steering rod from the second plate using PETG filament.
Textured build plates are recommended; otherwise, the bottom layer lines may be visible on some parts.
Avoid filaments with excessive shrinkage. Matte finishes are recommended for optimal aesthetics.
In colder climates, users of unenclosed printers should raise the ambient temperature.
For optimal print quality with enclosed machines, avoid placing the model near the enclosure door to prevent severe localized shrinkage.
Assembly Instructions:
Only differences from the previous version are detailed here
Steering Rod Assembly:

Rear Wheel Suspension Assembly:

Support Leg Assembly:
There are support legs on both sides; distinguish left and right.
If the support leg holes are loose, apply glue to the area where the leg inserts into the chassis and allow it to dry.
If unsuccessful on the first attempt, reapply glue until a snug fit is achieved.

Assembly Video: Refer to this video for all assembly steps except those detailed above.
More models from this Mario Kart series:
Click to view directly
Model 1: Mario Kart 8 Standard Kart
Model 1.1: Mario Kart 8 Standard Kart - Wheel Remastered Version (recommended for display purposes)
Model 2: Mario Kart DS Cover Model
Model 3: Mario Kart 8 Biddybuggy
Model 3.1: Mario Kart 8 Biddybuggy - Figure Compatible Version (recommended to print this version)
Model 4: Mario Kart 8 Pipe Frame
Model 4.1: Mario Kart 8 Pipe Frame - Figure Compatible Version (recommended to print this version)
Model 5: Mario Kart 8 Standard Motorcycle
Model 6: Mario Kart 8 B Dasher
Model 7: Mario Kart 8 - Flower Child Off-Roader
Model 8:Mario Kart 8 - Zelda Master Cycle Zero
Model 8.1:Mario Kart 8 - Zelda Master Cycle Zero (recommended to print this version)
License
You shall not share, sub-license, sell, rent, host, transfer, or distribute in any way the digital or 3D printed versions of this object, nor any other derivative work of this object in its digital or physical format (including - but not limited to - remixes of this object, and hosting on other digital platforms). The objects may not be used without permission in any way whatsoever in which you charge money, or collect fees.
Comment & Rating (5)