Search models, users, collections, and posts

Christmas Vacation Advent House V3

Print Profile(5)

All
P1S
X1E
A1
H2S
P2S
X1
H2C
H2D Pro
P1P
X1 Carbon
H2D
X2D
A2L
A1 mini

Christmas Vacation Advent House V2
Designer
83.5 h
34 plates
4.9(19)

Christmas Vacation Advent House V3
Designer
81.4 h
35 plates
5.0(2)

Mini Christmas Vacation Advent House P1S Plates V3
Designer
49.6 h
17 plates

Mini Christmas Vacation Advent House A1 Mini Plates V3
Designer
68.3 h
29 plates
Click to see more

Open in Bambu Studio
Boost
309
783
112
69
459
115
Released 

Bill of Materials

Maker's Supply Kits and Parts
Select all
6500K White LED Light Strip (1pcs) - KA004 / White (41100)
Bambu Filaments
Select all
Mistletoe Green (10502) / Refill / 1kg
Gold (13405) / Filament with spool / 1 kg
Ice Blue (13610) / Filament with spool / 1 kg
List other parts
  • 0.025x36in Music Wire for hinges x 1: https://www.amazon.com/PRECISION-METALS-500-0-025-Music/dp/B0006MZNBI
  • Gold Head sewing pins for window and door handles x 1: https://www.amazon.com/100pcs-Sewing-Straight-Quilting-Fabric/dp/B09PNPBLFX
  • Polymaker Polysmooth Clear PVB filament x 1: https://www.amazon.com/Polymaker-PolySmooth-Filament-1-75mm-Cardboard/dp/B09KLH5DMH

Description

Summary

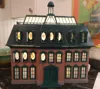
This is a model of the Advent House from Chevy Chase’s movie Christmas Vacation. It was only used in a couple of scenes, where opening the windows was used to mark the passage of time in the movie.


V1 3MF file - No longer supported.

The V1 file required making the house body out of hardboard and pine.


V2 3MF file

Version 2 (V2) requires using short pieces of wire for window and door hinges, and cutting roundheaded pins for the knobs.  V2 consists of contents of the original V1 file, plus the parts necessary for 3D printing the body of the house.


V3 3MF file

Version 3 (V3) significantly simplifies the assembly process by using printed hinges and knobs. It also adds a keystone to the Copula so it can be used with a day ‘1’ marker. If you print the Oval Deep parts, so you can put candy or other gifts behind each window, the Copula can be used to cover a day ‘1’ gift as well. The Coupla Floor part can be glued to the roof to let light into the Copula while preventing a 'gift' from falling into the house. However it requires multi-color printing to print ‘gold’ knobs.


Note, if you use the Version 3 file to make the house you do not need to order the Music Wire or Round Head Sewing Pins.
 

The ‘Mini’ 3MF files
The ‘Mini’ files uses the V3 design changes, but splits the design into parts small enough to be printed on 180x180mm bed, e.g., an A1 Mini, and those that need to be printed on a 256x256mm or larger bed, e.g., a Pxx, X1C, A1. This allows someone who owns a Mini to print most of the parts, and find a friend with a P1S to print the rest using the P1S file.
Note that the P1S file contains all the parts necessary to 3D print the body and roof of the house. These are all parts that could also be made of hardboard and pine if using the V2 file.


- Mini Christmas Vacation Advent House A1 Mini Plates V3.3MF - If you build the house using pine and hardboard, or the parts in the Mini Christmas Vacation Advent House P1S Plates V3.3MF file, then you can use this file to print all the remaining parts on an A1 Mini.

- Mini Christmas Vacation Advent House P1S Plates V3.3MFThis file contains only the parts for printing the body of the house. These parts are all too large to be printed on a Mini. If you use this file then the Mini Christmas Vacation Advent House A1 Mini Plates V3 file can be used to print all the remaining parts.


Note: This is a large complicated design, requiring many hours of printing and almost as many hours to assemble. Lots of people have successfully built it and customized it. I don't want to discourage you, but I did want you to know before you start that it is a BIG project. Please read the Christmas Vacation Build Notes.PDF file carefully for detailed assembly instructions before you start, to get an idea of what you are in for.


The whole design can be 3D printed, or the walls and base can be made out of hardboard wood. DXF files are included so the hardboard parts can be laser cut. And PDFs of the hardboard parts, which can be printed to size and used as templates to cut out the parts. Gluing the parts will be required.


Many found it painful to get the numbering right, so I added a file called Numbers.STL. It creates keystone shaped parts with raised numbers on them, which can be glued to the tops of the windows. Just switch from the background to the text color at 1mm print height. And I added a photo of a test print that I did so you can see what they look like.


The Window frames are designed so the hinges can be put on either side. It was pointed out to me that the windows on the left side of the house opened to the left, and those on the right, opened to the right. Now you can set the hinge to open them whatever way you choose.


The images from old Christmas cards that I used in the windows are in the Images 1.PDF file.


My original build was several years ago, and made the mistake of storing it in the attic over the summer. The main body was fine because it was made out of hardboard, but the PLA windows warped so badly, they wouldn't open. So DON'T do that. I had to reprint all the plastic parts. Since it is 3D printed, I put a lot more detail in the design of the window frames, etc., than the one in the movie.


The skylight, windows, front door, and roof trim are all 3D printed.


Hardboard Main Body

My original main case was made out of fiberboard, with a piece of 3/4 inch pine for the base. This approach will require some woodworking tools to make it. Detailed instructions for making the hardboard version are in the Christmas Vacation Advent House Build Notes.PDF file. The Build Notes also describes how to assemble the windows and doors.


3D Printed Main Body

Due to popular demand, I've added STL files to make a 3D printed main body (rather than hardboard).
The Christmas Vacation Advent House Build Notes.PDF file describes how to assemble the windows and doors, but the assembly instructions for the 3D Printed Main Body are below.


I used Paramount British Racing Green filament in my original design. But Bambu Mistletoe Green should work fine. You will also need some White filament if you print the day markers.


You can print the window frames and roof components and glue vellum to them to act as the ‘window panes' (Plates 15 & 16).
Or you can print the windows as 2-color prints (Plates 33 & 34), where you can use white or translucent PLA, or Polymaker Polysmooth Clear PVB filament to print the window panes.
Polysmooth PVB (PolyVinyl Butyral) filament prints very similarly to regular PLA, but spraying 99% Isopropyl Alcohol (IPA) on the Polysmooth filament after printing smooths its surface (similar to how Acetone can be used to smooth ABS).  Note: IPA has no effect on standard PLA. Polysmooth is expensive, but the ability to smooth it can be worth it. There are several videos on YouTube that talk about how to best use it. And make sure that it dry when you use it.


Note: The body and back parts are glued together. In the Christmas Vacation Advent House Build Notes.PDF file I talk in detail about the ‘Acrylic Cement’ solvent that I use for gluing PLA, but SuperGlue should also work.


It may be necessary to scrape down some of the parts to get them to fit together, but most should work with a simple press fit. Use glue to assemble all parts.


The following figure shows the respective House Base, Wall, Roof, and Fence STL files that make up a 3D printed version of the Main Body. 

And here are the parts that make up a 3D printed back for the house. You may need to drill a hole in the back to allow for LED power connections.


Note: All the Back parts are glued together. I positioned them on the top of my table saw to glue them up. Any flat surface will work, but be careful that the glue does not stick to it or ruin its surface.

Note:  The house has three flat roof levels: Roof (uppermost), Lower Roof (middle), and Lower Base roof (lowest).


Here is a clip of the Advent House in the movie:


Remixes:

You may want to look at these sites, especially if you are 3D printing the walls. I haven't printed these, but they all look very cool.
https://www.printables.com/model/1096689-christmas-vacation-advent-calendar-brick-exterior

https://www.thingiverse.com/thing:6875647


Revisions:

V1 - Initial release.
 

V2 - Added 2 color Plates (33 & 34) for using white or clear filament to print the window panes.

- Added assembly instructions for 3D Printed main body.

V2a - Added ZIP of DXF files so the hardboard version can be laser cut.

V3 - Simplifies the assembly process by using printed hinges and knobs. Adds 2 color printed walls. Requires multi-color printing.


V3 Plates:

Windows:

1) WinLow Back - Lower Window Backs.

2) WinLow Outer - Lower Window Outer Frames.

3) WinLow Oval Holder - Lower Window picture holder.

4) WinLow Oval - Lower Window Shallow Oval if just holding pictures. Do not print if printing Plate 5.

5) WinLow Oval Deep - Lower Window Deep Oval that can be used to hold gifts, e.g., candy and background picture. Do not print if printing Plate 4.

6) WinHigh Back & Outer - High Window Backs and Outer Frames.

7) WinMid Back - Middle Window Backs.

8) WinMid Outer - Middle Window Outer Frames.

9) WinMid Oval Holder - Middle Window picture holder.

10) WinMid Oval - Middle Window Shallow Oval if just holding pictures. Do not print if printing Plate 11.

11) WinMid Oval Deep - Middle Window Deep Oval that can be used to hold gifts, e.g., candy and background picture. Do not print if printing Plate 10.

12) WinLow Ovals and Oval Holders for WinHigh - Window picture holders for Middle and High Windows.


Misc parts:

13) Roof Eaves and Fence - The Roof Eaves are glued to the walls under the roof, and the Fence is glued to the Lower Roof.

14) Skylight Holder, Roof and Cupola - Miscellaneous parts for holding the Skylight in place, the Roof and the Cupola.

15) Skylight Sides - These require gluing on vellum for the window panes. Do not print if printing Plate 34.

16) Window Panels - All panels for Lower, Middle, and High windows. Do not print if printing Plate 33.

17) Front Door and Stairs - Components used to assemble the Front Door and Stairs.

18) Number Plates - Optional 2 color plates that can be used to number the Windows and Front Door with dates.


3D Printed Body, Roof, and Back:

Only print Plates 19-32 if 3D printing the main body. Do not print if making the main body out of hardboard and pine.

19) Roof Right & Left Front Sides.

20) Roof Left, Right, Center & Offset Sides.

21) Roof Lower & Lower Base Left.

22) Roof Lower & Lower Base Right.

23) Wall Side Left & Right.

24) Wall Front Side Lf.

25) Wall Front Side Rt.

26) Wall Center Front & Wall Center Sides - Center Wall and small side walls on either side of it.

27) House Base Left.

28) House Base Right.

29) Roof Back Lf - Left Side Roof Back.

30) Roof Back Rt - Right Side Roof Back.

31) House Back Lf - Left Side House Back.

32) House Back Rt - Right Side House Back.


Old style Window Panels and Skylights. Require velum ‘windows’:

33) Window Panels - Optional 2 color plate where clear or white filament can be used to print the Lower, Middle, and High window panes. All panels for Lower, Middle, and High windows. Do not print if printing Plate 16.

34) Skylight Sides - Optional 2 color plate where clear or white filament can be used to print the Skylight window panes. Do not print if printing Plate 15.


Enjoy


Documentation (21)

Assembly Guide (20)
Roof Center Front.PDF
Christmas Vacation Advent House Build Notes.pdf
Skylight Paper Templates.PDF
Roof Lower Base.PDF
House Base 2.pdf
Wall Front Side Lf.PDF
Wall Center Front.PDF
Wall Side Lf.PDF
Roof Right Side.PDF
Roof Left Side.PDF
Roof Offset Left.PDF
Roof Offest Right.PDF
Roof Right.PDF
Roof Left.PDF
Roof Lower.PDF
Bricks.jpg
Chevy Chase.jpg
Images 2.jpg
Images 1.jpg
Christmas Vacation Advent House Build Notes.pdf
Other Files (1)
DXF files for Christmas Vacation Advent House.zip

Comment & Rating (112)

(0/1000)

Print Profile
Christmas Vacation Advent House V2
This print turned out so well, thank you for your incredible work on this. I used a few remixed parts, the brick walls and the windows and doors with larger holes. The hardest part was getting the wire in for the hinges. For the roof I used Panchroma Galaxy Dark Green which kind of looks like it has snow on it. I did print the entire body, which fit together perfectly. I added one modification, which was a small adapter for the #1 on the cupola. This is apparently how its setup in the movie. I left the cupola top unglued so you can take it off for the first day of December to find a treat. Just finished it with a few days to spare before December, thanks again!
The profile uploader has replied
profile
3
Reply
Thanks for posting. It looks great! I never noticed the 1 on the cupola. That's a great idea.
0
Reply
Boosted
What did you use for the joints looks great
Show original
0
Reply
Replying to @DennisT. :
I used some .024in diameter music wire that I picked up at a local hobby shop. It's steel wire, so be careful, it will ruin the cutters that you use for copper wire. I used these to cut it, but they are an investment: https://www.amazon.com/Channellock-910-Cable-Cutter-Compound/dp/B01K4NKRW8. However you should be able to use some similar gauge copper wire. I also drilled out the holes with a 1/32 drill, and put a little kink in the end of the wire to lock it in position after I inserted it. See Figure 11 in the Build Notes.
0
Reply
This is printing along wonderfully. Not quite there for full construction, but I have no doubt that everything will print great. I'm having an incredibly difficult time understanding how to hinge the windows into the frames. I've probably read the instructions in the build guide 100 times, but I'm still not able to get it to work. Any insight?
The designer has replied
designer
2
Reply
The small holes in the window frames for the hinge pins are just dents after printing because of normal printing issues the holes collapse, so they must be drilled out. Use a drill bit that is slightly larger in diameter than the wire that you are using. The wire should slide snugly into the holes after drilling, then put a tiny bend in the end of the wire, so it will lock in place after insertion, and use a pair of needle nose pliers to push the wires through the frame and into the windows, on the top and bottom of the frames.
0
Reply
Also, there are many vendors that offer tiny (#61-80) drill sets, but most of them are junk. Their tips are not ground, and many bits in the set will actually be the same diameter. This Rogers Drill Bit set is the only 'low cost' set that I have found that are well made and accurately sized. I guess you get what you pay for. https://micromark.com/products/the-rogers-drill-bit-set-61-80-set-of-20 You might be able to find them from other vendors cheaper. Look for the Rogers name.
0
Reply
Good news and bad. The good news is that I redesigned the windows in the latest V3 3MF so the hinges and knobs are now printed, and the wires are no longer necessary. The bad news is that you need to print the window frames for the window panels to pop into.
(Edited)
0
Reply
Print Profile
Christmas Vacation Advent House V2
Thanks for uploading, assembly took a bit longer but turned out perfect, I also illuminated the spire and adapted door handles to it
(Edited)
The profile uploader has replied
Show original
profile
1
Reply
There are some nice brass door handes for doll houses out there, but the advent house is the wrong scale, so they look too big. Your's look great. Please post them.
0
Reply
Replying to @mcmaven :
It's uploaded sorry it took so long
(Edited)
Show original
profile
1
Reply
Replying to @user_3916595234 :
Thanks!
0
Reply
Boosted
Been wanting to print this for a long while and now finally getting round to it, is it possible to upload a file to print the roof skylight glass in transparent PLA?
The designer has replied
designer
1
Reply
Look at the latest 3MF file. I added 2 plates at the end that let you do all windows as 2-color prints.
0
Reply
Boosted
Replying to @mcmaven :
appreciate this thank you, I'm thinking of using a glow filament instead of the translucent to add that little extra touch
0
Reply
Replying to @Kilvi00 :
As in Glow in the Dark? If so, use a hardened extruder. It is a very abrasive filament. And please let me know how it works out.
0
Reply
Print Profile
Christmas Vacation Advent House V2
Just about done with this one, just have to add lights and the pictures behind the windows and that’ll be it. Out of everything ive printed this is definitely my favorite piece. My all time favorite Christmas movie so this will definitely be cool to have around the holidays. Very nice work on designing this!
The profile uploader has replied
profile
1
Reply
If you printed it in PLA just don't store it in a hot attic. I had to rebuild the first one that I built because all the windows warped over the summer, and would no longer close.
(Edited)
2
Reply
Replying to @mcmaven :
Yep it’ll be staying in a cooler spot!
0
Reply
Boosted
Print Profile
Christmas Vacation Advent House V2
Printed with a mix of this and the remix on Thingiverse and it came out great! used the remix primarily for brick texture and corners on the walls. The print seemed daunting at first but it all goes together fairly simply, I used a mix of hot glue for temporary support while the super glue dried.
(Edited)
The profile uploader has replied
profile
1
Reply
It is a LOT of printing... But your build is looking good!
(Edited)
1
Reply
My version of it is now finished and decorated. A bit of crafting was necessary, but that's not surprising given the number of parts. Many thanks for this great work 👌🏻🤩🥳
The designer has replied
Show original
designer
1
Reply
I like your lights. I would like to find some with that spacing that actually lit up, but your approach works very nicely!
1
Reply
Hello, and thanks for the great file and documentation, I noticed that the dxf of some of the parts have a horizontal line, I am worried of setting my laser to cut and make the parts smaller than they are. Could you tell me if that is a problem or if I should just cut as is? I also noticed that the roof_back is a dwg and not a dxf like the rest. lastly it would be very helpful if you had a dxf with all the differnet parts needed to cut in one file, it seems there are some dxf files I need to make 2 of as they are a reflection. Thank you so much for your help and support !!!
The designer has replied
designer
1
Reply
The extra line is either because; the surface is cut at an angle so the extra line shows the top edge, or in the case of the House Base, it is the cutout for 0.25 in deep slot that is cut for the wall pieces to fit into. The DXF files do not show the second edge on the opposite side for the angled cut, because it is hidden by the top surface. Note that all the roof peices are tilted, so the top and bottom edges should be cut at slight angles so they fit tightly together. Since a laser cutter can't handle tilted cuts, use the outer edge for the laser cut, then sand the edges to get the correct angles. But your best bet for the roof parts is to 3D print them. I just added a ZIP file with all the DXF files. Ignore the DWG file. My modeler doesn't support exporting multiple DXFs into a single file. Maybe there is an app out there that can import multiple DXFs and export them as single file, but I don't know of one. Bambu Suite can import multiple DXFs and export them as a single SVG...
(Edited)
1
Reply
Print Profile
Christmas Vacation Advent House V3
Both v2 and v3 are great. Make sure to download both to get all items needed. Thank to designer for the time for this model!
The profile uploader has replied
profile
1
Reply
Hi Bunny, I just posted two new print profiles where one has the mini printable parts and the other the P1S printable parts. Read the Description for more information.
0
Reply
Replying to @mcmaven :
I can't thank you enough! If you have a moment, how did you learn how to ode that? Where would I go to learn? I feel like a leach as I only down load, recolor, and print. I want to create and contribute too! :-)
0
Reply
Replying to @Vorpal_Bunny :
I started with a student version of Solidworks and have gotten very good at it over time. I basically used YouTube to learn how to use it. Solidworks is a good tool. It is reliable, and very capable. But it is really only for mechanical modeling. Solidworks for hobbiests is $48 a year. Fusion 360 is also a very capable mechanical modeler, but it is free for hobbiests. For Solidworks, the hobby version doesn't allow you to sell anything that you design. I don't know if the same rule applies to Fusion. And If you want to design more organic things like figures, I would look at Blender, which is also free, and has no constraints on selling things that you design with it. But it is not as good for designing mechanical things. The problem is that they all have very different user interfaces, each with a very steep learning curve. So no matter which path you choose, it will take a long time of dedicated effort to get proficient at them.
0
Reply
Boosted
Everyone loves it. Took a lot of time and materials with some headaches but it was well worth it!!!
designer
1
Reply