


Print Profile(3)


Description

Multilingual months can be found in a separate print profile called Languages. Languages include: English, Français, Español, Deutsch, Italiano, 中文, Português, 日本語, עברית, Polski, Dansk, and Nederlands. Please let me know if I've made any typos.
At this time I'm no longer taking requests for more languages. Fortunately, you can easily make your own month plates with Make My Sign. Read the section “Customize Month Plates” below for instructions.

Printed in a variety colours reminiscent of mid-century-modern design, these little calendars would look at home on anyone's desk. Prefer a more art deco or modern look? Print in tones of silver, copper, and black.

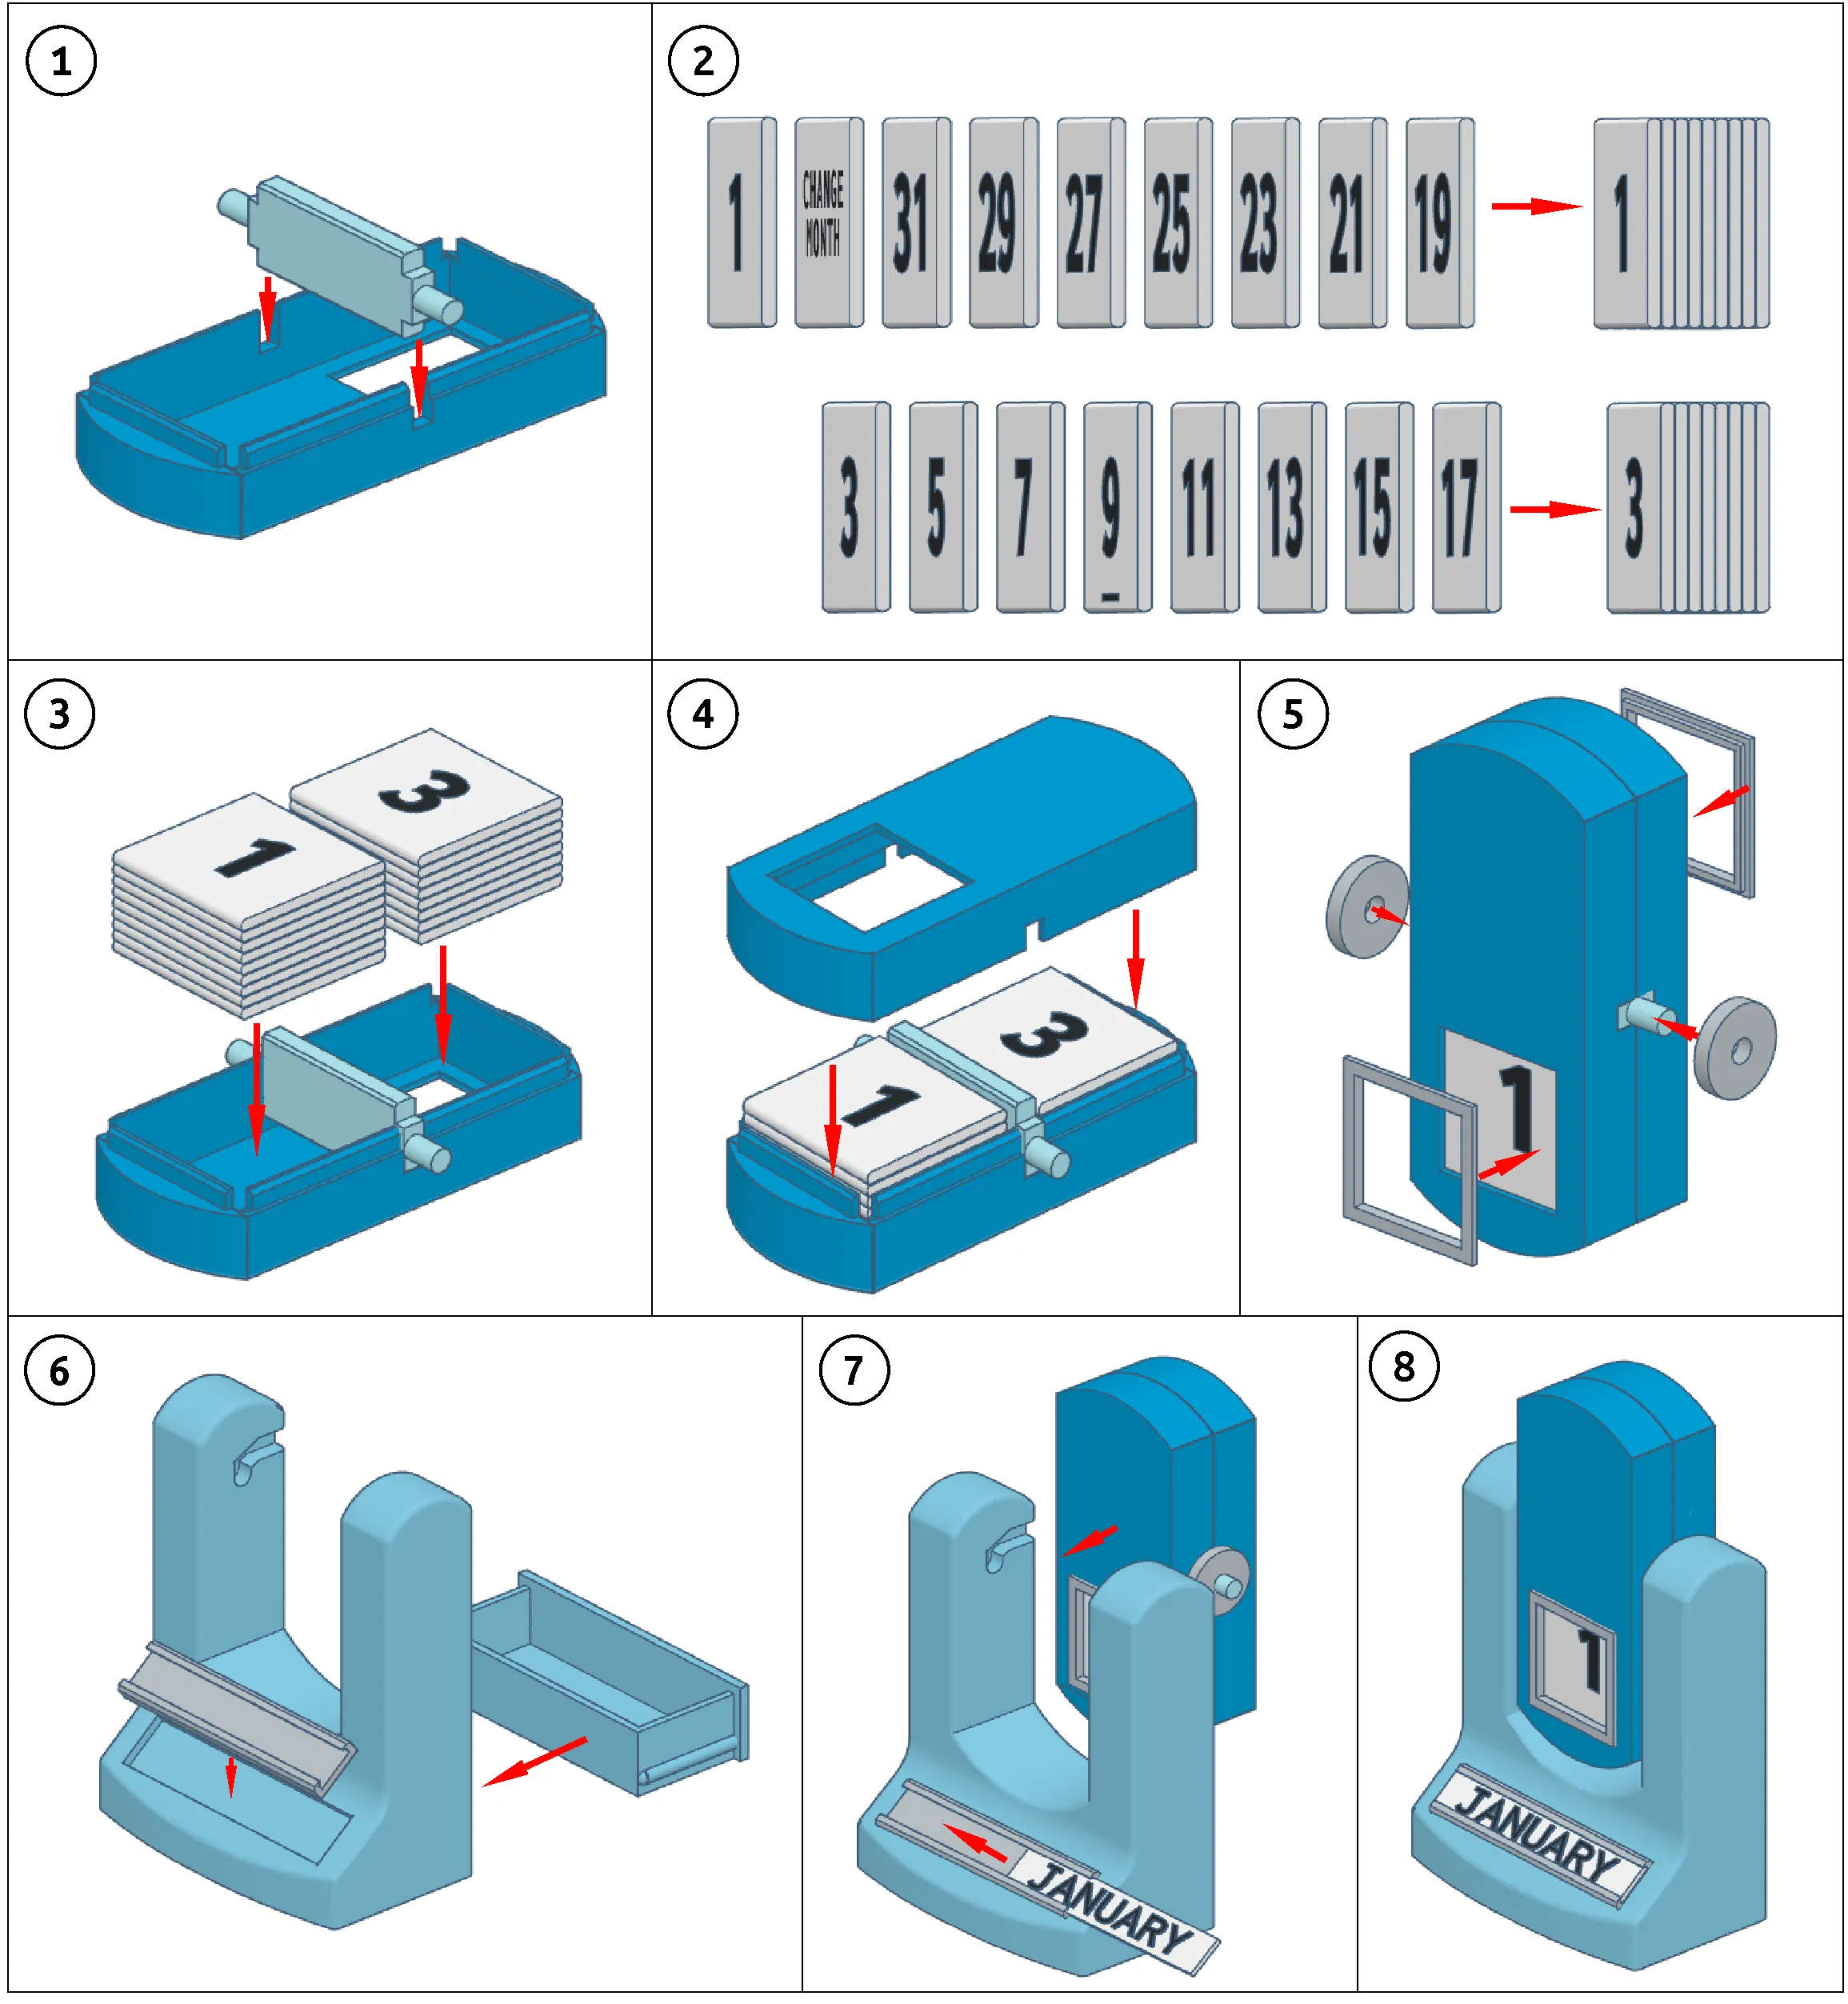
- Assembly:
- Snap-fit design
- No glue or extra hardware needed
- No AMS? I've included blank tiles that you can write the numbers on yourself. Or, you can do what @Hudsta did with fancy swapping. See their pinned comment down below for more details.
- History: these types of calendars aren't new. See About the Model below to learn some interesting facts.
Hilbert curve case: The interesting pattern of the silver case in the picture to the right was achieved using silk PLA, a smooth PEI plate, and by changing the bottom layer pattern to Hilbert Curve. All three factors are needed to replicate it. Textured plates disguise the pattern and plain PLA doesn't reflect the light (and thus the pattern), in the same way as silk does. Use the special print profile if you'd like to try it out!
Note: I recreated the end-of-month tiles found in the original 1925 calendars: Turn Slowly, Change the Month, and Patent #241137. If you prefer your calendar not to have them, I've also included blank versions without any text. You'll need to swap out tiles 15, 16, and 17.
📋Print Checklist
After printing, you should have the following pieces:
- Case top
- Case bottom
- Pivot
- Base
- Base drawer
- Number tiles x17
- Month plates x12
⚠️IMPORTANT!
- If the tiles or pivot warp, see troubleshooting steps below and/or print the plates marked “with brim.”
- If any part is too loose or too tight, there are alternate sizes in the print profile. If these alternative sizes don't work for you, read the troubleshooting steps below.
🛠️ Assembly
IMPORTANT! You will need to remove the supports from the base (the drawer at the bottom and the channels at the top). A good sharp yank with needlenose pliers should remove them cleanly. If they are fused too tightly, you will need to calibrate your filament to reduce over-extrusion.
🧰 Troubleshooting
It's my hope that you shouldn't have any problems with the print. It's been thoroughly tested using a variety of filaments on both the X1C and the A1 Mini. However, there are always unforeseen circumstances so here are some tips on how to overcome issues if they come up.
- Parts are too tight or too loose: Fit, or tolerance, of parts is highly affected by the type of filament used. If your filament creates parts that are a little too loose or a little too tight, try reprinting the part by using the appropriate plate in the profile. There are tighter and looser plates for the case, the drawer, and the trim. If these alternative sizes don't work, you will need to adjust the X-Y contour compensation further and re-print. If the part is too loose, you can always use a bit of superglue to keep the pieces together. Just be sure that you've verified that the numbers iterate correctly in the case before gluing it together!
- The pivot looks deformed: The round ends of the pivot have a very small footprint. Sometimes they will peel up on textured plates because it's too small to properly stick to the bumpy surface and/or the plate is dirty. For this reason, I recommend using a smooth plate to print it. If you don't have a smooth plate and/or the pivot deforms no matter what you do, reprint it with a brim (included in the print profile). Note: if the pivot deforms no matter what you try, it may still function even if it looks wonky. Fortunately, it's not visible so its less-than-perfect look won't be noticeable. If you have further difficulties regarding the pivot, please see the comments below for more information on additional troubleshooting steps you can take.
- The tiles warp/peel up while printing: I've read reports of peeling/warping tiles on the A1 series of printer. Unfortunately, unenclosed bedslinger style printers can be more susceptible to this problem due to uneven cooling (when the layers above the first layer cool too quickly they contract and warping occurs). A high temp smooth PEI plate will provide better adhesion in this case. However, if you don't have one or the tiles peel no matter what you do, try printing the tiles with a brim. There will be additional clean-up to remove it. How much will depend upon the filament used. Some brims detach cleanly and some will fuse more strongly. Go carefully and try to make it as smooth as you can.
- Parts came loose from the bed: There are many reasons why this may happen. These are just some of the reasons and suggested solutions.
- Correct plate: Check that the correct plate is selected in Studio. My print profiles use a textured bed but if you're using something else, you'll need to change it.
- Bed is dirty: Even if it might appear to be “clean,” dirty beds are the number one reason for adhesion failure. Wash in sink with warm water and plain dish soap. Don't touch the surface of the plate with your skin; move it by your fingertips and be careful not to brush it when removing prints. Skin oils transfer quickly and can cause parts to peel off. If it's been awhile since your last wash, you might want to do it again before attempting to print the number tiles. You can maintain plate cleanliness by wiping between prints with a clean lint-free cloth and 99% isopropyl alcohol.
- Filament: wet filament, old filament, and just some filament in general can cause adhesion problems. Drying the filament or trying a different roll can sometimes help. If the filament is new and dry, try bumping up the plate temperature in the filament profile by 5 degrees to a maximum of 65 for PLA.
- Cooling: if your printer has an auxiliary fan, edit your filament profile to turn it off (set it to 0). Uneven cooling on flat parts can cause them to lift.
- Glue: Gluestick can help stubborn parts stick to plates. Even though it's not generally used with textured plates, it may be necessary, especially with small-detail models such as the number tiles.
- Plate type: if the models keep stubbornly lifting off of the textured plate, try a flat plate instead. This tip is especially for unenclosed printers where ambient air temperature can cause uneven cooling. The nature of textured plates means that small detail items such as the number tiles, don't have as much sticking force and can be the most susceptible to lifting. Smooth PEI plates work better for small detail items because they have 100% contact with the part.
- Brim: If all else fails, or you'd rather not go through the trouble of the above steps, print the plates marked “with brim.”
- Tiles don't slide: Occasionally, a tile won't slide into place due to friction or the previous tile leaning too far forward. If this happens, use your finger to keep the previous tile in place and then give the case a little wiggle. The tile should slide into place. However, if the surface of the tiles feel rough, they won't slide very well and you'll get more fails than successes. I've tried to mitigate this with slicer settings but there are too many factors for me to be 100% certain my profiles will work with your filament. So how to fix it? The easiest way is to decrease the "top layer extrusion" value and reprint. The longer way is to calibrate your filament using Bambu Studio and then reprint.
- Number tiles have colour bleed: Whether or not colour bleed occurs is due to the opacity of the filament that was used to print it. White filaments are particularly susceptible to colour bleed as they can show colours from layers below. You can either live with the effect, try a different colour combination (i.e., white numbers on a black tile) or you can try a different manufacturer with the caveat that their filament may give you the same result. If you really want black numbers on white, a matte white filament might give you the colour bleed barrier you seek. I found that Eryone matte white did the trick but can't vouch for other manufacturers.
🎨 Customize Month Plates
Create your own month tiles in the language of your choice using Make My Sign with the following settings:
- Size: 9.2 x 57.80 mm
- Font: NotoSans
- Base plate thickness: 1mm
- Text thickness: 0.6mm


🖨️ Recommended Print Settings
All my 3mfs have my recommended print settings. They're listed here with an explanation of why I chose them.
Global
Tile Case
Base and Drawer
| Pivot
Number Tiles
Month Plates
|
📖 About the Model

Sliding tile perpetual calendars are not a new design. The "original" as near as I can determine was made in England by a company called Velos Ltd. sometime in the 1920s. As to the inventor, interestingly there appears to be two gentlemen who filed patents in the US for very similar calendars. There are differences in their designs, but the core concept – sliding tiles – was shared between them.
The first to file patent was William C. Hiering, as evidenced by this newspaper notice from 1927. The notice describes one of the calendar's uses as an “advertising medium of unusual merit.” Based on the examples I found while researching, this secondary use was indeed utilized. I've found examples with logos and names for a variety of companies including Rover and Tampax.
To the right, you'll see a delightful flip calendar in the art deco style which is what originally inspired me. I instantly fell in love when I first saw it. It reminds me of old industrial machinery found in workshops and factories. Not only that, but I was fascinated by how it magically changed the date whenever it was rotated.
Aside from pictures, I had little else to go on until I came across this Imgur post by Measured Workshop which revealed that it was not magic, but rather a clever mechanism that used sliding tiles.
Thanks to this helpful article and the original patents (patent 1, patent 2), I was able to reverse engineer the concept and create my own version using trial and error to get the dimensions just right. The case construction, the pivot, the stand, and the drawer are of my own devising. I decided to use interchangeable name plates so that other languages can be substituted easily. Lastly, as a nod to the calendar's history, I echoed the shape of the tile box and the words on the original tiles.
Filaments used in printed models:
- Polyterra Pastel Matte PLA: Watermelon, Banana, Mint Green, Ice, and Sapphire Blue
- Bambu Basic PLA: white and black
- Hatchbox PLA: cool grey and orange
- Eryone Silk PLA: silver
- Spectrum: Spicy Copper
🥰 How to Support me
If you appreciate the work I did to bring this model to you, please consider supporting me on Ko-fi. Even a small tip will help offset the cost of prototyping filaments. Alternatively, a like or a boost is another easy way to say “hey, you don't entirely suck.”

⭐ Licensing
If you wish to sell my models, you may purchase licensing rights through my official Ko-fi page.
This model is shared using my own Personal-Use License which supplements (but does not replace) MakerWorld’s Standard Digital License. My license is fundamentally the same (no public remixes, no file sharing, no selling) but includes specific exceptions and allowances not covered by the Standard Digital License.
Licenses offered through third-party websites (e.g. Cubee3D) are not authorized and are not valid.
Boost Me (for free)
🚀= 💪🐹 👍 = 🦵🐹 My models are created on a smoking hot Compy386 powered by Hunrod the Unusually Swole Hamster™. Every boost and like makes Hunrod stronger.
Documentation (1)
License
You shall not share, sub-license, sell, rent, host, transfer, or distribute in any way the digital or 3D printed versions of this object, nor any other derivative work of this object in its digital or physical format (including - but not limited to - remixes of this object, and hosting on other digital platforms). The objects may not be used without permission in any way whatsoever in which you charge money, or collect fees.
Comment & Rating (376)