Single Port Replacement AMS Lite Filament Hub


Print Profile(3)


Description
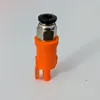
Single Port Complete Replacement AMS Lite Filament Hub
For those not using an AMS Lite with their A1 series printers, I offer you this cool little mod!
This single port AMS Lite hub is a complete, permanent replacement for the 4 port hub that came with your printer. It functions exactly as the original did, but only has one port for those not using an AMS Lite. The benefits are less mass on the print head, cleaner/neater looking and much easier tube removal!
Installation is as easy as removing your old hub, swapping the magnet over to the new one, and reinstalling it! It's Designed to be super light and strong; it only weighs 1.5 grams and prints in under 18 minutes with no supports needed. You can print this out of any material, but my profile is set up to use PLA. Bambu PLA Basic Light Grey is a PERFECT match for the color of the A1 series!
To install, you will need:
- QTY 1 plastic 4mm Bowden tube coupler, these are super cheap just about anywhere. Here's what I used:
- You will need to swap the magnet over from your original hub. This is really easy, just follow these instructions:
- First, mark the lower half of the magnet with a fine tip sharpie, as orientation of the magnet is crucial.
- Push the magnet out of your original hub with something pointy or a small screw driver. They aren't glued in and it doesn't take much force at all.
Insert the magnet into the new hub oriented exactly as it was when you removed it. Make sure the marker you applied is visible on the bottom.

- Put a bit of lubricant on the lower portion of the new hub that goes into the print head, you'll notice your old one was covered in it.
- Reinstall into the printer exactly as the old one came out, and install your center tube first.
- Install your single PTFE tube.
- Start printing! I suggest running a printer calibration cycle to reap the full benefits of the decreased weight and drag on the print head!
License
You shall not share, sub-license, sell, rent, host, transfer, or distribute in any way the digital or 3D printed versions of this object, nor any other derivative work of this object in its digital or physical format (including - but not limited to - remixes of this object, and hosting on other digital platforms). The objects may not be used without permission in any way whatsoever in which you charge money, or collect fees.
Comment & Rating (69)