Search models, users, collections, and posts

Life-Size Charizard Pokémon 3D Model

IP Report

Print Profile(1)

All
A1
P2S
H2D Pro
H2S
H2D
H2C
X2D
A2L

charizard_profile.3mf
Designer
201.9 h
36 plates
5.0(2)

Open in Bambu Studio
Boost
392
853
58
23
447
37
Released 

Description

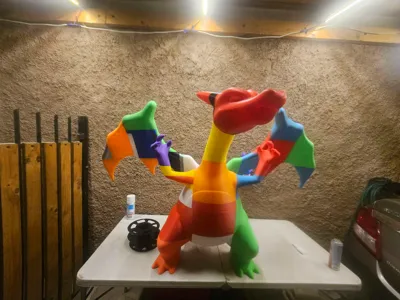
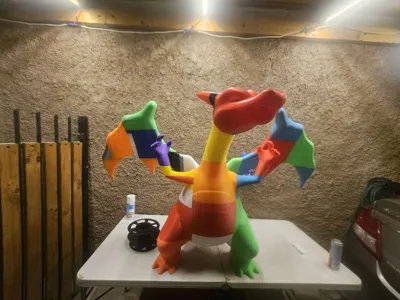
Life-Size Charizard Pokémon 3D Model – A 50-Part Build with Dowel Connectors and Detachable Wings & Head! 🔥🛠️
 

Summon the legendary fire-breathing dragon with this epic life-size Charizard 3D model, standing tall and fearsome. Designed with 50 individual parts, this model includes detachable components for easier printing, transport, and assembly—featuring removable wings, head, and body sections. Precision dowel connectors ensure a strong and accurate build.

Key Features:

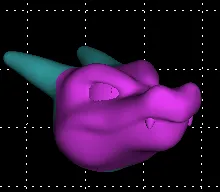
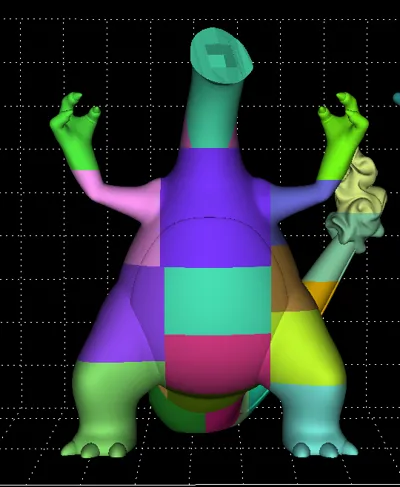
  • Comprehensive Assembly: Includes 50 parts, with major components like wings and head designed to detach
  • Alignment: Dowel connectors help lock parts into place securely
  • Gap Filling: Filler materials may be used to hide seams and smooth transitions between parts
  • Finishing Touches: Sand, prime, and paint the model for a powerful and polished final result

A must-have for any Pokémon fan or collector looking to showcase the fiery majesty of Charizard in full scale.


Note: Assembly and painting are required to achieve the final appearance.


Boost Me (for free)

Its Free :D 

Comment & Rating (58)

(0/1000)

After a few months I can finally call this project complete! Print took me about 3 weeks on and off to accomplish with the P1s using various colors of pla. The prep and gluing process was pretty straightforward thanks to the dowels keeping everything aligned. I decided to permanently attach the head as I found the connector a bit loose. The wings I added strong magnets and felt around the sockets for extra display strength. Overall im extremely satisfied with this print, thank you so much for taking the time to make this model possible!
The designer has replied
designer
11
Reply
Wow… this is perfection. Seriously, incredible work. The print quality looks super clean, and the finishing came out amazing. I love the decision to permanently attach the head — sometimes thats just the better move for long term stability And the magnets in the wings with felt around the sockets is such a smart upgrade for display strength Quick question what magnets did you use? They must be really strong to hold those wings securely Thank you so much for sharing this and for putting in the time to build it. Seeing it come together like this makes it all worth it 🔥
3
Reply
Replying to @HoXtyYy :
Thanks! Its been a huge learning process as never tackled something this large before. The print quality was great I spent a lot of time sanding and filling to get rid of the seams which was a struggle but i got there. Id say more than 90% went away theres some struggle areas as kept having the seams burst when I spraypainted the filler primer and later when i did the Orange. But yeah I def wanted this to be long term. As for the magnets these are what I used from amazon super strong and doubled them up in the center. Used 2 part epoxy on everything so super strong and bonded well. They really help keep everything nice and seated. Bumping the statue doesnt make them fall off. Yeah no problem! I am thinking about tackling that Raph model youve got some day haha so this is my practice run you could say haha.
designer
6
Reply
this is super inspiring for me to want to tackle this. crazy good work. Would you mind letting me know the final assembled dimensions? total height width and length/depth? thanks!
0
Reply
It took me a while but I finally finished it Great, tomorrow I start the post-processing process
The designer has replied
Show original
designer
4
Reply
looking clean buddy the fun part begins haha :D
0
Reply
hello would you have the finished dimensions it looks very small thank you
Show original
3
Reply
is that not the top picture
Show original
0
Reply
The post-production needs improvement but a wonderful project!!
The designer has replied
Show original
5
Reply
yeah after assembly spend always spend little extra time sanding and priming will do wonders when paint painted still awwsome work buddy big boiyyy in daa house :D
0
Reply
I’m diving in! onto a super racer! Print times are considerable, but I can’t wait to see the result
The designer has replied
Show original
0
Reply
cant wait to see :D
0
Reply
Replying to @HoXtyYy :
I have checked the files and numbers 21, 26, 27, 28, 38, and 39 do not fit within the Super Racer's print volume Is it possible to cut them? Thank you
Show original
0
Reply
Replying to @doudou44600 :
what's your print volume the model is cut to fit 256x256x256
0
Reply
great Projekt! thank you my friend. :)
The designer has replied
designer
1
Reply
<3
0
Reply
not life size but ok
(Edited)
The designer has replied
0
Reply
real life size Charizard would require over 25 to 40 kgs of filament xD
0
Reply
Replying to @HoXtyYy :
I know but don’t say it’s life size when it’s not
0
Reply
Replying to @melikekoalas :
its still life size Mr big brains
0
Reply
I want to print this at pokedex scale (5'7"-roughtly 1700mm). Will it still assemble properly if I scale each piece to 175%?
The designer has replied
0
Reply
depends on how you scale it if you try scaling in bamboo slicer good luck its a disaster waiting to happen been there done that if you do it blender with all parts selected plus the dowel yes its possible
(Edited)
1
Reply
Replying to @HoXtyYy :
Thanks for the quick reply, I will scale in blender
0
Reply
Replying to @Print3DOptions :
drop the print profile when done
0
Reply
I AM CURRENTLY PRINTING THIS AND DO NOT SEE THE FILE FOR THE DOWEL CONNECTORS PLEASE HELP
The designer has replied
0
Reply
done buddy
0
Reply
Replying to @HoXtyYy :
Thanks my guy
0
Reply
Replying to @user_1699402230 :
Hey! Glad its all sorted just a quick tip Remember to scale the dowel connectors down slightly for a proper fit For example, if a connector measures 7.43 mm scale it down to around 7.20 mm Different filaments expand differently and this small adjustment helps ensure everything slots together nicely Let me know how the build goes would love to see it finished!
0
Reply
Hello, I plan to print it already colored, as I own an h2c. I wanted to know if it was possible to get a guide for assembling the various parts so as to color it before sending it to print
The designer has replied
Show original
designer
1
Reply
that sounds awesome i did print some in multicolour on my h2c first thing i wanted to print haha so basically you need to download the files from the cad/stl section then you can download blender drag drop all parts in blender this will give you the full rendered model in parts and part namse plus you can move parts around like a live map sort of hope this helps and dont forget to scale down the dowels by 5% ish if they tight
0
Reply
good morning, I have started, I have 4 pieces already, the 5th and 6th are printing. do you recommend I start joining and post-processing, or just join them little by little
The designer has replied
Show original
0
Reply
you can start assembling from the bottom up is best once the full model is assembled then you fill and sand
0
Reply
Replying to @HoXtyYy :
thank you so much, I have the first 4 pieces that correspond to the right leg. I'm starting to attach them!! I'll be posting photos!
Show original
0
Reply

License

This user content is licensed under a Standard Digital File License.

You shall not share, sub-license, sell, rent, host, transfer, or distribute in any way the digital or 3D printed versions of this object, nor any other derivative work of this object in its digital or physical format (including - but not limited to - remixes of this object, and hosting on other digital platforms). The objects may not be used without permission in any way whatsoever in which you charge money, or collect fees.