AMS Lite 2.0 Upper Holder


Print Profile(1)

Description
🧩 General Information
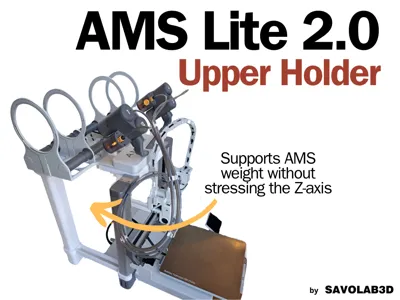
After several requests from the community, I decided to design a support to position the AMS Lite 2.0 on top of the printer.
The project immediately caught my interest as it posed an interesting technical and functional challenge.
One of the main issues when creating a top mount for the AMS is avoiding excessive stress on the Z-axis.
Often, to address this, people design 3D-printed brackets to reinforce the printer’s structure and make it more robust.
However, I’ve never been fully convinced by this approach.
So, I chose a more radical solution — one that takes longer to print and uses more material, but offers better protection for the printer in the long term.
⚙️ Support Components
The support is made up of three main elements:
🔹 Alignment Block
Ensures the AMS Lite 2.0 is properly aligned with the printer, providing precision and stability.
🔹 Two Vertical Arms
These are the main structural elements: they transfer the load directly to the ground, vertically.
This design reduces strain on the Z-axis and prevents any bending.
The weight is effectively split: half is supported by the Z-axis, the other half by these arms — greatly reducing stress.
🔹 Two Connector Arms
These connect the vertical arms to the printer, ensuring they remain securely in place and preventing any lateral movement that could cause the AMS to slip or fall.
✅ Key Advantages
- No structural modifications to the printer
- Preserves Z-axis integrity over time
- Enhanced stability, even with heavy spools
- Fully compatible with the AMS Lite 2.0 by SavoLab
🛠️ Assembly Instructions
The assembly is intuitive, but there are some important details to keep in mind to ensure the best results.
🦵 1. Assembling the Legs
- Start by printing the legs.
- They are designed to be joined using dovetail joints.
- Be careful with tolerances: they may vary depending on the filament brand and material.
It’s recommended to test the fit before printing all the parts. - If needed, slightly scale the model to match your filament’s tolerance.
The default tolerance is optimized for Bambu Lab filaments.
🔗 2. Attaching the Top Mounts
- Once the legs are assembled, mount the upper parts where the AMS will rest.
- These also connect using dovetail joints.
- At this point, connect the two legs using the small connector arms, which ensure proper spacing and prevent lateral movement.
🔩 3. Installing the Top Block (C3)
- Retrieve the two longest screws from the original AMS Lite 2.0:
these are the ones that hold the two main halves of the AMS together, with a threaded section and a smooth shaft. 
- Use these two screws to assemble the two top block parts, which are included in the same print plate.
These blocks will later be mounted on top of the printer. - Carefully align and screw the two parts together.
- Once assembled, the block must be snapped onto the top crossbar of the printer’s Z-axis.
The attachment system is identical to the original spool holder — it has been tested and works perfectly, as long as it is inserted properly. - Now remove the C3 cover from the AMS Lite 2.0, which is the bottom part that covers the electronics.
This piece will be replaced by the newly assembled block. - Finally, place the AMS Lite 2.0 on the support, which will now be properly aligned, stable, and secure.
🔚 Final Thoughts
Personally, I find this setup less convenient than the original AMS Lite 2.0 version, which I originally designed to sit at the same level as the printer.
Mounting it on top can make access and handling a bit less practical, but I completely understand that for users with limited desk space, this can be a very effective solution.
⚡ Power Cable and PTFE Tube
- The AMS Lite power cable is long enough, so no extensions or connectors are needed.
- It's important to route the PTFE tube properly and cut it to the right length.
- The recommended tube lengths for the original AMS Lite version also work perfectly for this setup.
- Just make sure that when the Z-axis reaches its maximum height, nothing gets pulled or forced.
The tube might slightly touch the motor arms, but this is not an issue and won’t cause any damage.


Boost Me (for free)
🚀 Thank you for downloading my model! If you enjoyed it and would like to support me even more, you can use the Boost.me feature: every contribution helps me keep creating new projects.
Membership
🔧 Would you like to sell physical products made from my models? You can do it legally and easily through my commercial subscription. Thank you for supporting my work!
License
You shall not share, sub-license, sell, rent, host, transfer, or distribute in any way the digital or 3D printed versions of this object, nor any other derivative work of this object in its digital or physical format (including - but not limited to - remixes of this object, and hosting on other digital platforms). The objects may not be used without permission in any way whatsoever in which you charge money, or collect fees.
Comment & Rating (76)