Search models, users, collections, and posts

A1 MINI - Connect 4 and 5 - self-separating stones

Print Profile(3)

All
A1 mini
P1S
P1P
X1
X1 Carbon
X1E
A1
H2D
H2D Pro
H2S
P2S
H2C
X2D
A2L

Turm   0.12mm layer, 3 walls, 10% infill
Turm 0.12mm layer, 3 walls, 10% infill
Designer
17 h
1 plate
4.9(31)

BASE  0.12mm layer, 3 walls, 10% infill
BASE 0.12mm layer, 3 walls, 10% infill
Designer
4.8 h
1 plate
4.9(31)

Game pieces 0.12mm layer, 8 walls, 100% infill
Designer
14.4 h
2 plates
4.6(37)

Open in Bambu Studio
Boost
514
1298
140
57
1.7 k
511
Released 

Description

Content has been automatically translated.
Show original

20% Smaller, Same Fun – Now for the A1 Mini – and Those Who Prefer a Compact Design

Original size see: https://makerworld.com/de/models/1147260-connect-4-and-connect-5-self-separating-stones#profileId-1150807


TINY VERSION:  https://makerworld.com/de/models/1250010-tiny-connect-4-and-5-self-separating-game-pieces#profileId-1272333


PLEASE REVIEW THE ASSEMBLY INSTRUCTIONS Below

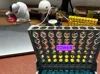
Tired of Connect 4? I have just the thing for you.

Connect 5 – Five in a Row – Five Wins

Now you can play Connect 4 AND Connect 5 with just one game


The game board is 50% larger – instead of 6x7, it now has 7x9 squares, meaning 63 squares instead of 42.


The game board and base are now connected and can be opened or closed with one hand.


Assembling the tower and base:


  1. Place the tower onto the base. The groove must face upwards.

    The rear pin in the image is already in the groove. Now simply press down. Done. Please allow the base to cool completely to achieve maximum strength.

One-handed assembly:


Before assembly, please check all chutes for any jams. If so, please do the following:

Fill the entire chute with one color of stones plus one additional stone.

Then move the stones back and forth. Repeat with the other color if necessary.

Only assemble the tower and base once the stones fall without obstruction.


I have added 3 spare parts per color, as you may no longer have the filament color if you lose a part.


Although it is only 20% smaller, approximately 40% of filament is saved.

(380g instead of 636g)


Two rods are included, which can assist with jams.

It is advisable to carefully deburr the inner chutes with a pipe cleaner or similar!

Note: I designed this Connect 5 version based on CyberYeti's excellent model, with a new base and a connection between the tower and base.

CyberYeti has given me permission to publish this :)

Note: I am working with a NEGATIVE PART that is NOT displayed in the 3D view :(

Comment & Rating (140)

(0/1000)

why does not has the side slot?
The designer has replied
0
Reply
you must lost the negative parts.
0
Reply
Replying to @MrM. :
how do i fix it?/ im new to 3d printing
0
Reply
Replying to @NaYieL :
download with bambu handy. then you will have.
0
Reply
Why does a bracket always break for me
The designer has replied
Show original
0
Reply
I am sorry Question Are you letting the component cool down properly The installation must be done with minimal bending of the tabs
Show original
0
Reply
Replying to @MrM. :
Yes, I let it cool down properly, but I suspect it always makes a bracket too thin
Show original
0
Reply
Replying to @MrM. :
I let it cool long enough, and how do I get the bend
Show original
0
Reply
This is such a great design! Great work! Would you please allow remixing, as i thickened the outer walls on the tabs that support the tower, and would like to make this option available to all. Currently It's the thinnest part of the design with the most structural load. Again, this is the only flaw; the rest of this design is amazing! My kids love it! and have printed it a few times as gifts for friends etc... Thank you!
0
Reply
Nice design! Having the A1 mini means we sometimes miss out on prints that are too large. This works perfectly. Be sure to choose colors that are lighter if you use a dark filament for the main part. The colors I used are a little difficult too see for this reason.
0
Reply
Print Profile
Game pieces 0.12mm layer, 8 walls, 100% infill
Beautiful game pieces The design is also very cool and the print turned out well
Show original
0
Reply
Print Profile
BASE 0.12mm layer, 3 walls, 10% infill
The print turned out well Now I just have to wait for the rest :)
Show original
0
Reply
Hello, do you have to print with 0.12mm? Because I would like to print it with 0.2mm. Has anyone tried this yet?
The designer has replied
Show original
0
Reply
hello, if you wait another 1-2 weeks you can download my new version of connect 5 with 0.2
Show original
0
Reply
Replying to @MrM. :
Sorry but what is connect 5? I just sliced everything at 0.2mm, does that make a difference
Show original
0
Reply
Replying to @Martin555 :
connect 5 or 5 wins or 5 in a row
Show original
0
Reply
Print Profile
Game pieces 0.12mm layer, 8 walls, 100% infill
Balls are not round and jam a lot print failed more then half a dozen times
Support Issue:no support and constantly spaghetti
Bed Adhesion Issue:constantly popping off of build plate.
The profile uploader has replied
1
Reply
you use an a1 printer? and yes, they are not round
0
Reply
pls try to print only 1 peace if you have printing problems. until you solve the problem. hundred of other people printed them well.
0
Reply
this happened to me as well but I fixed it
0
Reply
Print Profile
Turm 0.12mm layer, 3 walls, 10% infill
0
Reply
Print Profile
BASE 0.12mm layer, 3 walls, 10% infill
0
Reply

License

This user content is licensed under a Standard Digital File License.

You shall not share, sub-license, sell, rent, host, transfer, or distribute in any way the digital or 3D printed versions of this object, nor any other derivative work of this object in its digital or physical format (including - but not limited to - remixes of this object, and hosting on other digital platforms). The objects may not be used without permission in any way whatsoever in which you charge money, or collect fees.