Search models, users, collections, and posts
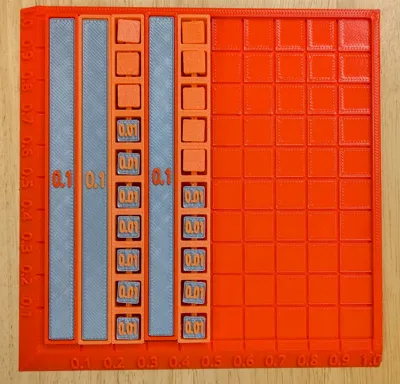
Decimal Rods
IP Report


Print Profile(4)

0.4mm nozzle, 0.2mm layer, 2 walls, 15% infill
Designer
9.5 h
3 plates
COLOR 0.6mm nozzle, 0.3mm layer, 2 walls, 15% infill
Designer
8.8 h
3 plates

0.6mm nozzle, 0.3mm layer, 2 walls, 15% infill
Designer
8.2 h
3 plates

COLOR 0.2mm layer, 2 walls, 15% infill
Designer
10.6 h
3 plates
Open in Bambu Studio
Boost
16
45
3
3
20
9
Released
Description
These Decimal Rods can be used for students to quickly represent decimals with a physical manipulative. The hundredths rods allow for each hundredth to be flipped over (instead of counting out each and every one). The tenths rods can be used with these to compare sizes of each part of a decimal or for using in regrouping with addition/subtraction of decimals. There is also a whole (1) that can be printed and used with whatever problems are being done. There are two plate setups:
- The decimal comparison plate allows for the tenths and hundredths rods to be compared, added, or subtracted while also referencing the whole (1). Students can also use decimal square paper to represent this pictorially, but having these concrete rods as a first step is extremely useful!
- There is an area multiplication setup going up to 3x3 (if you want larger, I suggest moving to use grid paper like this with students).
These can be printed in whatever colors you wish. If doing two-color printing, I found silver to be a nice background color for the numbers.
Here's a quick overview of the manipulative and how to use it:
Area Multiplication Example:
License
This user content is licensed under a
Creative Commons Attribution-Noncommercial-Share Alike
Comment & Rating (3)