Search models, users, collections, and posts

Picture frames 4x6 size

IP Report

Print Profile(6)

All
X1 Carbon
P1S
P1P
X1
X1E
A1
A1 mini
H2D
H2D Pro
H2S
P2S
H2C
X2D
A2L

ZIG ZAG 0.08mm layer, 2 walls, 15% infill
Designer
3.6 h
4 plates
4.0(6)

HORIZONTAL 0.08mm layer, 2 walls, 15% infill
Designer
3.6 h
4 plates
5.0(1)

HONEYCOMB 0.08mm layer, 2 walls, 15% infill
Designer
4.8 h
5 plates
5.0(1)

LINEAR 0.08mm layer, 2 walls, 15% infill
Designer
3.6 h
4 plates
Click to see more

Open in Bambu Studio
Boost
124
287
18
4
376
100
Released 

Description

Description

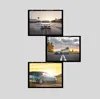
Picture size 4x6in (10cmx15cm) and 1mm gap between two parts of the frame for your photo


These are frames that can be joined together in groups of three or more according to your wishes.

I made 5 different types as you can see in each picture of the print profile.

Each frame consists of 2 parts, the part that has a letter (A,B,C...) and is marked, this is the front part of the frame, and the back part of the frame is made by yourself by mirroring the model through the x plane

To assemble one frame you also need 4 plugs, I called them connectors, but pay attention. Connectors that you need to use to assemble one frame, print on 97% scale, those connectors that connect the frames to each other, print on 100%, I test fitted them so here shouldn't be a problem. In some types you can stack more frames in the middle of the chain because parts are same i will show it in the pictures below. 


To connect frames together you need 4 connectors printed at 100% scale


Types where you can fit more middle frames.

  • Zigzag (A B B* B B*B B*…………B A*)
  • Linear (A C C C C C C C ………….C A**)
  • Vertical (D E E E E E E E…………..E D*)
  • Horizontal (F G G G G ……………G F*)

!GOOD TO KNOW BEFORE PRINTING!

  1. Before each print click on autoorient so the front side of the frame is on the plate.
  2. Linear style bottom frame A** was mirrored it twice. First mirrored x plane and than y plane to get right frame. (sign **)
  3. If the letter have * in the name it means its a mirrored version but its the same model
  4. I1 and I2 are different frames so be careful when slicing you dont mix it up
  5. I added all the frames files from A to I2 so you can experiment or create something new yourself
Honeycomb


If you have problems with printing connectors add a little bit of a glue to the plate or clean your plate with alcohol.


I really hope you can do awesome creations with this frames it helped me very much create a perfect design for my three photos. If you like the design please upload and rate my print profile:)

Comment & Rating (18)

(0/1000)

what’s happening here?
The designer has replied
0
Reply
how did you positioned the model in the slicer?
0
Reply
Replying to @orca.print :
I didn’t position it. downloaded it and hit print
0
Reply
Print Profile
ZIG ZAG 0.08mm layer, 2 walls, 15% infill
wasn’t pleased with the prints. broke while working with them.
The profile uploader has replied
0
Reply
what material and infill did you use?
0
Reply
Replying to @orca.print :
pla and settings you had
0
Reply
Replying to @orca.print :
really wanted them to work because I loved the way they could be used
0
Reply
Would love to see these made with room for a hueforge! I actually think, that if you made them "flipped", so we could just glue the hueforge to the frame (they are often more than 1mm thick) it would do the trick - or if there was small "ticks" to make them fit. Like this model has: https://makerworld.com/en/models/565105-hueforge-displate-wall-frame-200mm-x-200mm#profileId-484704 Just a friendly suggestion/request, because this is awesome work!
The designer has replied
0
Reply
Thanks for the idea might use it.
1
Reply
Print Profile
ZIG ZAG 0.08mm layer, 2 walls, 15% infill
to thin poor recess for picture
0
Reply
Print Profile
VERTICAL 0.08mm layer, 2 walls, 15% infill
It would be really easy to set the proper print orientation, put backings on their own plates, and a 97% copy of the connectors. I finally got this all together, and it works, but your description doesn't make the required changes obvious.
0
Reply
could you make another I plate with holes all the way around and another one for 3 sides with 2 holes each. I want to make a collage bigger than 4 frames but the current options limit that in the honeycomb style. also curious how you’re hanging them since there’s no holes on the back.
(Edited)
0
Reply
Print Profile
ZIG ZAG 0.08mm layer, 2 walls, 15% infill
0
Reply
Print Profile
ZIG ZAG 0.08mm layer, 2 walls, 15% infill
0
Reply
Print Profile
ZIG ZAG 0.08mm layer, 2 walls, 15% infill
0
Reply
Print Profile
HORIZONTAL 0.08mm layer, 2 walls, 15% infill
0
Reply

License

This user content is licensed under a Standard Digital File License.

You shall not share, sub-license, sell, rent, host, transfer, or distribute in any way the digital or 3D printed versions of this object, nor any other derivative work of this object in its digital or physical format (including - but not limited to - remixes of this object, and hosting on other digital platforms). The objects may not be used without permission in any way whatsoever in which you charge money, or collect fees.