ESP32 Mini or ESP8266 Soil Moisture Sensor


Print Profile(2)


Bill of Materials


Description
Description
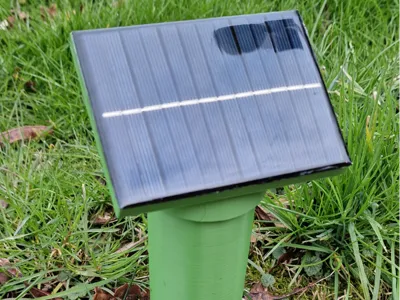
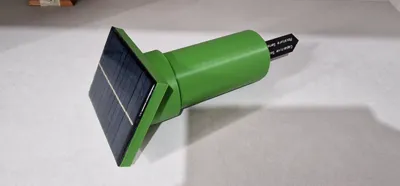
In addition to my set of sensors for external temperature and humidity control, and rainfall measurement, I have also added a sensor for soil moisture monitoring
I used a capacitive soil moisture sensor combined with an ESP8266 for data transmission to Home Assistant
I integrated an 18650 1s2p battery pack with its charger inside, and combined it with a small solar panel for charge management. If the solar panel is not sufficient for charging, I created an opening to insert a USB cable for manual recharging
Printing
All printed parts are made of ABS and do not require supports, except for the USB cable hole. The TPU parts are for the internal gasket and the USB port sealing cap
Assembly
Before inserting the humidity sensor, apply silicone in the slot to make it airtight, and on the outside where it protrudes, spread a thin layer of silicone to complete the seal. The solar panel should be fixed to the top part with a bead of silicone underneath, securing the panel to the lid and making it waterproof simultaneously
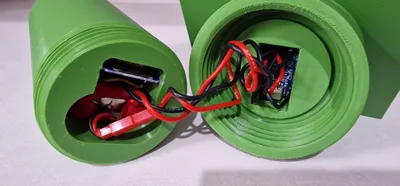
Electronics
For the electrical components, I created a battery pack by connecting two 18650 cells in parallel, and I added a small 1s BMS to protect the batteries
The battery pack is connected directly to the TP4056 charging module on the B+/B- pads
The solar panel is also connected to the TP4056 module's input on the pads next to the USB-C port + and -
The output of the charging module OUT+/OUT- is connected directly to the ESP8266 module on pins 3V3(OUT+) and G(OUT-)
The humidity sensor is connected to the ESP8266 module for power: VCC pin to 3V3 pin, GND pin to G pin, and AUOT pin to A0 pin
The D0 and RST pins of the ESP8266 module must be connected together if you want to use the deep sleep function, which will allow the dev-board to execute code at regular intervals and then enter power-saving mode
I made the wires a bit long, but you can easily make them shorter for easier closure
Here is an image of the connections to be made

Required materials
1pc Solar panel https://www.amazon.it/dp/B074PS2K4C?ref=ppx_yo2ov_dt_b_fed_asin_title
1pc ESP8266 https://www.amazon.it/dp/B01N9RXGHY/ref=twister_B07Z6L9GBD?_encoding=UTF8&th=1
1pc Soil humidity sensor https://www.amazon.it/dp/B0CQNF7S7L?ref=ppx_yo2ov_dt_b_fed_asin_title
1pc TP4056 USB-C module https://www.amazon.it/dp/B0CBKN3BC9?ref=ppx_yo2ov_dt_b_fed_asin_title
1pc 1s BMS for 3.7v cells
Boost Me (for free) Do you like the model? If so, support me and help me create more amazing models
Code
This is the code to insert into ESPHOME after creating the sensor. The first part is generated automatically; you only need to copy the section after “captive_portal:”
esphome:
name: soil-humidity-sensor
friendly_name: soil humidity sensor
esp8266:
board: esp01_1m
# Enable logging
logger:
# Enable Home Assistant API
api:
encryption:
key: "xxxxxxxxxxxxxxxxxxxxxxxxxxxxx"
ota:
- platform: esphome
password: "xxxxxxxxxxxxxxxxxxxxxxxxxxxxx"
wifi:
ssid: !secret wifi_ssid
password: !secret wifi_password
# Enable fallback hotspot (captive portal) in case wifi connection fails
ap:
ssid: "soil-humidity-sensor"
password: "xxxxxxxxxxxx"
captive_portal:
sensor:
# Analog hygrometer sensor configuration
- platform: adc
pin: A0 # Analog pin A0 on D1 Mini
name: "Soil Humidity"
unit_of_measurement: "%"
accuracy_decimals: 1
update_interval: 10min # Update frequency
filters:
- calibrate_linear:
- 3.3 -> 0.0 # In air
- 0.1 -> 100.0 # Moderately humid soil
deep_sleep:
run-duration: 120s
sleep_duration: 1200s
If the sensor fails to wake up due to signal loss, I added this sensor as a “Package” to resolve the issue
Package name “soil_humidity_sensor.yaml”
Part to copy into the created Package:
sensor:
- platform: template
sensors:
stable_soil_humidity:
value_template: >
{% if states('sensor.soil_humidity_sensor_soil_humidity') not in ['unavailable', 'unknown', 'none'] %}
{{ states('sensor.soil_humidity_sensor_soil_humidity') | float(0) }}
{% else %}
{{ states('sensor.stable_soil_humidity') | float(0) }}
{% endif %}
friendly_name: "Stable Soil Humidity"
unit_of_measurement: "%"
Update
For those experiencing issues with “deep sleep” where the sensor is no longer detected, this alternative can be used. “Modem Sleep” deactivates the WiFi module only when not in use, but keeps the ESP8266 active. This consumes slightly more power but prevents disconnection issues
This is the other variant:
esphome:
name: soil-humidity-sensor
friendly_name: soil humidity sensor
esp8266:
board: esp01_1m
# Enable logging
logger:
# Enable Home Assistant API
api:
encryption:
key: "xxxxxxxxxxxxxxxxxxxxxxxxxxxxxxxxxxxxxxx"
ota:
- platform: esphome
password: "xxxxxxxxxxxxxxxxxxxxxxxxxx"
wifi:
ssid: !secret wifi_ssid
password: !secret wifi_password
power_save_mode: LIGHT # Activates power saving for WiFi
# Enable fallback hotspot (captive portal) in case wifi connection fails
ap:
ssid: "soil-humidity-sensor"
password: "xxxxxxxxxxxx"
captive_portal:
sensor:
# Soil humidity sensor configuration
- platform: adc
pin: A0 # Analog pin A0 on D1 Mini
name: "Soil Humidity"
unit_of_measurement: "%"
accuracy_decimals: 1
update_interval: 10min # Update frequency
filters:
- calibrate_linear:
- 3.3 -> 0.0 # Value in air (dry)
- 0.1 -> 100.0 # Value in humid soil
interval:
- interval: 5min
then:
- lambda: |-
static int wifi_fail_count = 0;
if (!wifi::global_wifi_component->is_connected()) {
ESP_LOGW("wifi", "WiFi not connected! Attempting to reconnect...");
wifi::global_wifi_component->retry_connect();
wifi_fail_count++;
} else {
wifi_fail_count = 0; // Reset del contatore se la connessione torna
}
if (wifi_fail_count >= 2) { // Dopo 2 tentativi falliti (10 minuti)
ESP_LOGE("wifi", "WiFi not reconnecting, restarting device...");
ESP.restart();
}
Update
For those encountering issues with ESP8266, I have modified the base to accommodate an ESP32 mini. This is slightly longer and a bit wider, but offers a more stable WiFi connection. I am also including the modified code for this model.
esphome:
name: soil-humidity-sensor
friendly_name: soil humidity sensor
esp32:
board: esp32dev
framework:
type: arduino
# Enable logging
logger:
# Enable Home Assistant API
api:
encryption:
key: "xxxxxxxxxxxxxxxxxxxxxxxxxxxxxxxxxxxxx"
ota:
- platform: esphome
password: "xxxxxxxxxxxxxxxxxxxxxxxxxxxxxxx"
wifi:
ssid: !secret wifi_ssid
password: !secret wifi_password
# Enable fallback hotspot (captive portal) in case wifi connection fails
ap:
ssid: "Soil-Humidity Fallback Hotspot"
password: "xxxxxxxxxxxxxx"
captive_portal:
sensor:
- platform: adc
pin: GPIO36 # Corrected for ESP32
name: "Soil Humidity"
unit_of_measurement: "%"
accuracy_decimals: 1
update_interval: 10s # Update less frequently to save energy
attenuation: 11db # Expands ADC range to 0-3.9V to avoid saturation
filters:
- calibrate_linear:
- 3.0 -> 0.0 # Dry (in air)
- 0.95 -> 100.0 # Very humid soil
- lambda: |-
if (x < 0) return 0;
if (x > 100) return 100;
return x;
- median:
window_size: 5
send_every: 3
send_first_at: 1
deep_sleep:
run_duration: 180s # Active for 3 minutes
sleep_duration: 1200s # Deep sleep for 20 minutes
Electrical connections
The battery pack is connected directly to the TP4056 charging module on the B+/B- pads
The solar panel is also connected to the TP4056 module's input on the pads next to the USB-C port + and -
The output of the charging module OUT+/OUT- is connected directly to the ESP32 mini module on the 3V3 and GND pins
The humidity sensor is connected to the ESP32 mini module for power: VCC pin to 3V3 pin, GND pin to GND pin, and AUOT pin to GPIO36 pin
The GPIO26 and RST pins of the ESP32 mini module must be connected together if you want to use the deep sleep function, which will allow the dev-board to execute code at regular intervals and then enter power-saving mode
Essentially, the connections should be made on the innermost pins (the white ones). See pinout diagram

Update
For those who wish to monitor battery voltage, I am providing the connection diagram, which shows two 100K resistors connected on one side to GPIO34 pin, and on the other side, one resistor connected to GND-OUT- and the other to the positive of the OUT+ charging module

I am attaching the new code, where if you need to adjust the correct voltage value in case of imprecise readings, simply vary this parameter: multiply: 2.0
esphome:
name: soil-humidity
friendly_name: Soil humidity
esp32:
board: esp32dev
framework:
type: arduino
logger:
api:
encryption:
key: "xxxxxxxxxxxxxxxxxxxxxxxxxxxxxxxxxxxxxxxx"
ota:
- platform: esphome
password: "xxxxxxxxxxxxxxxxxxxxxxxxxxxxxxxxxxx"
wifi:
ssid: !secret wifi_ssid
password: !secret wifi_password
power_save_mode: light
ap:
ssid: "Soil-Humidity Fallback Hotspot"
password: "ElmXWDJFu3p5"
captive_portal:
sensor:
- platform: adc
pin: GPIO36
id: umidita_suolo
name: "Soil Humidity"
unit_of_measurement: "%"
accuracy_decimals: 1
attenuation: 11db
update_interval: 10s
filters:
- calibrate_linear:
- 3.00 -> 0.0
- 0.95 -> 100.0
- lambda: |-
if (x < 0.0) return 0.0;
if (x > 100.0) return 100.0;
return x;
- median:
window_size: 5
send_every: 3
send_first_at: 1
- platform: adc
pin: GPIO34
id: battery_volt
name: "Battery Voltage"
unit_of_measurement: "V"
accuracy_decimals: 2
attenuation: 11db
update_interval: 10s
filters:
- multiply: 2.0
- median:
window_size: 5
send_every: 3
send_first_at: 1
- platform: template
name: "Battery"
id: batteria_percento
unit_of_measurement: "%"
accuracy_decimals: 0
update_interval: 10s
lambda: |-
float v = id(battery_volt).state;
if (isnan(v)) return NAN;
if (v >= 4.20) return 100.0;
if (v <= 3.00) return 0.0;
return ((v - 3.00) / (4.20 - 3.00)) * 100.0;
binary_sensor:
- platform: status
name: "Soil Humidity Status"
deep_sleep:
run_duration: 180s
sleep_duration: 1200s
License
You shall not share, sub-license, sell, rent, host, transfer, or distribute in any way the digital or 3D printed versions of this object, nor any other derivative work of this object in its digital or physical format (including - but not limited to - remixes of this object, and hosting on other digital platforms). The objects may not be used without permission in any way whatsoever in which you charge money, or collect fees.
Comment & Rating (7)