Search models, users, collections, and posts
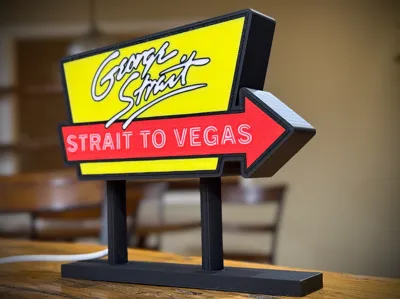
George Strait - Strait To Vegas - Las Vegas Sign
IP Report


This model is created by Image to Keychain
Make Your Model
Print Profile(2)

0.2mm nozzle, 0.1mm layer, 4 walls, 100% infill
Designer
2.1 h
1 plate

0.2mm nozzle, 0.1mm layer, 4 walls, 100% infill
Designer
8.9 h
1 plate
Open in Bambu Studio
Boost
19
52
5
2
21
6
Released
Description
This custom 3D-printed sign is inspired by the George Strait, Strait To Vegas logo for his 2025 residency shows in Las Vegas. Designed to resemble a classic neon billboard sign, this sign features a pedestal stand and is backlit with COB LED lighting, creating an authentic glowing effect.
Design & Creation Process:
- Sign Design: Created using an image I built and then uploaded to MakerLab's KeyChain tool to generate the 3D model.
- Base & Holder Design: Designed in TinkerCad for a simple yet sturdy stand that securely holds the illuminated sign.
Model Dimensions:
- Sign Only: 150mm wide × 87mm tall × 30mm deep
- Total Height (Including Pedestal): ~145mm
- Backlit with COB LED Strip: A 16” white COB LED strip is lined along the interior to illuminate the sign.
- Power Source: Powered by USB cable, which exits from the back of one of the supports.
Printing Details:
This model includes two separate print profiles optimized for different parts of the design:
1️⃣ The Sign (Thin Translucent Panel)
- Created via MakerLab's KeyChain tool
- Thickness: 2mm to allow backlighting to shine through.
- Nozzle: 0.2mm nozzle for fine details.
- Layer Height: Optimized for clarity in the design.
- Material Suggestion: Transparent or light-diffusing filament (e.g., white or frosted PLA/PETG) works best for a glowing effect.
- Note: Not tested with a 0.4mm nozzle, but you’re welcome to experiment!
2️⃣ The Base (Sturdy Support)
- Designed in TinkerCad
- Nozzle: 0.4mm nozzle
- Supports: Required for proper structure.
- Material Suggestion: I printed in PLA but a strong filament such as PLA+ or PETG could be used for durability.
Assembly Instructions:
- Print both the sign and the pedestal stand.
- Route the light through the hole in the support leg
- Attach the COB LED strip to the inside perimeter of the sign, ensuring even light distribution.
- Snap the sign into the pedestal, ensuring a secure fit.
- Plug in and enjoy the neon glow!
Support My Work 💙
If you love this design and want to support my 3D printing habit, consider buying me a coffee ☕:
👉 https://buymeacoffee.com/mtnearz
☕ Support My Work!
If you found this design useful, consider buying me a coffee! Your support helps me keep creating new designs.
👉 Buy Me a Coffee ☕
License
This user content is licensed under a
Creative Commons Attribution-Noncommercial-Share Alike
Comment & Rating (5)